Assignment #14: Create a Clutter Filter

The idea of a landing strip—the first place you touch down when arriving home, the place where you drop your keys and coat—is one that appeals to me on a fundamental level. I like the idea of everything having a home, even if it’s just a temporary stay between my coming home from work in the evening and leaving for work the next morning. It makes it easier to clean, because then everything can be returned to its proper spot instead of being moved from one horizontal surface to another. (I used to be a master at relocating my messes. It goes hand-in-hand with my love of making piles, which is my way of pretending to be organized when I’m too lazy to actually put things away.)

We’re lucky enough to have an entryway with a closet, and we’re finally getting into the routine of hanging up coats (although we still have a bad habit of leaving shoes lying around throughout the apartment). Beyond that, though, the entryway is completely bare. There’s a dish on one of our nearby end tables for Justin’s wallet and keys, and another basket to stash non-urgent mail. They work, but they crowd the table top and don’t leave any room for a drink or a book. It also always look a little messy.

One of the things I’d like to add is a bench. It would encourage us both to take off our shoes at the door, and if it had cubbies in it I could use them to store my purses when I’m not using them. I currently store them in the bedroom slipped between my nightstand and the wall; when I swap them out, I usually do it on the couch, which means I tend to leave the now-empty bag sitting in the living room instead of the spot I’ve designated. With a storage bench, I’d have no excuse for leaving purses scattered about.

1_Landing_Strip_Bench_Inspiration


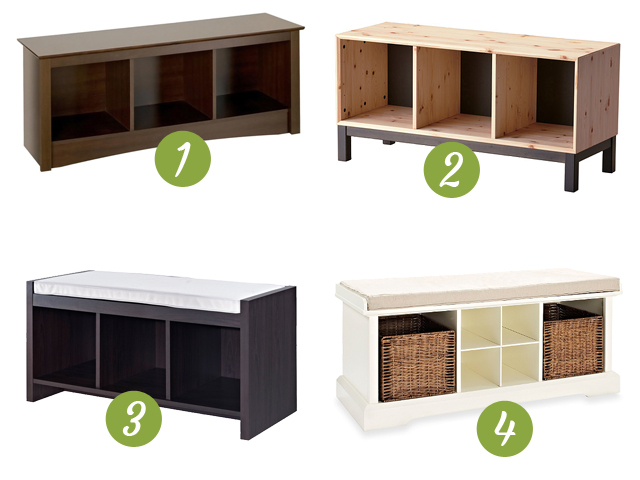
1 – Everett Espresso Cubbie Bench // 2 – NORNÄS // 3 – Altra Storage Bench with Cushion // 4 – Crosley Brennan Entryway Storage Bench

We were just trying to get a feel for what’s out there and what we like, so all of the options we picked out above were chosen for looks and not necessarily for size or price. We like #1 and #3 for for the clean lines, although I think I would make my own cushion to attach to #1. For #2, I’m not sure if we would paint the wood or leave it as-is, but I think we’d definitely paint the backs and/or insides of the cubbies for contrast. Justin is a little concerned about it being able to hold his weight, so we’ll have to check it out once it hits stores (it isn’t available yet in the U.S., but was featured in a recent Apartment Therapy article about new collections coming to IKEA this February, which is just around the corner). The more traditional #4 is a bit of an outlier, but I think the chunkier molding would ground the space, Justin felt that it looked a little sturdier than the other options.

With a closet in the entryway, we don’t need any extra hooks or pegs, so we’re free to hang something decorative about the bench. Either a mirror or a piece of artwork would be lovely, but I think a mirror would be especially practical since I wear scarves at least six months out of the year and usually have to run back to the bathroom to get them just so. Now hang on to your seat, because we liked a lot of mirrors.

2_Landing_Strip_Mirror_Inspiration


1 – Miranda Capiz Round Mirror // 2- Parsons Round Mirror – Bone Inlay // 3 – Wooden Circle Wall Mirror // 4 – Burst Circular Wall Mirror // 5 – Quoizel Reflections Gwyneth Large Mirror // 6 – Sunburst Reflections 38″ High Wall Mirror // 7 – Fairplex Bronze 39″ Wide Webbed Iron Wall Mirror // 8 – Metal Silver Petal 37 1/2” Round Wall Mirror // 9 – Safavieh Galaxy Wall Warm Amber Mirror // 10 – Bianca Quatrefoil Mirror (no longer available) // 11 – Safavieh Braided Chain Decorative Wall Mirror Gold // 12 – Safavieh Wired Wall Natural Mirror

I know, I know. That’s hardly a shortlist of favorites. We seemed to be drawn to a couple of different types:

Row 1: Round mirrors with a textured frame. I like that these are neutral and versatile, but not plain.

Row 2: Sunburst mirrors. They’re a dynamic shape, but not completely bonkers. Also, apparently we like mirrors surrounded by more mirrors. Who knew?

Row 3: Spirographic mirrors. They may be called “petal” or “galaxy” shaped in the details, but all I can think of are the awesome patterns created by the spirograph kit from my childhood.

Row 4: Other fun mirrors. These don’t really share common elements with the previous entries or each other, but we liked each in their own way because they felt different and visually interesting.

Can I just take a moment to point out how ridiculously expensive decorative mirrors are? This is unfathomable to me, because you would not believe the number of $100+ mirrors whose frames were made out of polyurethane, plastic, or polystyrene (AKA styrofoam). They weren’t even especially large or ornate designs, so I have no idea how they justify such hefty price tags.

Finally, we picked a few extras to round everything out.

3_Landing_Strip_Extras_Inspiration

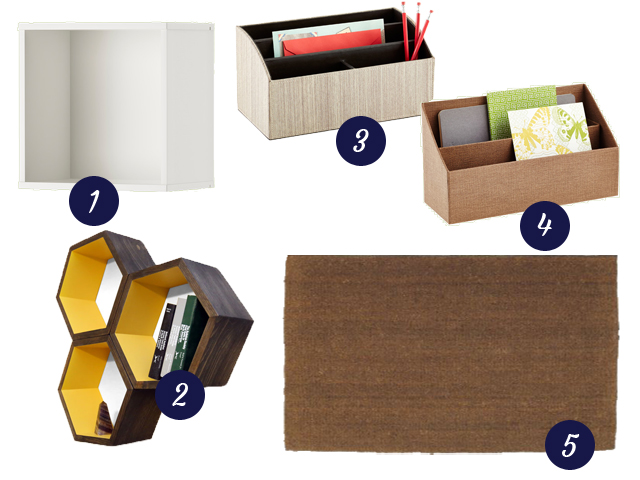
1 – FÖRHÖJA // 2 – Large Honeycomb Book Shelf // 3 – Latte Parker Letter Sorter // 4 – Chestnut Marten Letter Sorter // 5 – TRAMPA

By adding a wall cubby or two near the door, we can move Justin’s dish closer to the door. For an easy option we could stick with #1; for a splurge, Justin loves the idea of honeycomb shelves like #2 (he seriously digs hexagons). Top that off with a mail sorter like #3 or #4 and we’ve got organization under control. A plain mat like #5 is ripe for a DIY stenciling project.

Those are our ideas for a landing strip. Things will probably evolve before we’ve saved up for all of the pieces we’d like to add. What’s your take on the landing strip—nice to have, absolutely essential, or just another place for clutter to collect?

Assignment #13: Cross Off the Cabinet Clearout

The vanity cabinet is my nemesis.

Okay, nemesis might be a little strong. It’s not as though it’s the most packed piece of storage in our apartment; that dubious honor remains with the office closet (whose days are numbered). But it does feel like it’s actively waging war on my attempts at organization. Every time I clean the bathroom, I dutifully straighten everything on the counter and put things like hairbrushes and nail clippers back under the sink out of sight. The minute I turn my back, though, things start creeping out again, and three days later you’d never know that I’d tidied at all. The way that some people feel about dishes or laundry, those chores that are never really done because as fast as you wash things they’re dirty again? That’s how I feel about keeping my vanity neat.

I think the reason I find it so annoying is that I don’t even feel like I have that much stuff. I don’t wear makeup every day but do like to wear it on weekends and for special occasions, so while I do own a little bit of everything, it’s just that: a little bit. I have a few bottles of hair product, but you’d definitely never mistake our bathroom for a salon. I don’t collect hotel toiletries; I never have. I keep the first aid kit and general necessities like cotton balls and swabs under the sink, but we’re pretty good about not buying more until we’re nearly out. It’s not like we’re hoarding enough toilet paper to last through the apocalypse or anything.

Here, let me show you. Before I pulled everything out, the cabinet looked like this:

1_Vanity_Before

Not too bad, right? Could be worse, right?

Once I got everything out, I grouped things into categories:

2_Vanity_Items_CollageClockwise from the top left, you’ll see my cosmetics (nail polishes are in the pink train case, makeup is in the green Orla Kiely tote), hair tools and products, first aid and personal care items, and miscellaneous stuff. In case you’re curious, the thing in the box is a massager for the tension knots I get in my back and neck, and the charger is for Justin’s electric razor. No, I have no idea where the razor is. If I wanted to find it, the bathroom is the last place I’d look, because for some reason it always ends up in some strange place, like the office.

These are all items that I use regularly and intend to keep. There would have been more fluff and clutter here, except that I purged a bunch of unwanted items a couple of months ago, including cologne samples that Justin never worse and a few travel products that I didn’t actually like all that much. Despite that clean-out, I still found things to get rid of:

3_Rejects

You’ll notice that the train case and its contents went from being a keeper to a reject. As I was sitting on the floor preparing to tuck it all back into the cabinet, I realized that I couldn’t remember the last time I wore nail polish, let alone which color I used. All of my polishes are more than a year old, and all of them had separated. I realized that if I suddenly got the craving to paint my nails, I’d want something fun and fresh to match my mood, not some goopy old color that I’d bought to match an outfit I probably don’t even own anymore.

So, I’m bagging up all of those bottles for disposal. Apparently nail polish is considered household hazardous waste, so it’s not fit for the garbage or recycling, and definitely not the drain. I’ve been to the disposal facility in my county before, but if you’re not sure of where yours is or if they’ll take your particular kind of waste, check out the search feature at Earth911.

Other items getting the boot are old eye shadows and a lip gloss sampler freebie from I’d-prefer-not-to-talk-about-how-long-ago, some nail care paraphernalia, the two cosmetic bags, and two bamboo containers that used to hold a ceramic toothbrush holder and a soap dispenser that were dumped when I realized they were impossible to clean. Also, that retainer case? How is that even still here? I got my braces off in 9th grade. I’m now 27 and have moved 5 times since then. Time to say goodbye.

While the transformation isn’t dramatic, it’s nice to know that I’ve further streamlined my bathroom kit:

4_Vanity_After

The next step in the process will be to get better organization solutions because, let’s face it, that BB&B gift box has seen better days, and I need more clearly defined areas for things, otherwise they end up dumped all over each other. Then they multiply. And hatch plots to take over the bathroom. My bathroom doesn’t need to be a “spa-like sanctuary,” but I’d definitely appreciate it if it didn’t feel like an enemy camp.


Assignment #12: The Media Fast

Or, why I won’t be doing one.

According to the assignment summary, I should “take a break from television, computer, tablet and cell or smart phone.” The purpose of this break is to have “the experience of spending time in our homes in different ways” and to take “a rare break from the energy of the outside world finding its way into your private space.” I think these are admirable goals to have, and I certainly don’t fault anyone for pursuing them. If observing a media fast helps a person achieve those things, then I think doing one is both logical and beneficial thing.

But there are three main assumptions in the assignment that I want to tackle, because I find they crop up in a lot of the essays and exhortations about “unplugging,” and I find they bother me more than a little bit.

First, there’s the assumption that “media” only includes, or is wholly synonymous with, electronic media. When I first saw the assignment title, I wondered what I was expected to be doing all evening, since “media” in my mind includes not just television shows, movies, music, and video games, but also magazines, books, and board games. The assignment explanation clarifies that only digital entertainment is off-limits, which to me exposes a certain prejudice for non-electronic media over electronic media, as though literature delivered via printed page is inherently more valuable than that delivered via screen. Or more likely, it reveals an underlying belief that electronic media is consumed quickly and passively, whereas non-electronic media is engaged with slowly and thoughtfully. That may be true of some number of people some amount of the time, but I don’t think that it’s necessarily true, which is to say that I don’t believe electronic media can’t be engaged with slowly and thoughtfully.

Everyone has a choice about how they relate to different kinds of media. Justin and I choose to think critically whether we’re watching a movie or reading a book. Trading one for the other, when we treat both the same, seems like an arbitrary choice with no real benefit for us. So instead of recommending a media fast, I would challenge you to pause and consider why you enjoy your favorite book/show/movie game. What makes it good? What are its flaws? How would you convince someone like me to pick it up?

Second, there’s the assumption that regularly engaging with media largely precludes you from doing any other activities, or it keeps you glued to one spot in the house. Again, I’d say that may be true of some number of people some amount of the time, but I don’t think that it’s necessarily true. Most nights of the week, we watch (and discuss) some kind of show, I catch up on craft blogs via Feedly, and Justin browses his favorite gaming forums. I also usually knit while we’re doing all of those things—I like to keep my hands and my mind busy, even if they’re not working on the same things. Sometimes we’re on the couch, sometimes we’re at our desks in the office, and occasionally we take our phones to bed. We keep ourselves from getting into a rut by playing board games at the dining room table or doing crafts on the living room floor.

So instead of insisting on a new or different activity in order to use a different space, I’d suggest doing something you already enjoy but trying it out in a new spot. Chances are the space is only neglected because you found one spot that worked and had no reason to vary your, and all it takes to change things up is moving the same activity to a new location. This is a challenge I need to take on myself, because we have an armchair in our living room that is pretty much only used by guests. It’s just as comfy as our couch, but I just don’t think about sitting in it. If it turns out that the reason I don’t sit in it is because it’s missing something, like lighting or a place for a drink, then I can fix those things.

Finally, there’s the assumption that the energy of the outside world coming into your space is somehow a bad or disruptive thing. It certainly can be, but I choose to think that I have control over what comes in and what doesn’t, and I can filter things so that as much good and as little bad enters as possible.

As an introvert, it’s easy for me to shut myself in for days at a time without talking to anyone besides Justin, and I’m hardly bothered, because I find being out among people tiring at best and completely draining at worst. But if I also close off all of my online connections, I no longer have access to many of the things that inspire and motivate me. Since I’m already much more likely to avoid people than to spend too much time connected, I prefer not to block out what outside energy I am letting in. So instead of promoting a temporary retreat to your private space and hanging a “Do Not Disturb” sign, I’d encourage you to consider what you’re already letting in and see if there’s anything that ought not to get through in the first place. Whether that’s junk mail and endless email coupons or a “friend” that’s bringing you down is up to you.

For those reasons, I chose not to observe media fast tonight, nor do I expect I’ll be doing one any time in the future. I’m going to concentrate on improving the quality of my interaction with various media instead of fretting about the quantity.

Two pieces I enjoyed related to this topic are the New Yorker’s article The Pointlessness of Unplugging and PBS Idea Channel’s video There’s No Such Thing As Offline.

Of course, your mileage may vary, and I’m interested to hear what others think about the idea of a media fast.

Creating a Pantry

First project of the year completed, and it didn’t even take all weekend! After cleaning out our cart full of non-perishables and placing an order for an elfa system, we were anxious to get the pantry project rolling. Wouldn’t you be, if your laundry closet looked like this?

01_Laundry_Room_Before02_Pantry_Corner_Before

On Saturday I received a text to say that our order was ready for pickup. Even though everything fit easily into a single cart, the associate was kind enough to take it out to our car and load it into our trunk.

When we got home, we laid everything out on our dining room table.

03_Elfa_Components

The large reusable tote held the shelf brackets, the top track cover, and the smaller red bag. The smaller red bag held all of the hardware, which included drywall anchors with screws, wood screws, and independent shelf pins.

After checking to make sure that everything we’d ordered had made it home—and it had—we cleared the table to make room for all of the required tools.

04_Required Tools

The round thing with a picture of a sheep on it is a tape measure that usually lives in my knitting bag. I couldn’t find our regular metal tape measure, although it ultimately didn’t matter, since we didn’t end up using it for our installation.

We have roughly eight-foot-high ceilings, but we opted to go with a five-foot-high system since we knew we wanted space underneath it for a recycling bin of some kind. We could have gotten one that went floor to ceiling and just chosen not to hang shelves at the bottom, but didn’t see a reason to spend extra money for something we weren’t going to use. (Even if we re-purpose it, I doubt I’ll want to bend over to get things off the lowest shelves and would probably end up putting some kind of box or bin below it anyway.)

Because we weren’t concerned about fitting the vertical pieces exactly between the floor and the ceiling, and because the popcorn texture makes the ceiling uneven, I moved the top track down a couple of inches from the top of the wall. I also moved it away from the corner of the wall by about a half inch. There was no formula to it, I just eyeballed it and then made sure that the track was level before marking the holes.

05_Leveling_the_Top_Track

Using the recommended 1/8″ bit, I drilled three pilot holes where I had marked them.

06_Drilling_Pilot_Holes

Since I didn’t hit a stud with any of them (something I’d already checked with a stud finder), I enlarged the holes with a 3/8″ bit…

07_Enlarging_Pilot_Holes08_Pilot_Holes

…and tapped in the drywall anchors.

09_Tapping_in_Anchors10_Drywall_Anchors

(I’m laughing here because Justin pointed out that 1) strands of my hair kept getting stuck to the ceiling, and 2) I apparently tend to work with my mouth open, which was making for a lot of funny pictures. About two-thirds of the photos ended up as outtakes, between my dumb faces and crazy hair moments.)

Once I gave up trying not to look goofy, I could concentrate on securing the top track to the wall, starting with the center hole.

11_Securing_Top_Track12_Top_Track_Secured

Once the top track was in place, I transitioned from installation to assembly mode. The hanging standards slipped into the top track and the brackets hooked into the standards without any issues.

13_Hanging_Standards14_Brackets

For shelves, we settled on the Sand color, since the laundry room is small and gets no natural light even when the door is open. I don’t mind doing laundry, shopping for groceries, or cooking, but I figure there’s no reason to go out of my way to make the space feel dark, cramped, or uninviting.

15_Shelves

I’d originally planned on four shelves, but only because I completely failed to do basic arithmetic while I was in research mode. When it came time to place the order, we went with five. There are only four in this shot because I was already tearing into the shrink wrap of shelf #1. I may have been cackling gleefully at the time.

There are three options for securing the shelves to the brackets: wire connectors, independent shelf pins, and screws. Several reviews I saw indicated that the wire connectors felt a little loose and flimsy. Using screws would obviously provide the most security, but since we don’t have kids or live in an earthquake-prone area, it seemed like an unnecessary length to go to, so we chose the independent shelf pins. They’re little wedges of clear plastic on a long peg, with smaller pegs sticking out of the widest part of the wedge at a 90° angle. The long peg is inserted into a pre-drilled hole in the shelf and the wedge fits into the shelf bracket, with a smaller pegs slipping into notches in the bracket to prevent the pins from twisting and the shelf from skewing.

16_Shelf_with_Pins

The shelves dropped into place on the brackets easily; a gentle squeeze ensured everything was snuggly in place.

17_Adding_Shelves

The last step was to cut the top track cover to size with a pair of regular scissors, bend the long edges toward each other slightly to get it to fit under the edges of the top track, and apply gentle pressure until it snapped into place.

18_Top_Track_Cover

At last, we had a pantry!

19_Finished_Elfa_Front20_Finished_Elfa_Profile

Then came the fun part: filling it up. Even after cleaning out our old cart last week, I still found items that I could consolidate into a single container. Once I started putting things on the shelves, I realized that it made more sense to have them at different heights than to keep them evenly spaced. I grouped the shelves that needed less clearance at the bottom, which put more shelves within my reach (I’m only 5’2″). This gave us enough room on the top shelf to move most of Justin’s beer making kit there; I prefer that to store it next to the cleaning supplies on the other wall.

21_Full_Elfa_Front22_Full_Elfa_Profile

Looking at the pictures, I kind of wish I’d made a gif of the shelves filling up. Live and learn for next time.

Now for my favorite part: the side-by-side comparison of the old, sad space and the new, awesome space:

01_Laundry_Room_Before23_Laundry-Pantry-After

The blank wall where recyclables used to pile up is now an organized pantry. Speaking of recyclables, the red thing at the bottom of the photo is an Umbra Crunch Can that we picked up on sale at The Container Store while we were returning the unused wood screws that were included in our elfa order and a utility hook for another space that didn’t work out.

24_Recycling_Bin

Next to the pantry shelves are hooks to hold our Swiffer WetJet and ultra-lightweight ladder. The Swiffer used to live on the back of the laundry room door along with our ironing board. I made the decision to hang them there right after we moved into the apartment, and it made sense to me at the time because I was frequently doing laundry in the dining room (which didn’t have any furniture in it for about 5 months). But we were getting tired of things banging around every time we opened the laundry room door, and we knew it would only get worse once the space started pulling double duty. So I relocated the ironing board to the back of the linen closet door in the hallway, which freed up space for the ladder. New homes for everything!

25_Pantry_Hooks26_Ironing_Board_in_Linen_Closet

We still have the cart in the living room, and it’s still hosting the caffeination station. We’ll probably move it into the dining room for now, but I think the ultimate goal is to sell/donate it and replace it with a bar cart that’s a little less visually bulky. Or maybe we’ll find another solution all together.

To celebrate the new pantry, I cooked dinner on Saturday. Justin usually handles the cooking these days since he isn’t working, so it was really nice to get into the kitchen and make something for a change. I foresee many more home-cooked meals to come.