Or, proof that I actually sew things!

And not just any things—clothes!
Real clothes, the kind that will keep you decent in public places like Shelley Lake Park.
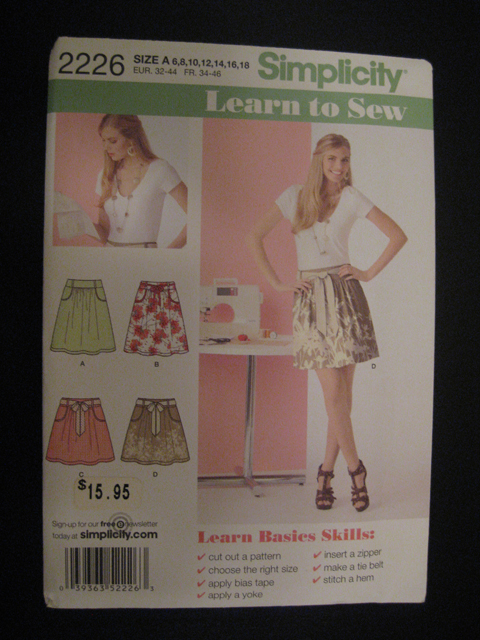
Almost two years ago, when I was still living in Virginia and had access to an independent fabric store but had not yet heard of the bounty that is five-for-$5 Simplicity pattern sales, I decided I was going to buy a couple of versatile basic patterns and some pretty fabric and start making my own clothes. One of those patterns was Simplicity 2226, a simple pleated skirt with pockets and belt loops and an optional sash belt.
I paid full retail price for the patterns (ouch!), bought entirely inappropriate fabric (stiff quilting cotton anyone?), pre-washed everything, then promptly chickened out and put everything in a box to be largely ignored.
When I pulled out that box a few weeks ago, I realized that I had everything I needed to complete at least one of those projects, which would serve the diverse purposes of using up a sizable fabric remnant, adding a skirt to my closet (which currently has no fall/winter skirts), trying a few techniques that I’d seen on blogs but never used before, and getting friendly with my serger. It also gave me a chance to break a long streak of being too afraid to start anything in case I stalled or failed. It’s true: I have the opposite of startitis, and it’s the #1 enemy of my sewing and knitting. One of my resolutions this year is to conquer this irrational fear.
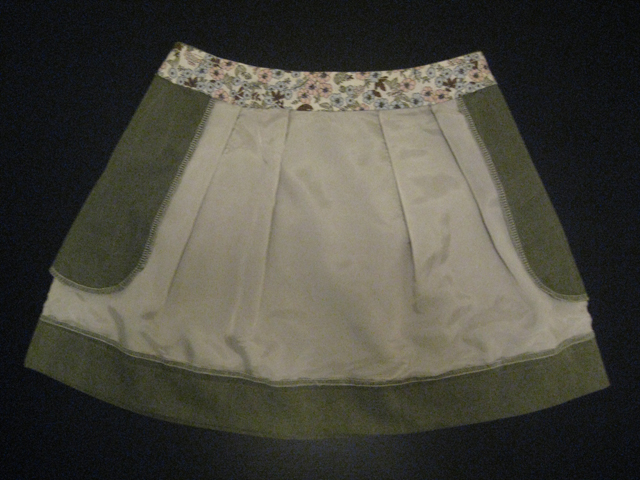
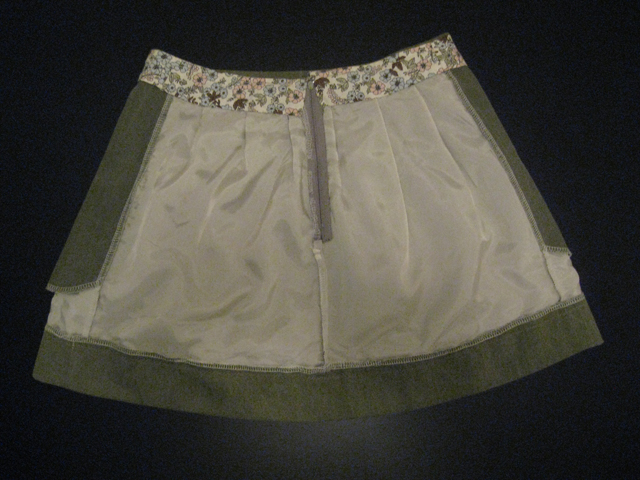
The pattern, as I said, is Simplicity 2226. I made View A, but cut it to the length of View B/C/D. I used a sage green brushed cotton twill, which I originally purchased more than five years ago to make a doublet for a Renaissance faire costume, for the main fabric. I largely relied on the pattern for guidelines on construction order; I know it’s a beginner pattern, but I still found it lacking in more than a few areas and ended up tweaking it to suit my fabric/equipment and to incorporate better techniques I’ve seen others use.
Based on my initial fabric choice, I decided to buy a cream rayon bemberg to underline the skirt and a Liberty-like floral quilting cotton for the waistband facing and pockets. The pattern doesn’t include instructions for lining or underlining— a somewhat shortsighted decision since it recommends fabrics like twills, sateens, and wools—and I knew my twill would cling to tights, so I basted the underlining to the main fabric immediately after cutting out all of the pieces, and left them basted together until I seamed/hemmed each of the edges. The pattern also calls self-facing the waistband and yoke/pockets—again, somewhat ill-advised given many of the suggested fabrics—but I knew the twill would be too heavy for that to work well, so I substituted the quilting cotton.
The first major change I made was to choose a size based on wearing the skirt at my hips (my preference) rather than at my natural waist (as intended). I went to the pattern envelope expecting to find the finished waist measurements so I could choose a waist size close to my hip size, but the only finished measurement is the length. I guess that would be important to some people, but it certainly didn’t help me any. Next I went to the pattern pieces, expecting to find the familiar plus-in-a-circle with the key measurements next to it. No dice. What? Nowhere on the pattern or envelope can you find finished waist and hip measurements, nor can you find any indication of how much ease the pattern incorporates—not even generic terms like close-fitting or loose-fitting. Simplicity wants the sewist to stick to the body measurement chart and trust the company’s ease choices.
Since we all know how that story ends, I whipped out a flexible tape measure and measured the waistband piece, accounting for seam allowances and whatnot. I fell between a 16 and an 18, so I cut the larger size to be safe. This ended up being overkill, for reasons I’ll explain shortly.
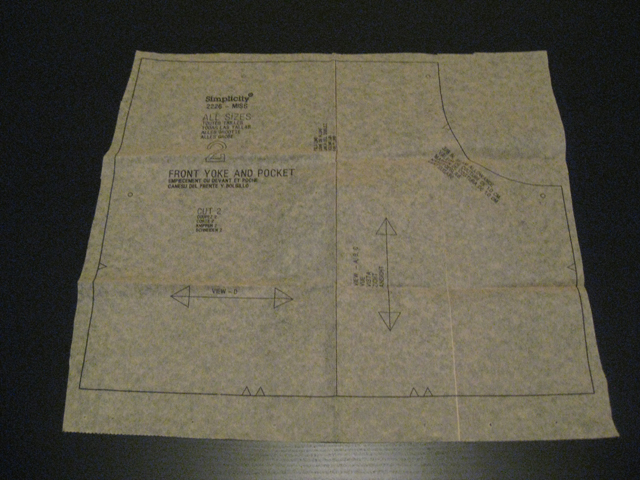
The other major change I made was to the Front Yoke and Pocket piece. This is supposed to be a pattern for absolute beginners, but I think that, in an effort to make things easier, the pattern actually makes the construction more complicated because it’s harder to visualize. I know it took me way longer than it should have to understand what was supposed to happen.
Here’s the Front Yoke and Pocket pattern piece:
And here’s what you’re supposed to do with it:
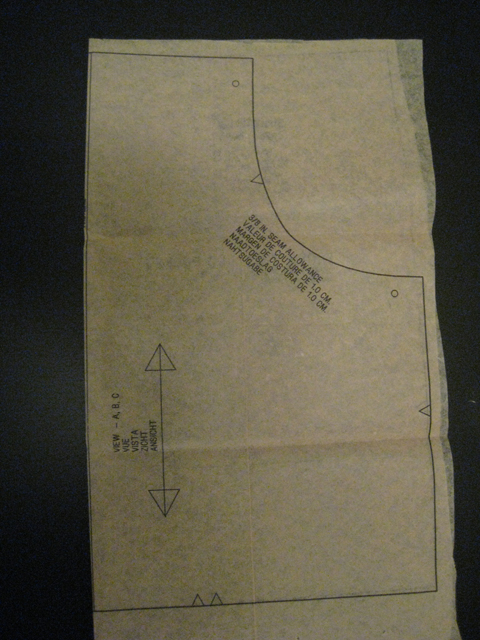
It’s a little difficult to see in this photo, but by folding it in half and stitching around the bottom and side, the fabric creates the yoke and pocket all at once. Okay, so it’s not exactly masterwork fabric origami, but I’ve never encountered a pattern or a piece of RTW clothing with this manner of construction. Sure, it eliminates the need for separate yoke and pocket pieces, which reduces the overall number of pattern pieces by one, and cuts down on the number of edges that need to be sewed, but it also creates a pretty bulky, shapeless pocket.
Since I was using a heavier bottom-weight fabric for my skirt, I knew this was just not going to work, so I borrowed the yoke and pocket pattern pieces from Simplicity 2451 instead. To make sure everything would line up around the pocket opening and side seam, I laid the new pieces over the originals, lining them up as closely as possible, and traced them off.
I assembled the skirt using both my serger and my sewing machine. Before I started reading sewing blogs I had no idea you were supposed to finish your seam allowances (aside: let’s agree to never look at the guts of any of the costumes I’ve made, shall we?), and I’ve always liked the look of serged seams on RTW items, so I went a little crazy and serged everything I could.
The instructions weren’t written with a serger in mind, though, so there are a places where I should have serged before assembling, like the zipper.
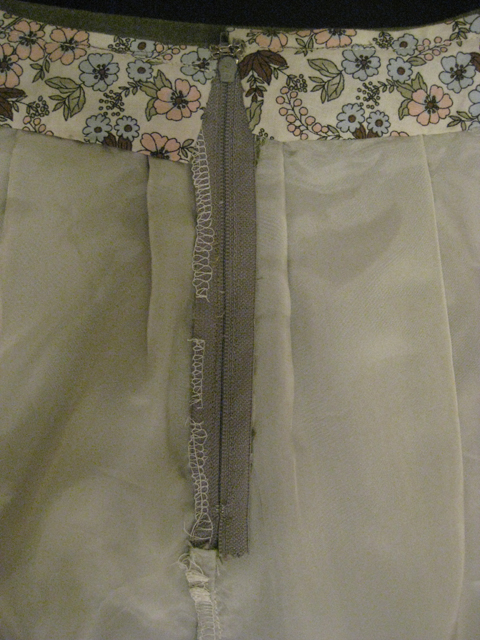
I had to pick apart some of the serging because I’d accidentally sewn the zipper shut. I’m just glad I didn’t chew any irreparable holes in the fabric. Live and learn.
Oh, and speaking of learning! That’s the first time I’ve done a lapped zipper. I had no idea I was in for one until I got to that step—I even thought I’d bought the wrong zipper by mistake, since I’ve only done invisible zippers up until now. I’ll admit it was tricky to get my head around at first, but after reading the pattern instructions and the instructions that came with the zipper about 50 times each, I finally decided to just follow each step and see where I ended up. As it turns out, following the instructions is a pretty solid path to success. I was a little surprised, considering the weirdness surrounding the yoke and pocket, but the pattern instructions delivered. And I have to say, I think I like the look of the lapped zipper. I wouldn’t use it all the time, but it seems like it’s a better choice for this skirt than a more delicate invisible zipper would have been. The top of the zipper isn’t even, but I think that actually has less to do with my zipper insertion and more to do with my waistband hacks. (Also, I can’t see it, so I’m not really bothered by it.)
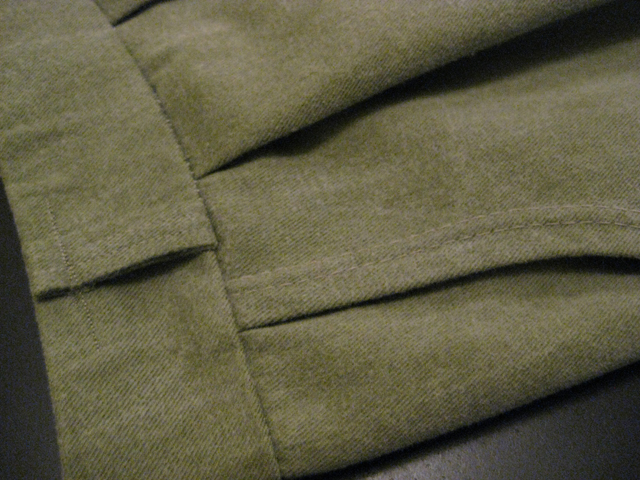
See, after I attached the waistband to the skirt, I decided it was too tall at 3 inches, so I cut it down to 1.625 inches. If you remember geometry at all (or have passable spatial manipulation abilities), you know that when you cut the top edge from a curved shape the new top edge is longer. Since I hadn’t accounted for this change in the flat pattern, the skirt ended up several sizes too large. Luckily, it was a relatively simple matter to pinch out and remove about 3.5 inches from each side at the center back seam. I did lose a pleat on each side of the zipper, which brought the next pleat on each side very close to the zipper and pulled the side seams toward the back, but I think it still looks fine. It probably goes without saying, but I also shortened the belt loops accordingly.
The pattern actually calls for gathering at the waist, but when I tried it (using the clever trick of sewing a zigzag stitch over dental floss) it was way too bulky and puffy. Not a good look. So I converted the gathers to pleats. The distance between the seams was twice as long on the skirt as on the waistband, so I had plenty of material to work with and it divided evenly into four pleats on the front and three on each side in the back. I used a combination of basic math and eyeballing to get the final arrangement you see here.
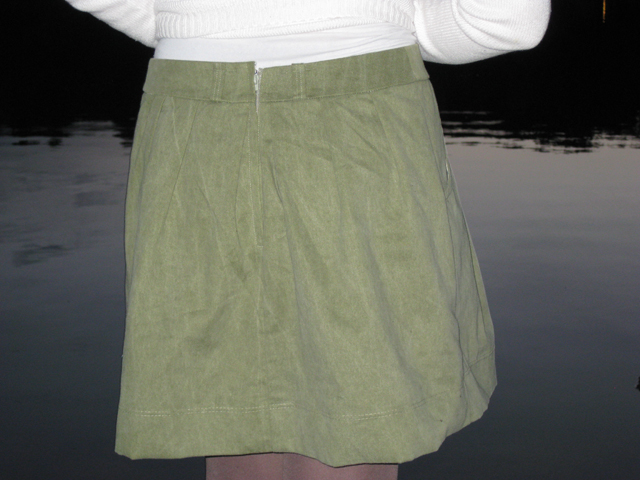
The shorter length was still a bit too long, so I folded up an extra-deep hem to make it hit above my knees instead of cutting across them. The hem was topstitched with a twin needle, as were the pocket openings. In hindsight I wish I’d bought heavier thread for the topstitching; all I had was all-purpose thread, but I wasn’t about to make a trip to the fabric store for it—that way lies impulse buys—so I settled for a longer stitch length. I also debated whether I should have used a single row of topstitching across the top and bottom of the waistband, but since it will likely be covered most of the time it probably doesn’t matter one way or the other.
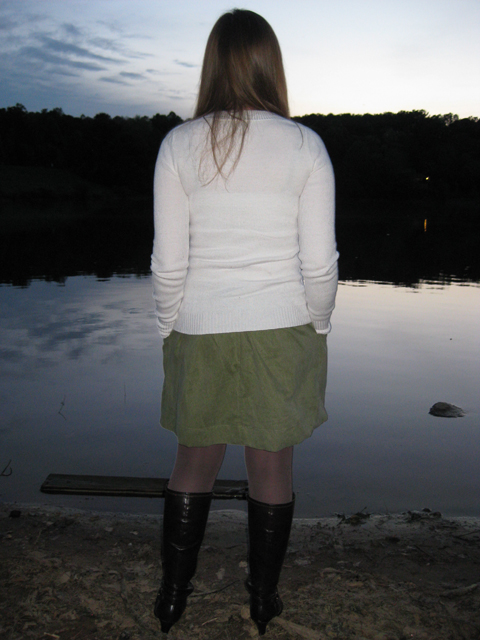
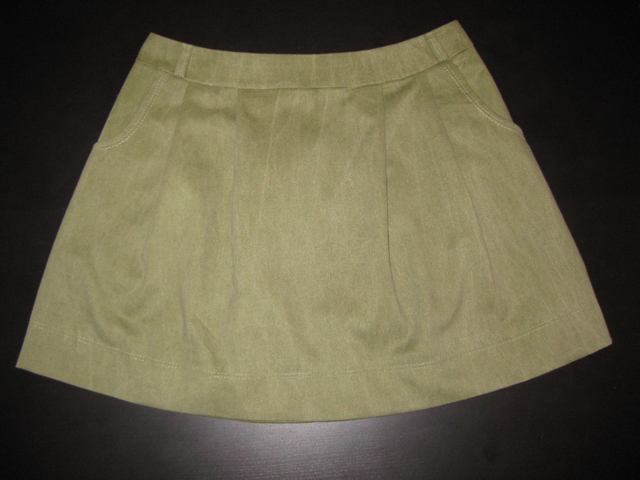
All in all, it’s a cute and comfy skirt that will pair nicely with tights and boots. I’ll need to work on finding or making more tops to go with it, but since the temperature here shot from the 60s to the 80s in the course of a week, I don’t think I’ll be pulling this back out until October or November.
Will I make this pattern again? I don’t think so. I want variety in my skirt selection, and while I think this would work just fine in other fabrics, I think there are other shapes I’d rather have more of—or at least try out—first.
Would I recommend this pattern to others? Meh. I think the yoke and pocket construction as written is dumb, but the instructions are otherwise clear and well-illustrated for the most part (with the exception of maybe one diagram in the lapped zipper insertion section). The construction is straightforward without being completely boring, but it still really bugs me that there are no finished measurements anywhere on the envelope or pattern. You could undoubtedly do worse for patterns, but I also feel like you could do better. If you have the pattern already I think it’s worth making up, but if you don’t, I wouldn’t go out of my way to buy it.
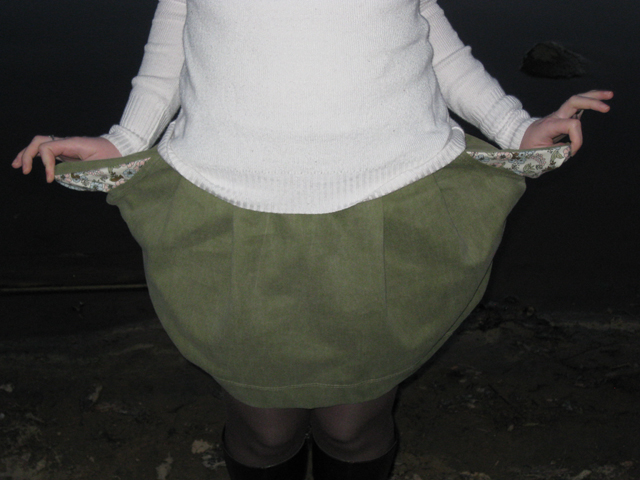
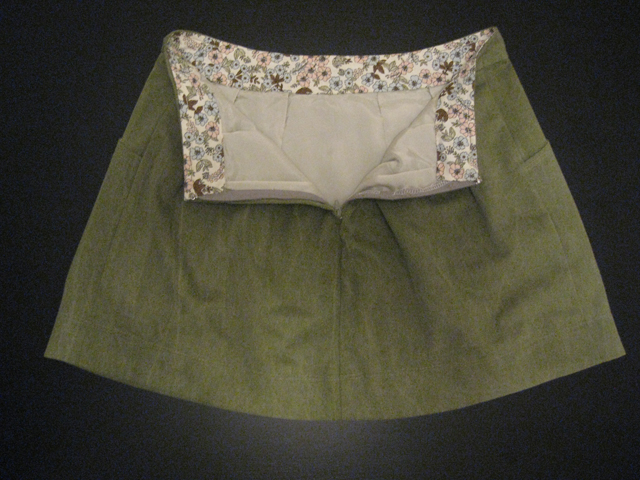
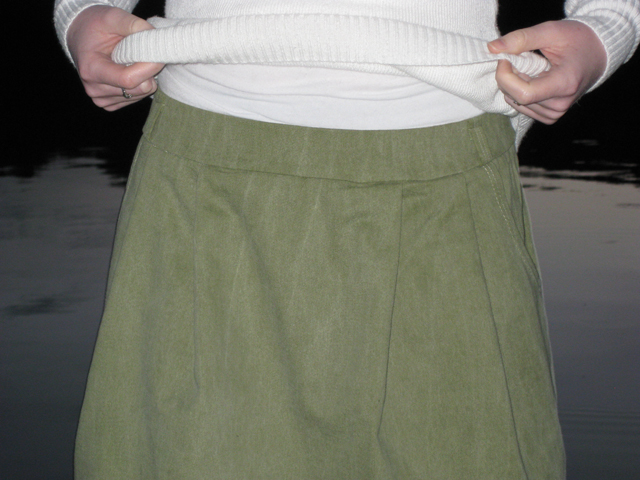
Before we say a final farewell (for the next five or six months at least), here’s a fun picture with the pockets turned out as far as they’ll go. Imagine they’re waving goodbye to winter and hello to spring/summer.