Magical Realism

On the opposite end of the spectrum from my Pumpkin Pie sweater is this monster, which did not so much inspire introspection into the nature of craft as it did provoke spates of cursing and self-condemnation.

The pattern in question is Casapinka’s Magical Thinking, the Local Yarn Shawl of 2019. As in 2018, I found it difficult to resist the lure of a “free” pattern in support of my beloved LYS Warm ‘n Fuzzy. I’ve put “free” in quotation marks because you receive a download code for the shawl only when you purchase suitable yarn for the project on Local Yarn Store Day (the last Saturday in April).

That’s where the trouble began.

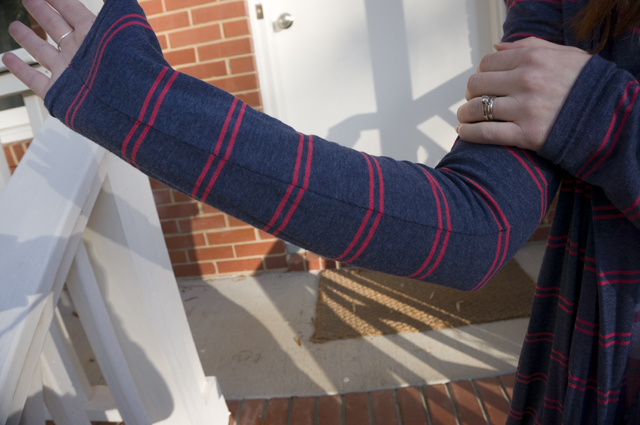
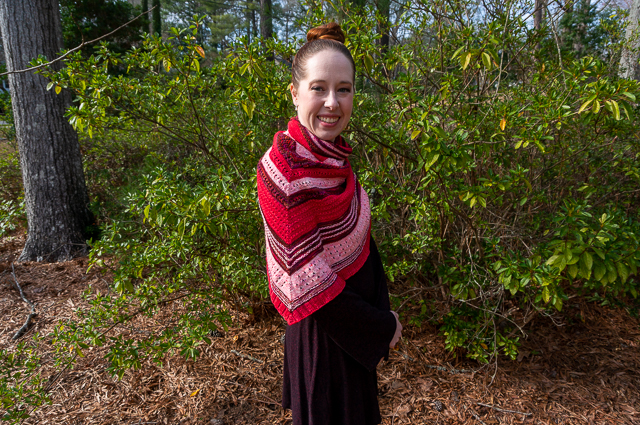
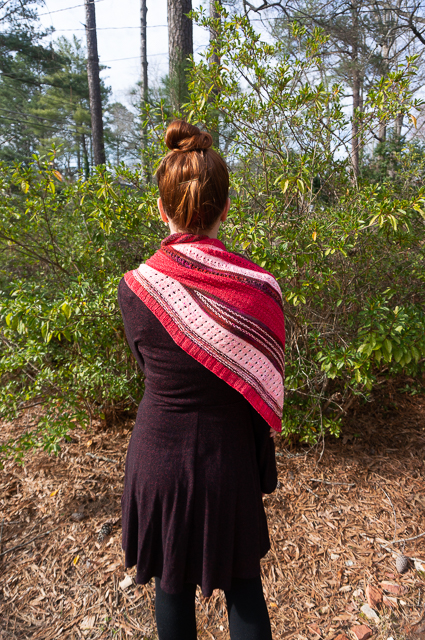
Don’t get me wrong—I don’t begrudge my LYS one cent of the money I’ve paid for yarn, needles, notions, or knitting swag over the years. But I have no shortage of sock yarn shawls already, and within the framework of having no particular need for another sock yarn shawl, I definitely spent more money than I should have. Whereas my 2018 Local Yarn Shawl required two skeins of fingering weight, this year’s offering demanded three—three! As you might imagine, these hand-dyed beauties—a semi-solid, a tonal, and a speckle—came with a premium price tag. I do very much love the colors, though, both individually and together. That’s how they get you.

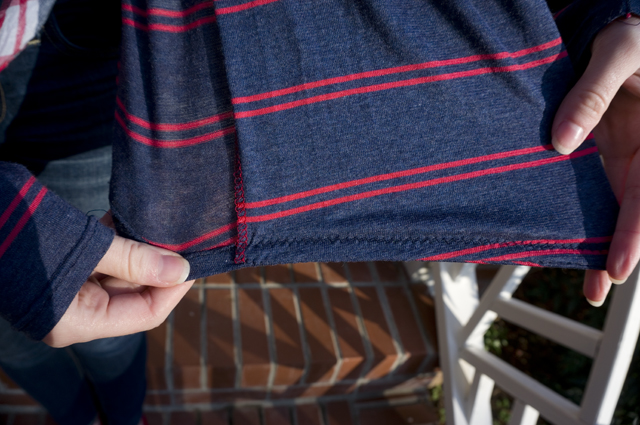
Everything would have been peachy if all I’d needed to do was assuage a bit of guilt for indulging in luxury yarn (a trivial inconvenience for the veteran knitter). At some point, no doubt around the time I had an armload of yarns I was auditioning for my next neck accessory, it dawned on me that I had, in fact, been suckered into yet another striped project. (If you’re wondering why three out of the four links lead to apparently solid-colored knits, it’s because I had to alternate skeins to manage dye lots/color transitions, which works the same as knitting contrasting color stripes).

“It’s fine,” I told myself. “It’s knit in the round. I can carry the unused yarn inside the work.”

This is…not really the case. There are a handful of places where you can carry the yarn, true, but it’s not possible to carry all three yarns all the way through from beginning to end. My sense of betrayal and disappointment (mostly with myself, to be clear) when I realized there were actually going to be a lot of ends to weave in did not contribute to an auspicious start to the knitting portion of this endeavor.

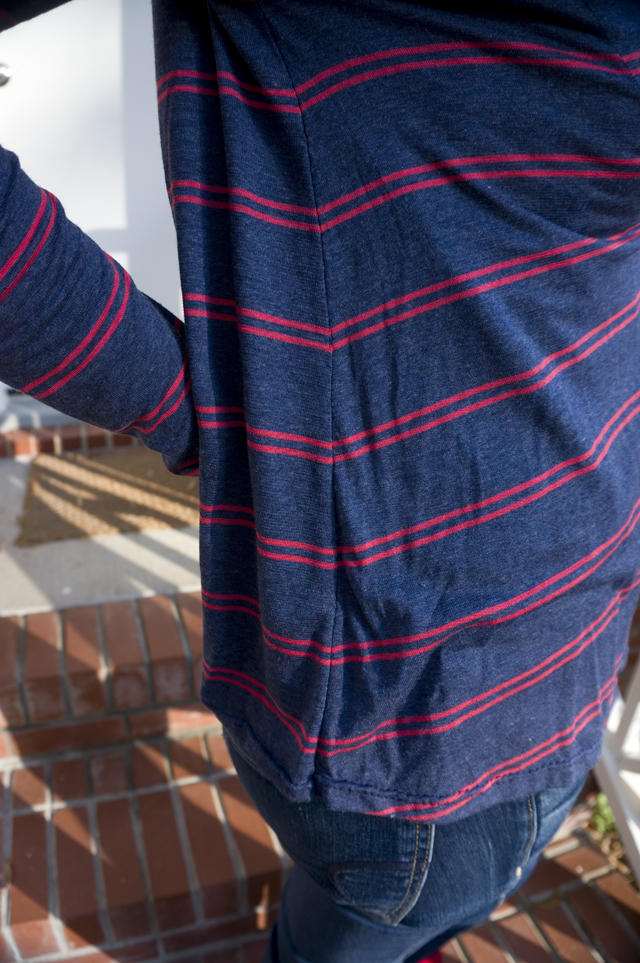
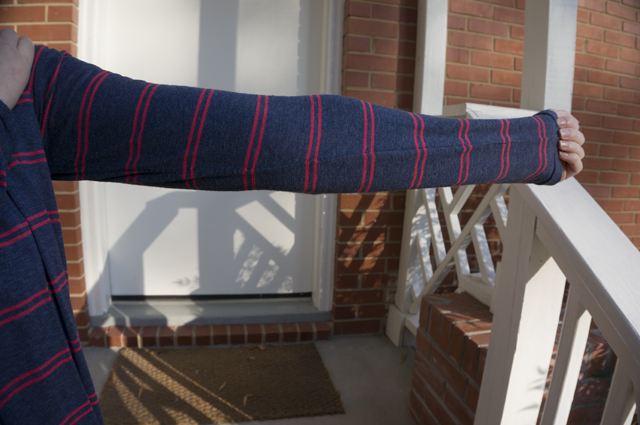
The pattern instructions were, quite frankly, not my favorite. For starters, there seems to be no consistent logic to when the first stitch of the round is slipped. It’s supposed to prevent a jog in the stripes, but slipping the first stitch isn’t indicated for every color change, nor is it omitted when the color stays the same. There’s probably some esoteric bit of stripe-knitting theory I’ve failed to grasp here, and that’s hardly the designer’s fault. Regardless, I struggled with the transition between the end of one round and the beginning of the next looking like a gappy, jagged mess the whole time I was knitting, even with the slipped stitches.

Then, there’s the explanation of the increase rounds. In theory economical but in presentation inelegant, the increase rounds caused more than a few minutes of puzzling on my end. “Do them as you do the first increase round” it says in bold, and “Note that increase rounds are defined in bold, above” it says, but then doesn’t specify whether it means the first increase round in each section (nope) or in the whole piece (yep, it’s this one). The stitch instructions for this foundational increase round are not themselves bolded for convenience, which is baffling when you consider they’re referenced throughout the remaining 6 pages of the pattern.

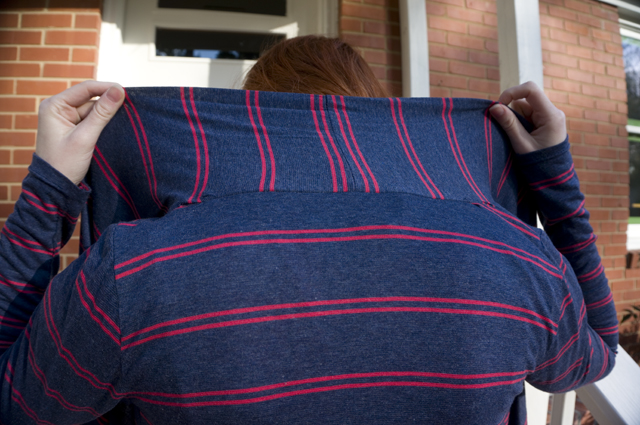
Eventually the entire thing became so big and unwieldy that not even novel changes in the texture held my interest; eventually “one more round” was not the breathless whisper of anticipation but the ragged mantra of someone who just wants the thing to end.

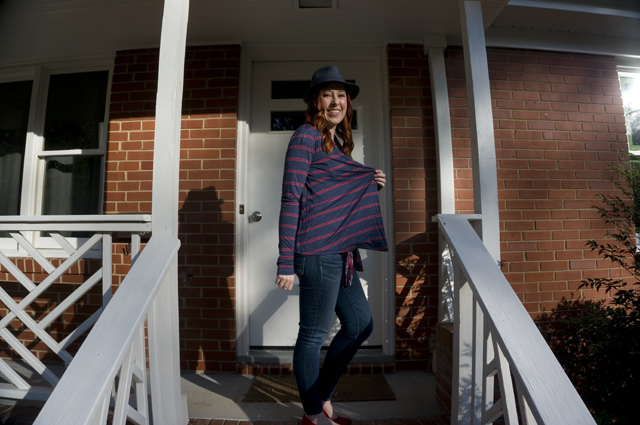
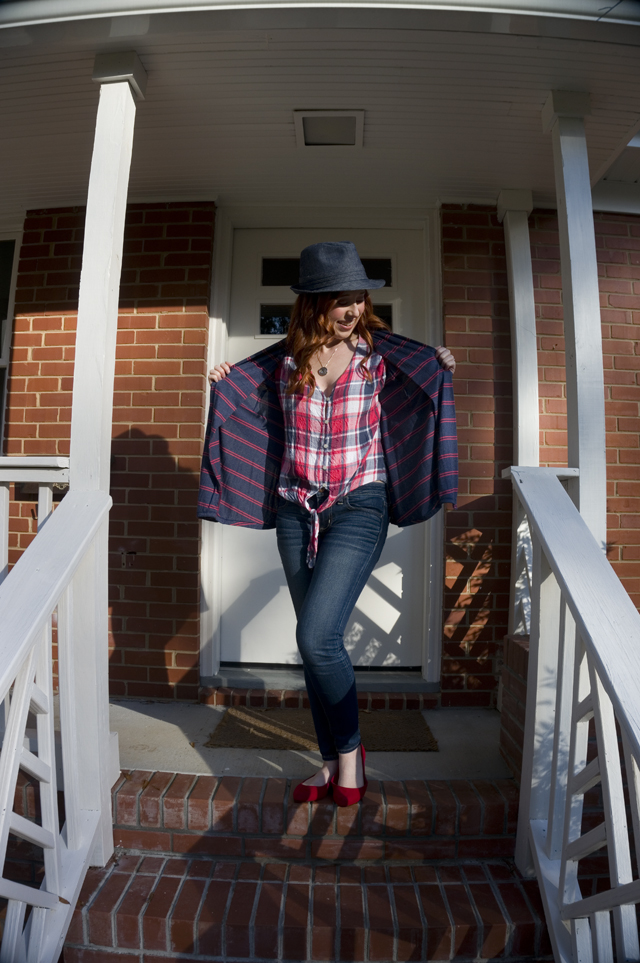
And, wonder of wonders, it finally did. The issues I had with the beginning of round transition disappeared with blocking, and, as is so often the case, the memory of my agitation during the making-up has dulled with time. I may not have loved a single minute of the process, but I’m pretty fond of the finished product—fond enough that I wore this exact outfit for my birthday party, back on a bitterly cold night in November. (I was supposed to wear a dress I’d made myself, but that’s a story for another day…)

An Open-Front Cardigan for Transitional Weather

Caitlyn stands on her front porch smiling and wearing a denim hat, open-front cardigan, tie-front button-up shirt, jeans, and pointed-toe flats

Caitlyn is turned sideways and holding out one side of her open-front cardigan to show its drape

Caitlyn is facing away from the camera to show off the back of her open-front cardigan

A close-up shot of the twin-needle topstitching on the back hem of the McCall's 6084 open-front cardigan

When I picked up this lightweight sweaterknit during Hancock’s going-out-of-business sale, I imagined it as a relaxed-fit pullover, possibly with dropped shoulders. I happened to have just such a sweater in my closet already, and I’d noticed a couple of small holes where it had snagged on something, so I thought it might be a good idea to plan for its replacement.

The more I thought about it, though, the more I felt this fabric was going to land in that awkward territory of too light to be warm when it’s chilly outside, too thin and see-through to be worn as a t-shirt/shell, and too hot to layer over a camisole in the summer. In light of that, a cardigan to throw on indoors when the AC is too strong seemed like a more practical choice than a pullover. Plus, I have lightweight cover ups in several neutral colors—black, brown, grey, and oatmeal—but few colorful ones and nothing with a pattern. Time to expand those sweater horizons!

Picking a pattern was less a comedy of errors and more a two-part skit of failing to pay attention. See, I already had McCall’s 6084 in my stash, so I was prepared to dive right into tracing and cutting. Except that when I’d bought the pattern during some hazy late-night discount-pattern spree of the past, I’d grabbed the L/XL/XXL envelope instead of the XS/S/M I needed.

Fortunately, a quick trot to JoAnn solved that problem, but then I immediately encountered another: McCall’s 6084’s waterfall fronts are just turned under and hemmed, meaning the wrong side would be visible in the finished garment. On a solid fabric that’s probably not a huge deal, but with stripes I expected it would be a lot more obvious. I knew I’d feel compelled to try to make the stripes match at the boundary between right- and wrong-side, and I knew that caring that much would drive me mad.

Instead, I did the “less mad” thing (yes, those are sarcasm quotes) and decided to hack the pattern in arguably the weirdest way possible. By way of explanation, let me first provide the following context:

Three of the four neutral-colored cover ups I mentioned before are from Express. (You’re probably starting to notice a trend here.) Those workhouse cardigans have wide front panels that can overlap in the front but, by dint of the drape of the fabric, the shape of female anatomy, and the lack of closures, tend to hang open. The panels are attached along shoulder princess seams, and they’re level with the rest of the cardigan at the hem (rather than angled like you see on waterfall-front cardigans). Most importantly, the panels are wide strips of knitting that have been folded in half before being attached, so that not only is the edge of the front opening finished, but also if you open the cardigan you’re still seeing the right side of the fabric all the way to the princess seam where it’s attached. Basically, the panels act like bands, but very, very wide ones. I love this finish, because no matter how the fronts flop around, you never see the wrong side of the fabric.

I decided this doubled-front-panel approach was the way I wanted to go on my cardigan. There were, however, two major challenges to this. The first was that McCall’s 6084 doesn’t have princess seams, just a shoulder dart that subtly shapes the front/neckline/collar. I considered cutting through this dart to make a princess seam, but then ran into the second issue, which is I only had two yards of fabric. I definitely didn’t have enough fabric to double the width of the front piece between the opening and the shoulder dart, nor did I have enough to cut narrower facings to attach to the front edge.

My solution? Cut the pattern as drafted, but then fold the front edge to the inside until it aligns with an invisible princess seam drawn through the shoulder dart.

I had to adapt the order of operations in order to get finished edges where and when I needed them, but apart from the mental gymnastics required this caused no major issues. The grown-on front facings, for lack of a better term, are held in place at the neckline (the fronts extend to form the collar) and at the bottom hem where they’re tacked down by the twin-needle topstitching; they hang free between shoulder and hem:

Caitlyn holds open the fronts of her cardigan to show how the grown-on facings hang on the inside

A close-up shot of the inside hem of the McCall's 6084 open-front cardigan, showing how the topstitching holds the grown-on facing in place

This works…okay. Because there’s no seam to provide structure, the fronts tend to sag and bag toward the bottom. It’s not super noticeable in these pictures, and no one is likely to notice when you’re moving around, but standing still, on a hanger, or lying flat, it’s pretty obvious. Luckily, since I’m not constantly positioned in front of a mirror or doing artsy flat-lays, the shortcomings of my hacky construction aren’t annoying enough to keep me from wearing this—once it’s on, I only notice if I think about it.

Construction-wise, I basted everything on my sewing machine and then ran everything through my serger. I spent entirely too much time matching the stripes during cutting AND sewing, but let me tell you, it paid off. Look at this side seam!

A close-up shot showing meticulous stripe matching at the side seam of the McCall's 6084 open-front cardigan

And this sleeve!

A close-up shot showing the stripe matching on the right sleeve of the McCall's 6084 open-front cardigan

And the other sleeve too!

A close-up shot showing the stripe matching on the left sleeve of the McCall's 6084 open-front cardigan

There’s nothing particularly noteworthy about the collar, but here’s a picture anyway:

A close-up shot of the back neckline of the McCall's 6084 open-front cardigan, showing how the front extensions are seamed to make a deep shawl-like collar

I used up every inch of this fabric that I could, which is incredibly satisfying. Bringing more blue and an easy-to-coordinate pattern into my closet also ticked two important boxes for me. I finally feel like I’m transitioning from making projects to making and wearing clothes. It feels good.

Caitlyn sits on her front porch next to a denim hat, smiling and wearing an open-front cardigan, tie-front button-up shirt, jeans, and pointed-toe flats

Perfectly OK Tartan Pajama Pants

Caitlyn seated on a hearth, elbows resting on the knees of her tartan pajama pants, looking to the side and smiling

Close-up of tartan pajama pants waistband, which is held up with a silver satin ribbon tied in a bow

Legs akimbo, showing the fullness of the tartan pajama pants through the front of the hip and thigh

Side view of the tartan pajama pants with the pocket pulled open to reveal tartan pocket bags

Rear view of the tartan pajama pants showing the stripe matching across the bum

While everyone else is reflecting on the end of the year, I’m scrambling to catch up on all of my 2018 projects! I had hoped to have that done before the holidays, but a combination of work deadlines and other professional obligations, as well as a few seasonal activities, meant I was busy right up until we went out of town for Christmas. I thought I might have time to write during my vacation (the longest I’ve taken since graduating college), but because we were visiting family we were far too wrapped up in eating, sleeping in, watching movies, playing games, and exchanging gifts to have much screen time. I’m not as bothered as I thought I’d be. So what if I have to put off doing any kind of wrap up until mid-January? No one was keeping score but me, and I’ve decided to misplace the scorecard.

The only trouble with being so far behind is trying to remember what I did (or didn’t do). I actually have a lovely sewing planner that my sister gave me—the pages came from this Etsy shop, and she comb-bound it with acetate covers herself to make it more durable—but I have a devilishly hard time remembering to actually write in it. These tartan pajama pants are a great example of a project that would have benefited hugely from taking notes, because they a) were intended as a wearable muslin, b) involved several modifications to a basic pattern, and c) required a significant hack job to fit correctly because of additional alterations I forgot to make.

The pattern is, I believe, Simplicity 1520. I say “believe” because I also have Simplicity 0301, a unisex pattern that was formerly available for free on Simplicity’s site but has since been removed or very well hidden. The reason I passed over the free pattern in favor of a purchased one is because the free pattern has a simple cased elastic and a very generous fit, whereas I was looking for a slimmer cut, a combination of elastic and drawstring, and preferably pockets. The joke’s on me, however, because although S1520 appears to fit that bill, it actually has none of those features—I misread the back of the envelope and ended up with effectively the same pattern.

As best as I can remember, I modified the pattern to include buttonholes at the waist to feed a drawstring through, shortened the inseam at the lengthen/shorten line to accommodate my 5’2″ frame, and marked the placement for inseam pockets using my pocket template (AKA the pockets from Simplicity 1419).

What I notably failed to do was reduce the crotch depth, both because I’m shorter than average and because I prefer to wear my pants (especially my lounge pants) on my hips. I was blissfully ignorant of this oversight until I’d already made the buttonholes (and folded and sewn down the top of the pants to make a casing for the elastic), and I was so annoyed about it that I decided to salvage what I had instead of completely reworking it. That is to say, instead of cutting off the top of the pants at the correct height, making new buttonholes, and folding down a new casing, I lopped off the “waistband” 5/8 inches below the stitching line that made the casing, removed something like 3″ of excess fabric from the crotch, and reattached the “waistband” by stitching in the ditch. My ditch-stitching wasn’t very tidy, but you can’t really tell. The bigger giveaway is that the tartan no longer lines up near near the top of the pants, but honestly far less egregious than the (lack of) stripe matching you normally see in ready-to-wear.

Shortening the crotch meant moving the pockets down as well, but that was a straightforward change, albeit a time-consuming one because I’d already serged the seams. (Ugh, why.) I moved them a little too far down, so they’re not really useful for sticking my hands in. They still work just fine for a phone, so I could not be bothered to move them a second time.

The fabric is a lightweight flannel shirting from JoAnn. To match the tartan, I cut everything on a single layer and used a walking foot to sew my seams before finishing them with a serger. I focused on making sure the horizontal stripes matched across vertical seams, and I feel I was successful; next time, I’ll pay more attention to respecting the pattern repeat and mirroring the vertical stripes as well.

The silver ribbon was a freebie that came tied to the bag of an Aerie purchase. Instead of threading both elastic and ribbon through the casing, I took a cue from Lauren’s Margot PJ Pants and cut my ribbon in half before sewing each piece to the end of a length of no-roll elastic. I thought for sure I was going to love this, but in reality I don’t. It’s a pain to try to cinch the pants and keep the slippery polyester satin bow tied. I can’t decide if I’d rather just elastic or just a drawstring, but this hybrid jobby just ain’t doin’ it for me.

Given how badly I botched the fit initially, I don’t think these are a very good muslin, but they for sure are wearable. I’ve basically been living in them this winter, especially since I switch into lounge pants as soon as I get home from work. I have more of this flannel stashed away—my first cut shrank in the wash and was just too short for pants—that I’m hoping to use for a second cozy project. And since I could use another pair of winter pajama pants, I’ll probably take a second crack at this pattern before finally cutting into a more precious fabric that I’ve been hoarding. (Yes, precious pajama fabric. You’ll understand when you see it.)

Here’s hoping that, in 2019, I can graduate to a level of sewing where I don’t mess up pajama pants. 😂

Turning Point

Caitlyn is standing in a local park with one hand on a tree and the other on her hip. She's wearing a striped sweater and jeans and smiling directly at the camera.

Caitlyn is standing with her back to the camera and her hair pulled forward over her shoulder. Her striped sweater has alternating rows of fuchsia, turquoise, lime, and light grey with light grey ribbing at the neckline and hem.

Caitlyn is hugging her chest and looking playfully over her shoulder at the camera while showing off how the pink, blue, green, and grey stripes on her sweater match across the side seam.

A close-up of Caitlyn's forearms and hands. Her striped sweater has wider fuchsia, turquoise, and lime stripes alternating with thinner light grey stripes, and light grey ribbed cuffs.

Caitlyn is resting her hands on the back of a green park bench and smiling at the camera. The stripes on her sweater aligned across the body and sleeves, and the ribbing on the cuffs is echoed at the hem.

Given this sweater was on the needles for two years and two months, is it any surprise the photos sat on my phone for nine more months after that?

I kicked off this project right at the end of 2015, and I showed my progress on it at the beginning of June 2016. I’d just started on the sleeves when we experienced the basement flood that derailed the remainder of our summer, and that cemented 2016 as a terrible year for us. (There were many terrible things that happened that year. It was a bad year for everyone. But that was our personal tragedy.)

Eventually—I don’t remember when—I pulled the sleeves out of their abandoned project bag and finished knitting them. I’d ignored the CustomFit instructions for binding off the shoulders in favor of using short rows, as usual following the handy guides provided by TECHKnitting and Knitty. Seaming the shoulders was a cinch using a three-needle bind off.

Attempting to set in the sleeves (in the flat) revealed that I’d made a mistake on one of the sleeves and the cap wasn’t tall enough. I wish I could say where I’d gone wrong, but apparently I didn’t see fit to leave myself any explanatory notes about this. I ended up ripping out the sleeve cap to the underarm bind off and re-knitting, meticulously counting decreases on the second try.

Setting in the sleeves so that the stripes matched across the upper chest and the sleeve caps was a struggle and a half. I looked at many, many pictures of hand-knit and ready-to-wear tops with stripes to determine what properly matched stripes should look like. (I later discovered the Seamwork article “How to Match Stripes Like a Pro” also gives a clue.)

I concluded that a match stripe is typically located at the widest point on the chest, which generally corresponds to the lowest point of the armhole. You can place the match stripe at a higher point on the chest and sleeve, especially if you’re cutting and sewing a garment, but the armhole bind off provides a convenient matching point to work from on hand-knits. Importantly, you may be able to match more than one stripe above it, depending on the height of your stripes, but the closer you get to the top of the sleeve cap, the less likely the stripes are to match.

This should have been obvious to me, since I had specifically worked out what color stripe to begin the sleeves with precisely so my stripes would align at the armhole. But when it came time to seam, I got it in my head that I should be able to match all of the stripes on the sleeve cap to those on the body. That was an evening of self-induced crazy-making, let me tell you.

Once I finally stopped trying to achieve an impossible perfection in stripe-matching, setting in the sleeves and then sewing up the side and sleeve seams proceeded as usual—mattress stitch all the way!

I mentioned in my progress post that I was using one of TECHKnitter’s eight tricks for weaving in as you go. I chose the overcast method because it can be used for same-color or different-color joins in both flat and circular knitting (so versatile!) and because it’s recommended for fine yarn (no added bulk!). Unfortunately, I haven’t mastered the proper tension required to make this work well, because the tails are distorting the stitches they’re trapped against. Some stitches are pulled taller and other are squashed shorter, making it looks like there’s jog in the stripes. It’s not visible at a distance, but I can see it when I’m looking at the sweater up close and it bugs me (probably more than it should). My solution will be to only knit stripes where the unused yarn can be carried up the edge of the work. Or knit fewer striped garments. (AHHAHAHA yeah, right. Like I can stop myself.)

Even weaving in as I knit, I had an unforgivable number of ends to deal with. To stave off utter despair, I made myself weave in about half of them before I let myself pick up and knit the neckline. It helped. Somewhat. I still had to weave them in, but breaking the work up over a couple of evenings before and after the final knitting sprint did keep my twitching eye in check.

Now that I’ve not only come to the ends of the ends, but also worn the finished sweater a couple of times, I feel like I’ve formed an honest opinion of it.

I’m glad I knit a CustomFit design more or less as written. My previous CustomFit sweater involved heavy modification due to less-than-optimal yarn selection. This sweater has given me an opportunity to evaluate my measurements and what CustomFit thinks of as a close fit, including the placement of bust darts, the circumference of sleeves, and so on. Overall, I’m happy with the silhouette, and I’m less inclined to tinker with the pattern generator to try to get an even slimmer fit (which could result in unflattering straining or wrinkling).

When I wore it out for the first time, I was lukewarm about my yarn choice. I love Cascade Heritage Silk (blogged evidence here, additional proof on Ravelry) because it’s an affordably priced wool–silk blend that offers next-to-skin softness and a rainbow of colors. But the drape of the silk means that it can feel like it’s bagging out when I bend or sit and sagging over the course of the day. But after multiple wears, I’ve realized this is mostly in my head. While it’s true it doesn’t have the recovery of 100% wool, it doesn’t actually grow with wear or get sloppy-looking. For a lightweight sweater worn on its own or over a camisole, it’s a solid choice and I’d recommend it.

The turning point this sweater is named for was the realization that this sweater pairs exclusively with jeans and gym shoes. It doesn’t look like any of the other sweaters in my drawer; it doesn’t go with anything else in my closet. It clashes with my complexion, especially now that I’m a redhead.

The candy-colored yarns that were irresistible on the shelf seem strangely muted when knitted up together. (I know that’s hard to believe, looking at those photos.) Their vibrancy waned with my enthusiasm, and didn’t return even after I finished the project.

I remember when I got those yarns, from the now-closed Yarn Tree Studio in Raleigh. I bought them first and foremost because they looked good together, like they belonged together. Not because I wanted to wear them. Which is so silly, in hindsight, because I’d always intended to wear them—as a sweater, as a shawl, as a something. I only saw them as “pretty yarns,” and didn’t for a moment consider them as “the stuff to make clothes.”

I could defend my decision by saying I bought the yarn six months before I did Wardrobe Architect for the first time, but I find I’m not actually interested in justifying this sweater to myself. Instead, I feel like I’ve finally learned something that all of the meditations and mood boards didn’t drive home for me: just because something looks good on the rack/on the yarn or fabric shelf/on someone else, and just because I like how it looks, doesn’t mean I need to own it or wear it.

If my goal right now is to have more things in my closet that work together to create cohesive outfits, then I need to think about my buying and making in terms of projects that support that goal. There’s nothing wrong with owning styles that aren’t “flattering” or are one-of-a-kind, unless my goal is to have more garments in flattering colors and remixable shapes—then I’m just going out of my way to dilute my closet and increase the chance I’ll have “nothing to wear.”

I don’t like making mistakes, and the idea of learning from my failure has never captivated me—I’d much rather save time and heartache by learning from the mistakes other people have already made, if that’s an option. Despite reading and observing other people’s style journeys, it took personal experience to learn this particular lesson about making what I want to wear. It was a long walk, but I got there in the end.

I’ve already seen the payoff: during a trip to the New York City Garment District this summer, I went with a plan to look for specific fabrics intended for specific garments, all of which should work together in a variety of combinations. As soon as I catch up on my backlog of finished projects from the last few months, I’ll share my autumn/winter sewing plan, which is already in full swing!

Caitlyn is sitting on a green park bench facing away from the camera toward houses in the distance.

FO: Diversion

Last year was, for me, as for many people, not a particularly good year. When it came time to add this scarf to my notebook in Ravelry (I’ve fallen out of the habit of recording my projects in real time, and instead rely on notes taken throughout a project to summarize everything when it’s finished), that reality was driven home when I discovered that I had completed only one knitting project all year, a cabled hat. I had started a sweater, and re-started another, but neither came off the needles in those 366 days.

This scarf was the product of two forces. The first was a desire to overcome the deep creative block produced by a certain fingering-weight striped sweater that refused to be finished, and that I slowly came to regret starting at all. I’m not typically one to have multiple projects running concurrently—at least, not of the same craft—but I felt if I tried to remain monogamous with that particular project, I’d never knit again. A simple, soothing project that I could pick up and put down during a car ride or evening television seemed like exactly the thing I needed to keep me from quitting knitting entirely, without sending me down an ever-increasing spiral of other projects that would prevent me from finishing the sweater eventually.

The second force was a previously documented intense dislike for scraps. I don’t mind a remnant that’s large enough for a second, smaller project, or a yard or two of yarn that I can wind onto a bobbin in case future darning is required. But a couple dozen yards of yarn, too long to throw away without guilt? Hate them. I had just such a quantity of grey Cascade 220 Superwash Sport, left over from my Hermione Hearts Ron hat and Holding Hands with Ron gloves. The obvious solution was to use the yarn for stripes in a larger project.

The “pattern,” if you could call it that, is just a rectangle of ribbing, left unblocked so that it looks like stockinette but doesn’t curl at the edges. It’s a trick that I first learned about many years ago from Jared Flood’s Noro Striped Scarf, when I was a new knitter who spent more time reading about knitting than practicing the craft. For more technical details of my scarf (finished size, yardage, needles, etc.), check out my project on Ravelry.

The navy yarn is Rosy Green Wool Cheeky Merino Joy, a Global Organic Textile Standard (GOTS) certified superwash sport-weight wool and an absolute delight to knit and wear. It’s easily as soft as the wool-silk blends I’m fond of, with a wonderfully smooth hand and plump twist. I haven’t knit with many yarns, but of the ones I have experienced, this is easily my favorite. If I could only ever knit with one yarn again and this were it, it would be no tragedy.

This scarf proved to be exactly the diversion I needed from my other knitting challenges, and a balm for the stresses of life. (The only thing it didn’t turn out to be was the end of the grey yarn: while I did manage to use up all of the scraps from my other projects, shortly after weaving in the last end and crowing my triumph, I discovered another whole skein lurking in my stash.) It coordinates with my favorite hat and gloves, and it’s a welcome companion to my peacoat on frosty days, even if it doesn’t stand out against the coat’s navy wool. I’ve worn it several times a week since I finished it, and though I’ll be packing it away very soon as the weather warms up, I look forward to pulling it out again in the fall, and for many seasons to come.

Lest all my attempts at serious faces above lead you to believe that I don’t love the finished product, I’ll leave you with a few smiling photos as proof: