


How did I arrive at a point in my life where I didn’t own a solid white or a solid black t-shirt? It’s certainly not because my wardrobe is dominated by prints—easily 90% of my clothes are solids. It’s also not because I eschew basics—I tend to buy staples like v-neck sweaters and button-up shirts in multiples, and I own few, if any, pieces I would consider “statements.” And yet here I was, lacking in the most basic of everyday garments (after underwear, of course).
The last few times I’ve tried to buy plain white and black tees, either short- or long-sleeved, I was deeply disappointed by the options available. I’m sure you’re all-too-familiar with the scene: racks of tissue-thin shirts that cling unflatteringly, bind up around the arms, and fall apart in three washes or fewer. No thanks.
I had plenty of white and black cotton/spandex blend in my stash, as well as a PDF copy of the free Tonic T-Shirt pattern from SBCC Patterns. I’d attempted the pattern before and wasn’t happy with the results, but I was determined to get it to work so that I’d have a well-fitting pattern at my disposal whenever I wanted/needed to whip up a new tee. (I also really want SBCC Patterns to work for me, because they’re specifically drafted for petites and I’d love to be able to support someone pitching my niche.)
As it turns out, my issue with the fit of the first attempt came down almost entirely to size selection. I’d sewn a small because I didn’t want the shirt to be too snug in the waist or hips, but that meant the finished bust was 1″ larger than my actual bust. Also, I must have taken my waist measurement on a day when I was bloated or something, because I’ve since re-measured at a slightly smaller size. These measurement issues, combined with a fabric that wants to mold rather than drape, made for an ill-fitting shirt that went straight into the recycling heap.
This time around, I cut out an extra-small (in white) in order to get negative ease at the bust and was much happier. To concentrate on neat, even sewing with no puckers or wavy seams, I basted everything with a zig-zag stitch on my sewing machine and then went back over everything with my serger. It takes twice as long, but it’s the only way for me to get a good finish. Maybe one day I’ll be able to zip everything through the serger without putting holes through the middle of the fabric, but today’s not that day, and tomorrow’s not looking good either.
I prefer to install my knit bands in the round rather than in the flat because I feel like I get a cleaner finish that way, and I had to cut off 1″ of the band in order to have a loop that was smaller than the neck opening. (I also prefer to sew my seams and then turn up and topstitch my hems for the same reason. So, I basically ignored the instructions and used the alternative method for every step. It worked out fine.)
With the proportions sorted out, I noticed two things: the hem has a tendency to ride up, most likely due to the amount of negative ease through the body, and the neckband was difficult to serge and topstitch down evenly due to its narrowness.
I immediately cut out another shirt (also in white), but lengthened the bottom hem straight down by 1.5″ and doubled the height of the neckband. I chose to add length at the bottom rather than at the lengthen/shorten line because the narrowest part of the shirt does seem to be hitting the narrowest part of my waist. This worked exactly as I planned, but for someone long-waisted, the lengthen/shorten line is the way to go.
I like the double-height neckband—it somehow has a more casual feel—but even with the previous alteration of shortening it by 1″ it was a little too long, and even after pressing it’s noticeably wavy. It’s no worse than you’d find in some ready-to-wear, but it’s something I wanted to fix on future versions.
With that in mind, I cut out a third and fourth shirt, both in black. For this iteration, I cut an XXS neckband instead of an XS and reduced the height of the neckband to 2 1/8″. This new neckband is now taller than the original but shorter than the doubled version, and it just might be perfect. I could probably shave a tiny bit more of the length off to get the band to lay completely flat, but I’m not sweating it.
At this point, I also lengthened my topstitch from 2.5 mm to 3.5 mm, which made the stitches a little more visible without being sloppy.
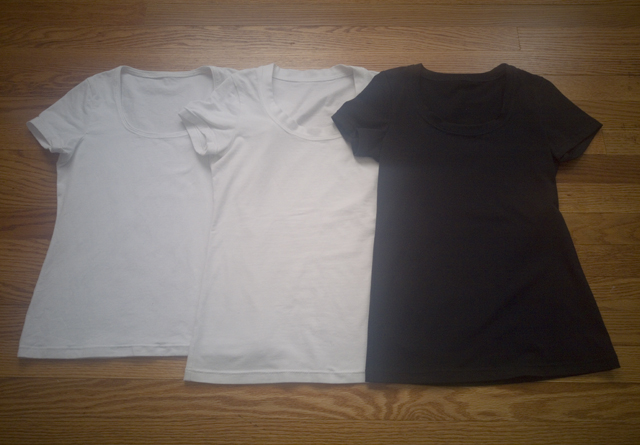
Below are the three version to give you an idea of what the differences look like in context. Black and white do not like to be photographed together like this, so the exposure/contrast is absolutely awful, but I hope it gets the point across.
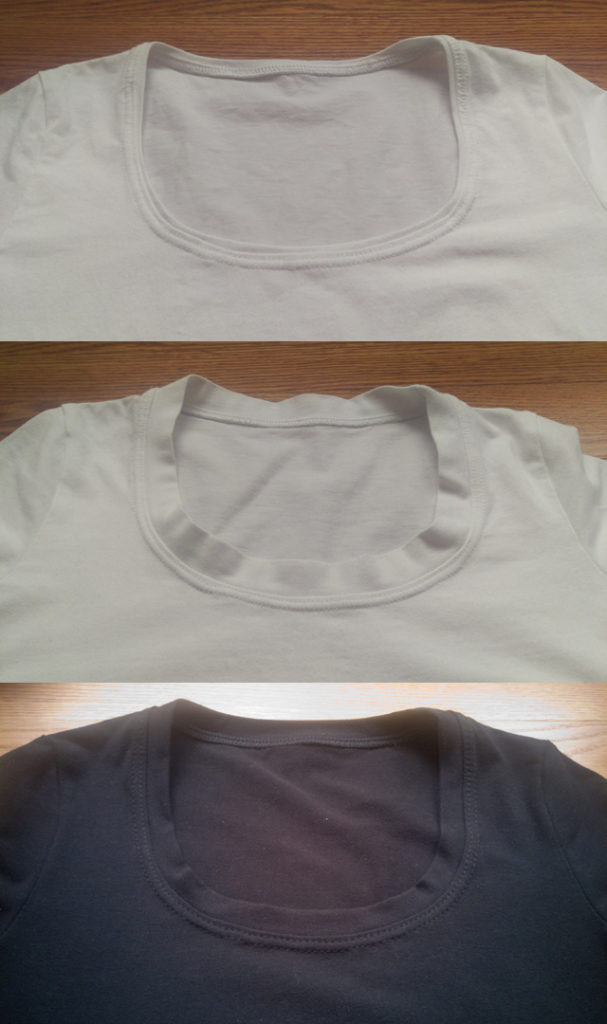
Here’s a look at the necklines up close, so you can see the differences in neckband height:
One last thing I’d like to mention is that Steam-a-Seam 2 is the not the same as Dritz Wash Away™ Wonder Tape. At some point I had rolls of both in my notions collection, but I must have used up the latter on a previous project. I grabbed the Steam-a-Seam 2 thinking that it was designed for the same purpose and painstakingly applied it to the sleeve hems and bottom hem of my first t-shirt, only to realize after heat-setting it that it’s much stiffer than Wonder Tape. It seems to have softened a bit after a couple of washes, but I definitely wouldn’t use it again for stabilizing a knit hem while sewing. Steam-a-Seam 2 Lite might work for that purpose (I haven’t tried it myself), but I think I’ll stick with Wonder Tape.
I’m so glad to have these shirts in my closet. They aren’t glamorous, but they’re comfortable, and it’s nice to feel like even on an ordinary day I have something handmade to wear.
That black tee looks so good! You are so right about self-made t-shirts adding that extra dash of awesomeness to a regular day’s outfit. I admire that you were willing to make so many tweaks to get closer to your ideal t-shirt: now you can build an army! 😉
Neckbands are one of those pattern pieces I never really trust–there’s just too much variation from fabric to fabric. I’ve had the best luck attaching the band with the neck opening round, but the band flat. I start at CF, stretching up each side as I go (I’ll do one pin on one side and then one on the other, to keep things mostly centered) and sewing the CB of the neckband once I have the rest of it pinned and stretched. It’s fiddly, but I haven’t had a too-loose neckband since switching to that way!
I like how you think!
Among the many posts I’ve read by different bloggers about making knit tops and dresses, I don’t think I’ve seen anyone using the method you describe for neckbands—I’ll definitely give it a try on my next knit garment. One of the fringe benefits would be not having to line up the neckband seam with the shoulder seam, which is a skill I’m improving on but still don’t nail every time. Anything that takes the edge off my perfectionism is a win in my book. Thanks so much for the tip!
Funny how those basics seem to be the things that get overlooked! It really is ridiculously hard to find a white tee that isn’t completely see-through, in particular. I’m actually working on a black tee myself at the moment, because I just don’t have a plain black short sleeve anything anymore, and I don’t know how this happened. Trying to get those neckbands flat can be a pain, but it does get easier with practice. Usually. Assuming the fabric cooperates.
I’m glad I’m not the only one with mysteriously vanished basics! Your blog is new to me, so I’ve added it to my feed. 🙂 I hope you’ll share your tee when it’s finished—it looks like it might be your first project since the wee one arrived (congratulations on a healthy delivery!), so I’m sending good vibes your way for an enjoyable re-entry into the realm of sewing and all things crafty.