
Given this sweater was on the needles for two years and two months, is it any surprise the photos sat on my phone for nine more months after that?
I kicked off this project right at the end of 2015, and I showed my progress on it at the beginning of June 2016. I’d just started on the sleeves when we experienced the basement flood that derailed the remainder of our summer, and that cemented 2016 as a terrible year for us. (There were many terrible things that happened that year. It was a bad year for everyone. But that was our personal tragedy.)
Eventually—I don’t remember when—I pulled the sleeves out of their abandoned project bag and finished knitting them. I’d ignored the CustomFit instructions for binding off the shoulders in favor of using short rows, as usual following the handy guides provided by TECHKnitting and Knitty. Seaming the shoulders was a cinch using a three-needle bind off.
Attempting to set in the sleeves (in the flat) revealed that I’d made a mistake on one of the sleeves and the cap wasn’t tall enough. I wish I could say where I’d gone wrong, but apparently I didn’t see fit to leave myself any explanatory notes about this. I ended up ripping out the sleeve cap to the underarm bind off and re-knitting, meticulously counting decreases on the second try.
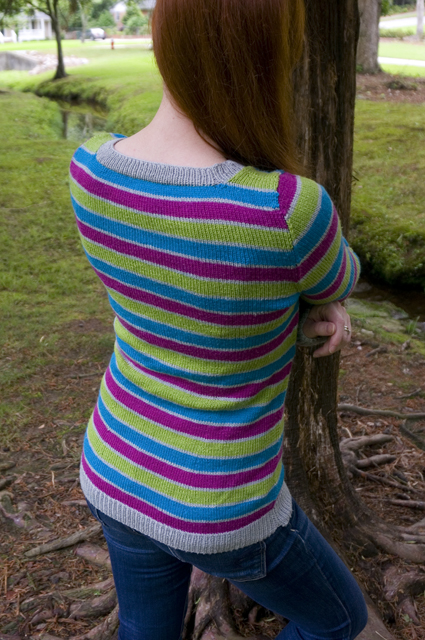
Setting in the sleeves so that the stripes matched across the upper chest and the sleeve caps was a struggle and a half. I looked at many, many pictures of hand-knit and ready-to-wear tops with stripes to determine what properly matched stripes should look like. (I later discovered the Seamwork article “How to Match Stripes Like a Pro” also gives a clue.)
I concluded that a match stripe is typically located at the widest point on the chest, which generally corresponds to the lowest point of the armhole. You can place the match stripe at a higher point on the chest and sleeve, especially if you’re cutting and sewing a garment, but the armhole bind off provides a convenient matching point to work from on hand-knits. Importantly, you may be able to match more than one stripe above it, depending on the height of your stripes, but the closer you get to the top of the sleeve cap, the less likely the stripes are to match.
This should have been obvious to me, since I had specifically worked out what color stripe to begin the sleeves with precisely so my stripes would align at the armhole. But when it came time to seam, I got it in my head that I should be able to match all of the stripes on the sleeve cap to those on the body. That was an evening of self-induced crazy-making, let me tell you.
Once I finally stopped trying to achieve an impossible perfection in stripe-matching, setting in the sleeves and then sewing up the side and sleeve seams proceeded as usual—mattress stitch all the way!
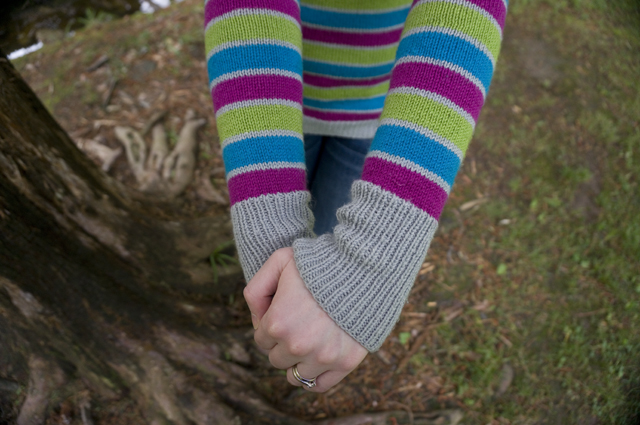
I mentioned in my progress post that I was using one of TECHKnitter’s eight tricks for weaving in as you go. I chose the overcast method because it can be used for same-color or different-color joins in both flat and circular knitting (so versatile!) and because it’s recommended for fine yarn (no added bulk!). Unfortunately, I haven’t mastered the proper tension required to make this work well, because the tails are distorting the stitches they’re trapped against. Some stitches are pulled taller and other are squashed shorter, making it looks like there’s jog in the stripes. It’s not visible at a distance, but I can see it when I’m looking at the sweater up close and it bugs me (probably more than it should). My solution will be to only knit stripes where the unused yarn can be carried up the edge of the work. Or knit fewer striped garments. (AHHAHAHA yeah, right. Like I can stop myself.)
Even weaving in as I knit, I had an unforgivable number of ends to deal with. To stave off utter despair, I made myself weave in about half of them before I let myself pick up and knit the neckline. It helped. Somewhat. I still had to weave them in, but breaking the work up over a couple of evenings before and after the final knitting sprint did keep my twitching eye in check.
Now that I’ve not only come to the ends of the ends, but also worn the finished sweater a couple of times, I feel like I’ve formed an honest opinion of it.
I’m glad I knit a CustomFit design more or less as written. My previous CustomFit sweater involved heavy modification due to less-than-optimal yarn selection. This sweater has given me an opportunity to evaluate my measurements and what CustomFit thinks of as a close fit, including the placement of bust darts, the circumference of sleeves, and so on. Overall, I’m happy with the silhouette, and I’m less inclined to tinker with the pattern generator to try to get an even slimmer fit (which could result in unflattering straining or wrinkling).
When I wore it out for the first time, I was lukewarm about my yarn choice. I love Cascade Heritage Silk (blogged evidence here, additional proof on Ravelry) because it’s an affordably priced wool–silk blend that offers next-to-skin softness and a rainbow of colors. But the drape of the silk means that it can feel like it’s bagging out when I bend or sit and sagging over the course of the day. But after multiple wears, I’ve realized this is mostly in my head. While it’s true it doesn’t have the recovery of 100% wool, it doesn’t actually grow with wear or get sloppy-looking. For a lightweight sweater worn on its own or over a camisole, it’s a solid choice and I’d recommend it.
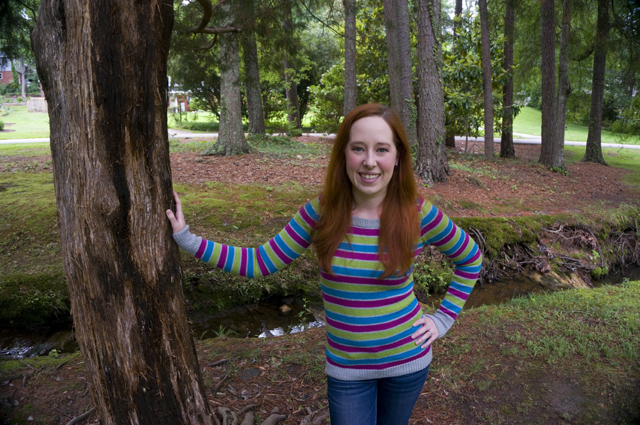
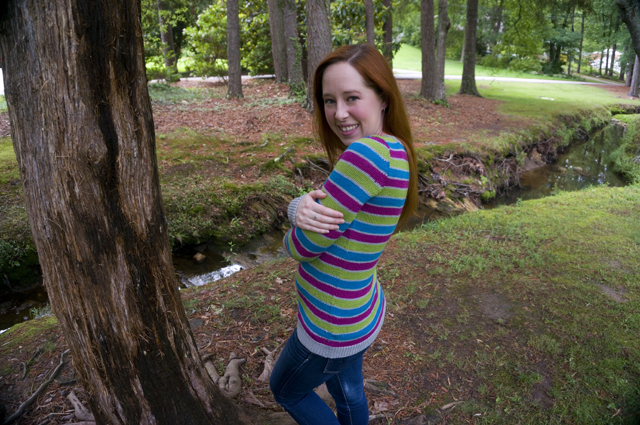
The turning point this sweater is named for was the realization that this sweater pairs exclusively with jeans and gym shoes. It doesn’t look like any of the other sweaters in my drawer; it doesn’t go with anything else in my closet. It clashes with my complexion, especially now that I’m a redhead.
The candy-colored yarns that were irresistible on the shelf seem strangely muted when knitted up together. (I know that’s hard to believe, looking at those photos.) Their vibrancy waned with my enthusiasm, and didn’t return even after I finished the project.
I remember when I got those yarns, from the now-closed Yarn Tree Studio in Raleigh. I bought them first and foremost because they looked good together, like they belonged together. Not because I wanted to wear them. Which is so silly, in hindsight, because I’d always intended to wear them—as a sweater, as a shawl, as a something. I only saw them as “pretty yarns,” and didn’t for a moment consider them as “the stuff to make clothes.”
I could defend my decision by saying I bought the yarn six months before I did Wardrobe Architect for the first time, but I find I’m not actually interested in justifying this sweater to myself. Instead, I feel like I’ve finally learned something that all of the meditations and mood boards didn’t drive home for me: just because something looks good on the rack/on the yarn or fabric shelf/on someone else, and just because I like how it looks, doesn’t mean I need to own it or wear it.
If my goal right now is to have more things in my closet that work together to create cohesive outfits, then I need to think about my buying and making in terms of projects that support that goal. There’s nothing wrong with owning styles that aren’t “flattering” or are one-of-a-kind, unless my goal is to have more garments in flattering colors and remixable shapes—then I’m just going out of my way to dilute my closet and increase the chance I’ll have “nothing to wear.”
I don’t like making mistakes, and the idea of learning from my failure has never captivated me—I’d much rather save time and heartache by learning from the mistakes other people have already made, if that’s an option. Despite reading and observing other people’s style journeys, it took personal experience to learn this particular lesson about making what I want to wear. It was a long walk, but I got there in the end.
I’ve already seen the payoff: during a trip to the New York City Garment District this summer, I went with a plan to look for specific fabrics intended for specific garments, all of which should work together in a variety of combinations. As soon as I catch up on my backlog of finished projects from the last few months, I’ll share my autumn/winter sewing plan, which is already in full swing!
