FO: CustomFit Courant

Have you ever had a project that was so fraught with problems and frustrations that, when it was finally finished, you weren’t sure if you even wanted the thing anymore? This sweater was a little bit lot like that.

2015-12-29_1_CustomFit-Courant

The yarn, Tanis Fiber Arts Yellow Label DK, was a souvenir from the Purple Purl in Toronto, Ontario. I visited during a day trip while on a longer vacation to the Canadian side of Niagara Falls to celebrate my fifth wedding anniversary, and I went in with the explicit purpose of purchasing a sweater quantity. I chose the color because it’s similar to a long-gone favorite sweater (a casualty of threadbare elbows and, eventually, a too-short hem). I specifically bought enough to complete Amy Herzog’s Courant, a pattern similar to another favorite sweater that needs to be retired (it also succumbed to threadbare elbows, as well as shadowy underarm discoloration that won’t wash out).

2015-12-29_2_CustomFit-Courant

Just after I returned from that trip, Amy announced the Maker program for CustomFit. CustomFit is a Web-based application that uses your body measurements and your gauge to generate a custom sweater pattern. Anyone can create a CustomFit account for free to store body measurements and gauge information; you only pay when you generate a custom sweater pattern. The Maker program is a subscription option for CustomFit that allows you to pay a small monthly fee to receive sweater credits on predetermined dates throughout the year that can be redeemed for patterns, rather than paying per pattern. The Maker program has basic and premium subscriptions, and both offer significant cost savings over the pay-as-you-go option if you knit more than six sweaters a year.

I’m not that prolific (yet), but I was intrigued by the concept and wanted to support this alternative approach to pattern sales. Plus, I was already preparing to cancel another subscription service that I no longer used, and it coincidentally had the same annual cost, so I decided to trade one subscription for another to get a service that I would actually use without increasing my monthly spending. Win-win.

2015-12-29_3_CustomFit-Courant

With Justin’s help I took comprehensive body measurements. I knit a gauge swatch. Because Courant is one of the patterns built into CustomFit, all I had to do was plug my numbers into a simple form and hey presto! I had a perfectly fitting sweater pattern at my fingertips.

In a flurry of excitement I cast on and knit all of the pieces in about ten days, helped along by a four-day weekend and a very understanding husband. Then I blocked and sewed up all of the pieces, and suddenly I realized that this sweater was not going to fit. It was too big all over, but especially in the armholes and bust.

I wept. I wailed. I gnashed my teeth. I questioned whether I was the only person in all of knittingdom for whom the magical fitting formula simply did not work. I prophesied a lifetime of ill-fitting hand-knit sweaters and despair.

I…may have overreacted.

But can you blame me? Promised the sublime joy of a perfectly fitting sweater without on-the-fly modifications or frogging, is it any wonder that my hopes went soaring among the rafters? Or that, when this elusive prize failed to materialize, they would come crashing down with such noise?

2015-12-29_4_CustomFit-Courant

When I finally pulled myself together, I contacted the CustomFit help desk, where I was connected with none other than Amy herself to discuss my knitting and fitting woes. We determined that the most likely culprit was a combination of a too-small swatch and superwash yarn, which has a tendency to grow under its own weight more than a non-superwash yarn in larger items, with a dash of mis-measuring thrown in. She counseled me to give in to my tight knitting tendencies, as a firmer fabric can counteract superwash stretching shenanigans. She also provided more insight into the different amounts of ease in various parts of my schematic.

2015-12-29_5_CustomFit-Courant

Eventually I mustered the energy to frog all of the pieces, de-kink and re-wind the yarn, and knit several new swatches. I generated a fresh pattern at a tighter gauge, provided to me for free courtesy of the lovely folks on the CustomFit team.

It took a lot longer to re-knit the sweater than it did to knit it, partly because of the gauge and partly because I wasn’t feeling particularly charitable toward the project. The bazillion ends created from re-working already-cut yarn certainly didn’t help matters. And if that weren’t enough, I decided that the original cowl-neck wouldn’t work with my yarn (no natural drape), so I redesigned it to have a split that would allow it to lie flat across my shoulders.

2015-12-29_6_CustomFit-Courant

I finally completed the sweater at the end of May. When I tried it on, I wasn’t in love. Some of the problems are my own doing. The sleeve cuffs are a little snugger than I’d like, but I narrowed the sleeves compared to the original pattern, and my tubular cast on ironically turned out to be tighter than my normal long-tail cast on even though by all accounts it should be stretchier. I also think the fabric I created is too stiff: while not quite bulletproof, it still lacks some of the flexibility and recovery you would expect from a plied 100% wool yarn.

Some of the problems are, I think, a result of a conflict between my fit preferences and the fit philosophy underlying CustomFit. When I chose a close fit, I imagined it would hug my back curve more closely, and I didn’t anticipate so much excess fabric under the bust. (In case you’re looking at the photo above and thinking that I’m full of lies, I should mention that I’m holding my breath in that picture. No, I don’t know why, although caramels and homemade Chex Mix are delicious easy scapegoats.) I also understood that the purpose of negative ease at the hips is to better anchor the sweater, but when I raise my arms, a healthy sliver of midriff appears.

2015-12-29_10_CustomFit-Courant

Basically, I expected a close fit to better conform to my shape, instead of completely hiding what little waist definition I have and making me look like a rectangle. But, since it was too warm to wear anyway, I decided to stuff the entire thing in a drawer and re-evaluate my feelings in colder weather.

I pulled it back out to wear while Christmas tree hunting on the one of the few below-freezing days this month, and I can confirm that it is at least warm. I don’t dislike it quite as much as I did during the first try-on–I’m no longer entertaining the absolutely ridiculous notion of frogging the whole thing a second time to make a different sweater–but it will never be my favorite sweater.

2015-12-29_Collage_CustomFit-Courant

Despite my lukewarm feelings, I’m going to give CustomFit another try. If I can’t find a way to make it work for me, then I can always spend my credits making sweaters for Justin now that CustomFit has options for straight sweaters.

FO: Hylia

What do you do when you make something that isn’t quite right? I’m not talking about a glaring fit issue or a really unfortunate color choice—I’m thinking more of those niggling little things that keep a good project from being great, like pockets that are a little too low to relax your hands in or a neckline that grazes your throat, but only when you lean far forward. Do you wait awhile to see if it’s something you can live with? Do you fix it, or move on and make something new now that you know better?

2015-03-08_Meditation_03

About a year ago, I knit the hat above, which I called Meditation to play off the names of the pattern (Lotus Hat by UptownPurl) and the yarn (Zen Yarn Garden Serenity Worsted in Blood Orange), and because I found the knitting itself to require a little mindfulness without being difficult. The slanting motif looks like it would involve some kind of traveling stitch but in reality requires only simple decreases next to the yarn overs. I wore the hat several times, but soon discovered that the loose gauge, openwork, and short height meant that it didn’t cover my ears completely and didn’t keep my head particularly warm.

Now, I absolutely think there’s room in the world for hats that are more pretty than functional, but what really killed me was that the pattern doesn’t use very much yarn—only about 64 grams/112 yards out of 100 grams/175 yards, which meant that I had about a third of the skein left when I was finished. Normally I’d be thrilled to find such an economical pattern, but since the yarn was a souvenir from Lettuce Knit that I carefully selected during a day trip to Toronto whilst celebrating my 5th wedding anniversary in Niagara Falls, it seemed a shame to use so little of it and have so much lingering behind with no real purpose in sight.

Frogging a project that I didn’t deeply dislike felt strange at first, but that’s a feeling that’s quickly overcome. I waffled for a while about what to knit it into for its second life—I didn’t want to repeat my “mistakes”—and settled on Koolhaas, the perennial favorite from Jared Flood.

2015-10-18_01_Hylia

Although I don’t have a particularly large head, I chose to make the larger size so that I could be sure that it would cover my ears. I used about 90 grams/158 yards of yarn this time around, leaving behind enough yarn to make repairs should I ever need to but (probably) not enough to do another pattern repeat. The only place where I deviated from the pattern instructions was the decreases, where I replaced the SSK with K2togtbl; I think it continues the look of the twisted stitches better.

2015-10-18_03_Hylia

This pattern offers an excellent opportunity to practice cabling without a cable needle. (Like nearly everyone who knit this before me, I followed Grumperina’s tutorial.) Although it’s not my first cabled project or my first time working without a cable needle, I still consider myself a cabling novice. For someone looking to learn to knit cables, or someone like me who wants to get better/faster at them, I highly recommend this pattern. It probably looks overwhelming, but I’d argue that a small, heavily cabled item like a hat is the perfect opportunity to practice, because it allows you to iterate. As you continue making the same motions over and over again, you start to build muscle memory while figuring out how you can make the stitches most efficiently and consistently. Compare that to a large item or an item with only one or two cables, where each cross is isolated from the ones before and after it by swaths of other stitches, and you can see why this project makes sense. This is one of those times where do yourself more favors by jumping straight in rather than dipping in a toe here and there.

2015-10-18_02_Hylia

I confess I didn’t get up to full knitting speed for more than three or four crosses before I stumbled and had to slow down, and I did end up with a few crosses in the wrong place, but overall I feel my technique did improve, and it didn’t take me nearly as long as I thought it would.

How do I know? Back in September, during the first weekend that the temperature really dropped into fall territory and the skies were overcast, Justin and I were lucky enough to have a weekend of no commitments. We decided to hunker down inside, and instead of popping in movies, he decided to play through The Legend of Zelda: A Link to the Past on the Super Nintendo while I watched (it’s a long-standing custom of ours that, whenever one of us plays a single-player game, the other watches). He’d started a game previously, but apparently the cartridge’s battery is failing, because his save had been wiped. Undaunted, he started a fresh game, but he knew he’d have to play the whole thing in order to keep his progress.

Luckily the cartridge had enough juice to survive being powered off overnight, so he managed to complete the game in two long sessions spread over two days for a total of about 14 hours, during which time I knitted the entire hat from start to finish. We were actually racing each other at the end, and he beat me by a narrow margin of about an hour, but only because I took an hour-long nap on the first day. So I call it even. 😛

2015-10-18_04_Hylia

Considering the connection between the hat and the game, I was tempted to call this Minish Cap after the red hats worn by the Minish people in the game of the same name, but it’s the wrong shape and I want to leave room in case I decide to knit myself a Minish cap in the future (cosplay, anyone?). Instead, I named it after the lake that features prominently in A Link to the Past and many of the other games.

When I took these photos, it was only about 60 degrees outside, so I can confirm that it keeps my head nice and toasty, proving it was a good choice to frog a good project in favor of a great project. Have you ever done the same? Would you? If not, what would you do instead?

FO: Garden Party Dress and Mashion Cardigan

2015-09-10_01_Dress-and-Cardigan

AKA Outfit Along 2015

2015-09-10_02_Dress-and-Cardigan

AKA Third Time’s the Charm

2015-09-10_03_Dress-and-Cardigan

AKA Better Late than Never

2015-09-10_04_Garden-Party-Dress

If I had actually sewn the dress I said I was going to sew, I probably would have finished on time instead of more than a month late. Then again, “finishing” may have consisted of wadding the dress up in disgust and refusing to think of it ever again. In the balance, satisfaction was clearly more important than punctuality.

The problem with the original dress plan is that I bought McCall’s M6887 solely as a result of peer pressure, in direct defiance of my own stated preferences and without regard for my previously purchased fabric. Don’t get me wrong—I like the pattern, and I think I actually will make it at some point. But in order to not hate the feel of the waist seam/fit-and-flare silhouette, I’m going to have to make it out of a stretch woven at least, or possibly even adapt it for a stable knit like ponte. My fabric was neither of those things, and I didn’t even make it as far as I muslin before I had a reality check and realized that I already didn’t like the road I was headed down.

After reviewing my recent haul of patterns, I briefly considered making McCall’s M7084, a shirtdress, instead. But it also has a waist seam, and I didn’t have enough fabric to do the fuller skirt, which felt like a must on a breezy summer dress. Instead, I settled on McCall’s M7156, which has princess seams and no waist seam. I’d been imagining it in a rayon challis or possibly a lightweight jersey, but decided that it should work with my fabric. And if it turned out a bust, I wasn’t any worse off than I would have been by sticking with the original plan.

I decided to skip the muslin on the grounds that there are a total of 8 seams on the dress, all designed to be sewn at 5/8″, which allowed plenty of leeway if I needed to take it in or let it out anywhere. After a recent knit dress project, those seams looked enormous! *cue the faintly ominous music of foreshadowing*

As I was handling my fabric in preparation for cutting, I confronted the fact that, no matter what my husband said, it was too lightweight to sew on its own and liable to be see-through in strong sunlight. So I quickly went out and purchased a white cotton sateen to use as an underlining. It came on a ridiculously wide bolt, something like 109″. I feel like I’ve heard somewhere that because sateen is a satin weave, it’s warmer than a plain weave, but you just can’t beat how smooth and lustrous it is. Besides, when it’s 95°F with an equally high humidity index, nothing is really going to feel cool, you know?

It’s a good thing it felt so lovely, because I struggled mightily to prep it for cutting. When I went to square the cut edges to the selvage, I expected it to behave like a plain weave and attempted to snip into the edge and tear it straight across, but instead it tore on a diagonal. (I tried to find a scientific explanation for this, but nothing at all came up in my searches. Is it because it’s more similar to a twill than a plain weave? If anyone can tell me what happened, I’d love to hear about it.) Since I couldn’t use the torn edge to position the grainline of the pattern pieces, and because the fabric was so wide, I went through an elaborate ritual that involved positioning the first piece relative to the selvage and then each subsequent piece according to the grainline of the piece that directly preceded it. It took forever, but I think I must have done it right, because everything hangs really nicely in the finished dress.

2015-09-10_05_Garden-Party-Dress

I started with a size 10 at the bust and graded out to a 14 at the waist and hip. I also took advantage of the For Petite line at the hip to shorten skirt. I cut everything on a single layer for accuracy, and I stole the pocket pieces from McCall’s M7084 since I’d cut them out when I though I was going to be making that pattern. I hand-basted all of the underlining pieces to my fashion fabric by hand, and followed the advice of this Threads article to account for turn-of-cloth. It took a couple of evenings in front of the TV to get it all done, but it was well worth the effort because I avoided any slipping or bunching during the actual sewing.

Since I didn’t make a muslin first, I machine basted all of the seams to check the fit. But because of the wavy nature of my hand basting and a couple of places where I had to staystitch per the instructions, I didn’t baste all of my seams at 5/8″ as I intended to sew them because I didn’t want to a) sew over any other temporary stitching or b) take out my hand-basting stitches before the actual, final stitching was done. I know, I know. This is a decision that seems completely absurd when I type it out now, but that was my thought process. I had plenty of excess fabric throughout with the narrower seams, so I reasoned that sewing them at the correct width would bring everything perfectly into line.

2015-09-10_06_Garden-Party-Dress

Rather than test this theory in a semi-rational way by sewing them at that distance, I decided to double-down on my questionable decision-making and proceeded to disassemble the basted dress and serge the vertical edges of each piece first. (I should have done this—with the knife disabled, if I was worried about accidentally shaving off too much fabric—before I basted everything together, but since I’m new to serger ownership I forget this and no commercial pattern I’ve ever encountered actually tells you to do it.) And, because my brain works in ways mysterious even to me, I elected to serge the edges at different widths. I know, I know. This doesn’t make any sense. Sure, avoiding a bulky seam on the princess seams makes sense, but do not ask me why I sewed the center front/center back seams and the side seams at different distances. I do not know. Also don’t ask me why I thought it was safe at this point to cut into the corners between the pocket bags and the side seams to allow me to press the seams open—I was just blindly following Lauren’s tutorial for adding pockets and conveniently forgot that she didn’t need to check the fit of her dress midway through.

Once I had the edges tidied, I sewed the dress up properly. Shock of shocks, it was too tight pretty much all over. Who would have guessed that barely estimating the changes you planned to make and then making said changes inconsistently would result in an outcome other than the one intended? Not me, apparently.

I had a bit of a cry about it, and then I unpicked all of the seams and sewed them as narrowly as I dared. I believe it was ¼” for all of the seams except the princess seams, which had already been serged together, but I can’t be sure, because I’d trimmed off different amounts while serging.

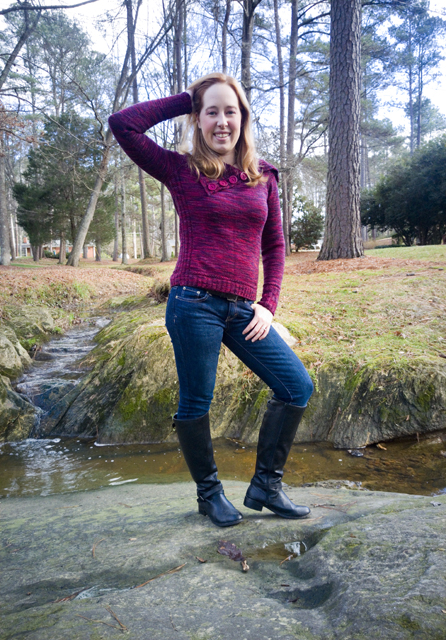
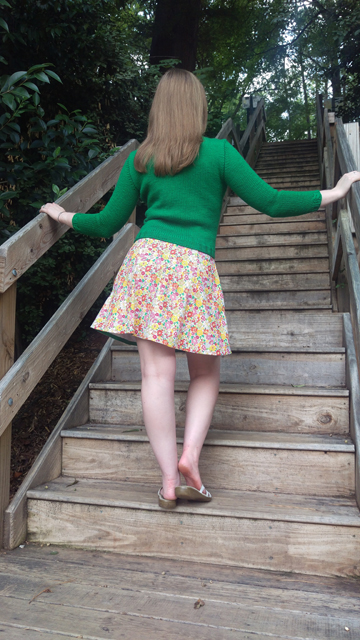
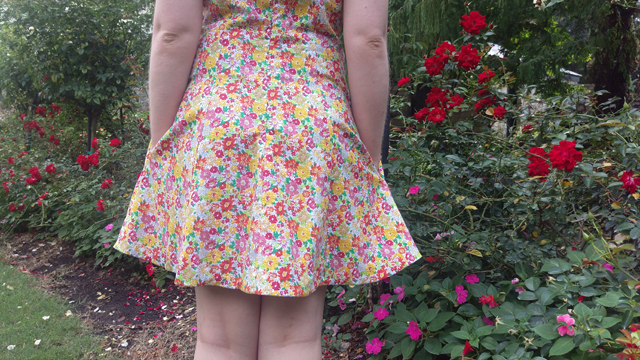
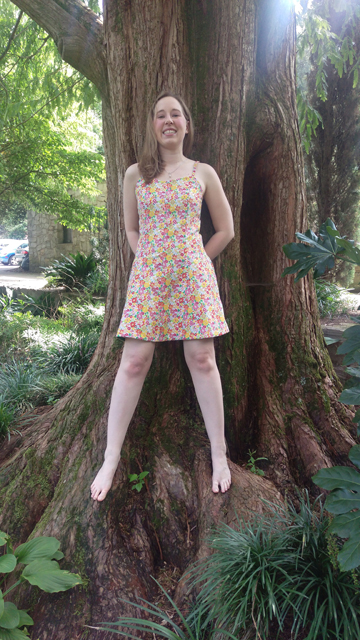
Lucky for me, this solved all of the fitting problems. But because I cut close to the original stitch line to free the pocket bags for pressing the seams, and then moved the seam outward, I ended up with holes above and below the pockets on the outside of the dress. To fix this, I carefully sewed a line of stitching that blended between the old and new seams to close the holes. The only downside was that my excellently constructed pockets are a little lumpy at the top and bottom and no longer completely hidden; they now have a tendency to peek out a bit, as you can see in a couple of the shots at the top. Otherwise I daresay they would have been perfect.

Once the fit was resolved, the rest was, if not exactly smooth sewing, at least more pleasant sewing. Taking advantage of the various feet for my machine was, I think, a contributing factor. The invisible zip, while still a little uneven at the top, is easily my best to date. (Well, as long as you ignore the fact that I sewed the seam to the dress and, while unpicking it, poked a hole through the underlining and fashion fabric. I was able salvage it by embroidering a red flower over the hole. Justin suggested I put a tiny flower on all of my makes. It would be sweet, I’ll admit, but I don’t think I have the patience for that.)

2015-09-10_07_Garden-Party-Dress

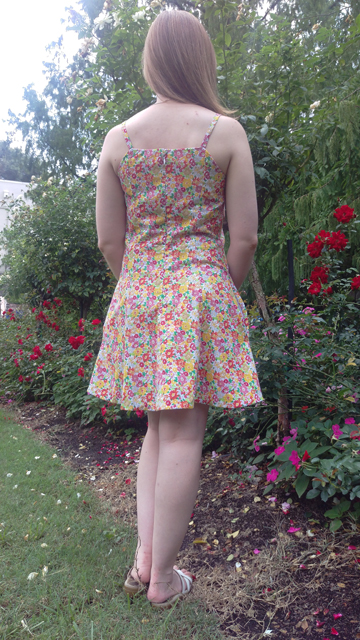
Since I underlined the whole dress, I elected to skip the facings in the pattern and use bias facings instead. I used self fabric for the neckline edge and stash quilting cotton for the hem. It was a great excuse buy Clover bias tape makers. (I love gadgets). I used this tutorial from Colette for making continuous bias tape. It took a couple of tries to get everything just so, but it was totally worth it and I don’t see myself ever buying pre-packaged bias tape again unless I’m in an absolute crunch. I used my overcasting foot to attach the bias tape, since I don’t have an edgestitching foot (yet) and it gives me basically the same result; I turned and sewed them down by hand using blind stitches. The bias facing along the neckline ended up narrower than intended, but it hasn’t popped free during wear, so I get to pretend that it was a deliberate and delicate touch rather than another miscalculation.

I attached the straps before the bias facings, but forgot to also check their length before I sewed the facings down, and they ended up too long and with exposed ends showing through in one or two spots. I solved the problem by pinching out the excess right where the straps meet the dress and then sewing them to themselves and to the bias facings with more hand-sewn blind stitches. You can’t tell from the outside, and you can honestly barely tell from the inside, either.

2015-09-10_08_Garden-Party-Dress

As I mentioned earlier, I took advantage of the For Petite line to shorten the skirt portion, but it still came out quite long so hacked off about 4 inches from the bottom.

2015-09-10_12_Garden-Party-Dress

I didn’t use the For Petite line to shorten the torso between the bust and waist because it seemed to align with my own measurements, but in hindsight I think it would have been a good idea to do that too. It would make a subtle but positive difference.

2015-09-10_09_Garden-Party-Dress

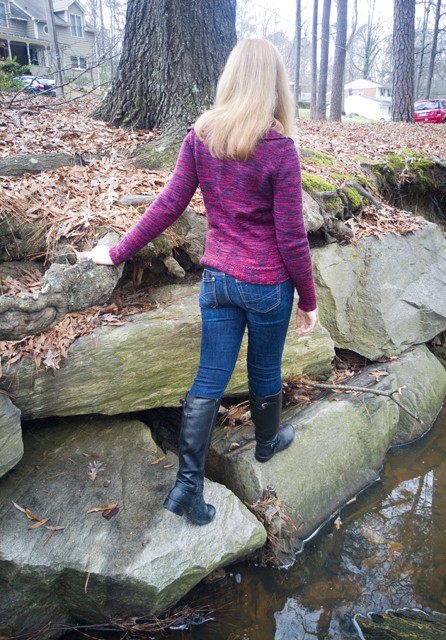
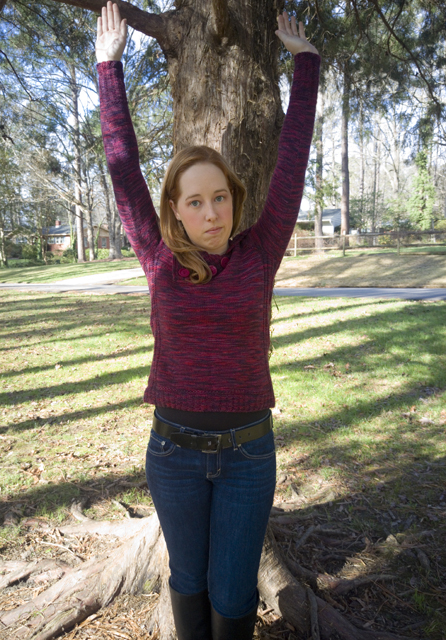
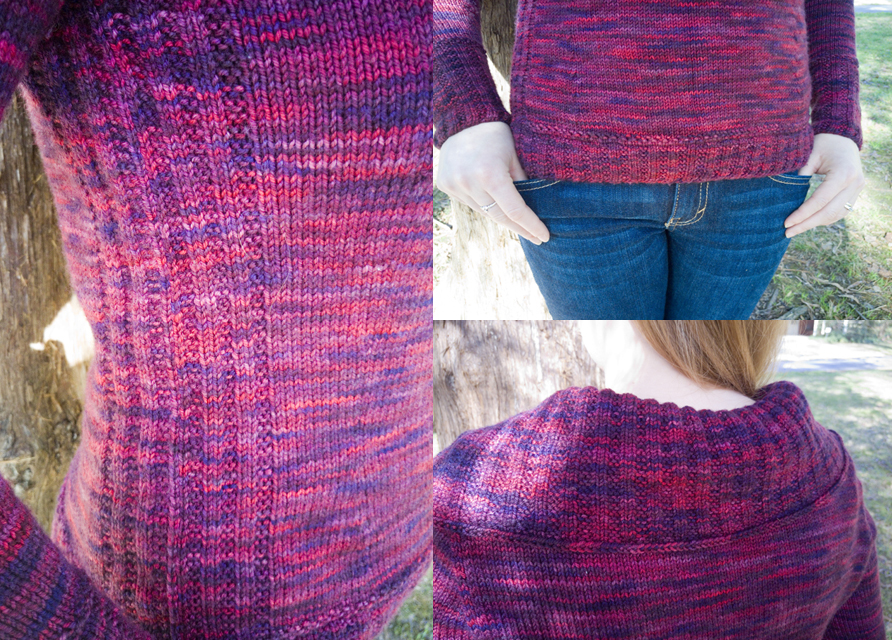
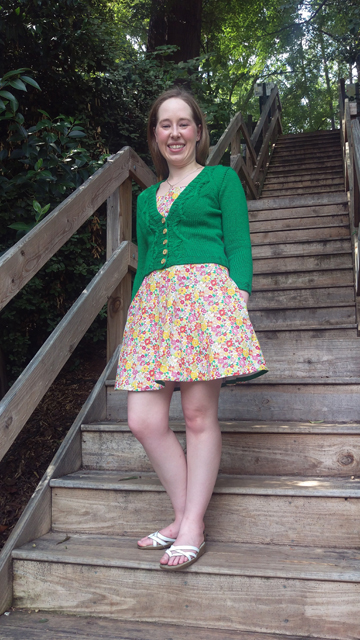
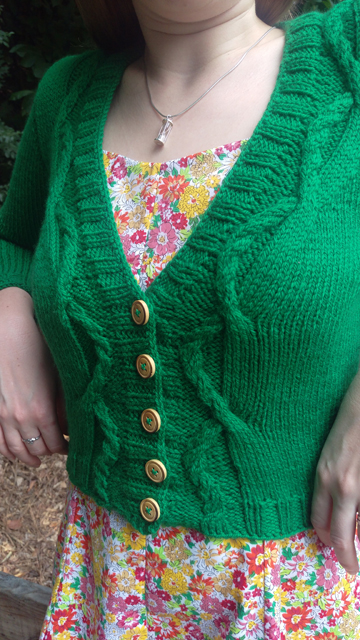
I think that’s everything for the construction and fit of the dress. There’s a lot less to say about the cardigan, although there are a few key things I’d like to share. First, I’m apparently such a tight knitter that I had to go up not one but two—TWO!—needle sizes to get gauge. I’m not sure I would have knit it quite that loosely if I’d had my way, but so far nothing has snagged so I can’t complain about it.

2015-09-10_10_Mashion-Cardigan

Second, and a thing I feel justified in complaining about, is the construction of the sleeve. Now, I’ll admit that this approach to a top-down set-in-sleeve is new to me, but it’s not the short rows that tripped me up (I’ve done them before on my Black Cherry Tart Cowl). No, it was picking up stitches that nearly drove me to madness. It’s not clearly spelled out in the pattern, but you should pick up a stitch in every other stitch, regardless of whether the edge is vertical, angled, or horizontal. That may not seem like a big deal, but one constant that every knitting resource agrees about is that you pick up stitches at a 1:1 ratio along horizontal edges. That’s what I tried doing on this cardigan, and it resulted in too many picked up stitches. I ripped this part out and re-did it several times, attempting to pick up fewer stitches everywhere else, before I realized what had to be done. I understand that designers shouldn’t be expected to hold the knitter’s hand every step of the way, but if you’re going to require the knitter to fly in the face of one of the few universally accepted pieces of wisdom, I’d appreciate it you’d say so up front.

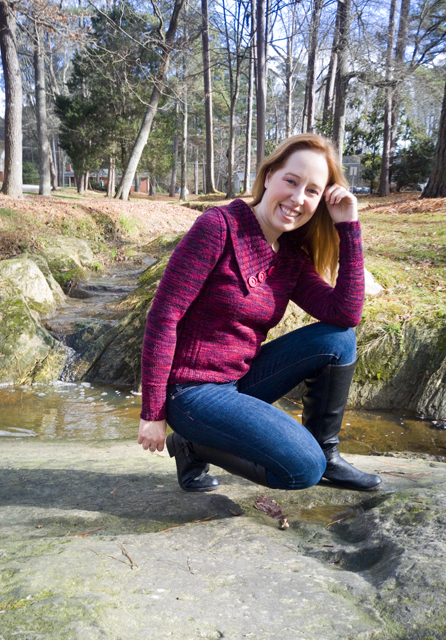
That frustration aside, I’m not convinced about the fit/attractiveness of this set-in-sleeve construction method. Picking up every other stitch results in an almost hole-y pickup, especially around the underarm. The cap shaping seems okay, but I think the way the sleeve connects to the body at the underarm is causing the large wrinkle you see at the bust in every photo where I’ve bent my elbows away from my body.

2015-09-10_11_Mashion-Cardigan

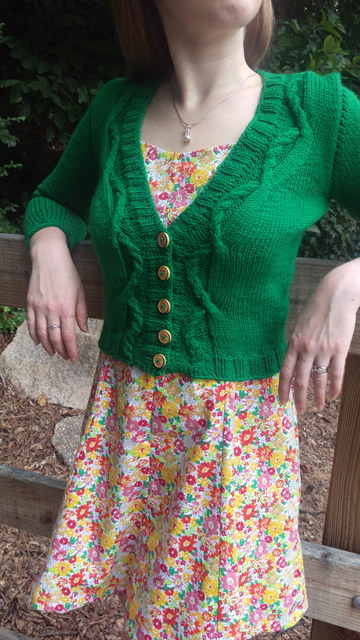
Third, I found that the final cable cross happened in a weird place relative to the ribbing, so I adjusted by crossing later than specified to align with the pattern set by prior crosses. It’s possible this was my fault, since I had issues with the cables shifting too early (detailed here), but I thought it was worth mentioning.

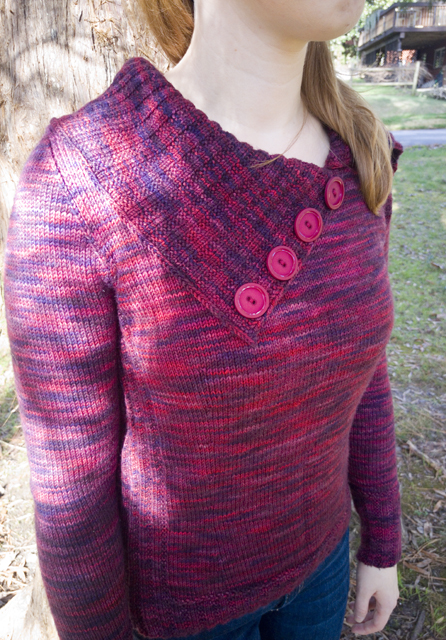
I’m aware that it sounds like I’m being rather negative about the knitting, but I did truly enjoy it and I love the final result. It’s toasty warm even with the three-quarter sleeves, and it perfectly complements the dress. The buttons are easily my favorite part, though. I was going to use plain green plastic buttons, but at the last minute chose these wood-look ones instead and really love have they contrast the yarn but tie into the natural theme of natural fibers and flowers.

Oh, and in case you’re wondering, the name Mashion comes from the name of the pattern, Marion, and the fact that Justin and I embarked on a journey to watch all of M*A*S*H from the beginning around the time I started knitting, and much of it was accomplished during the first couple of seasons. Plus it’s green, which is ubiquitous on a show about Army life.

Overall, I’m so glad to have participated in the Outfit Along and so happy to have two handmade items that I know I’ll wear because I know I can wear them with each other if nothing else.

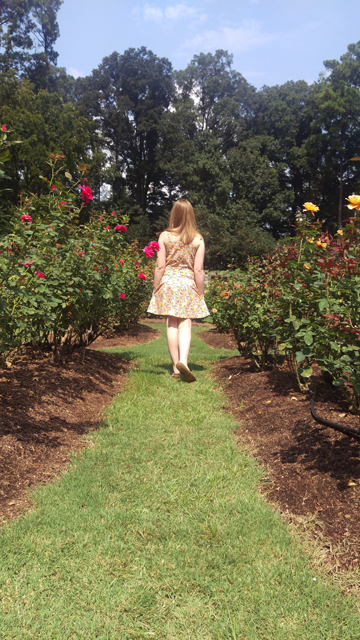
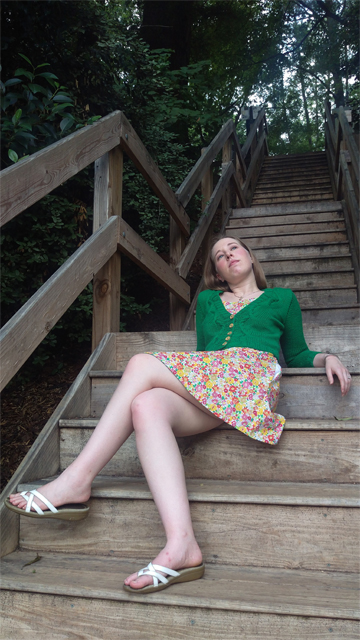
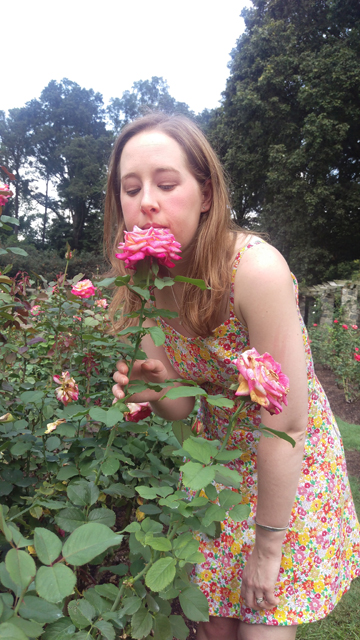
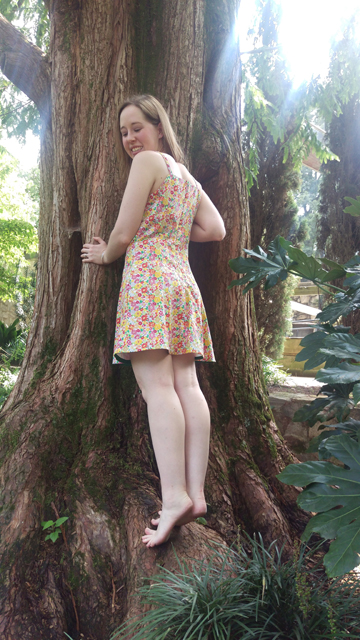
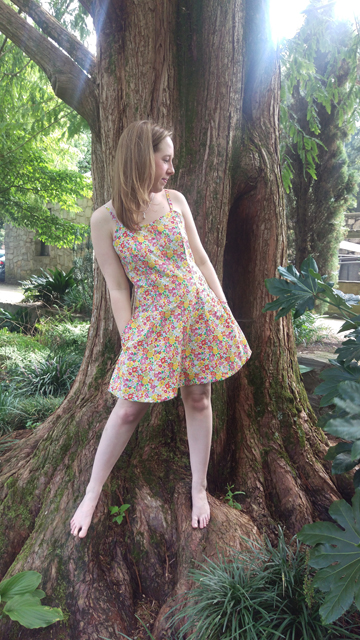
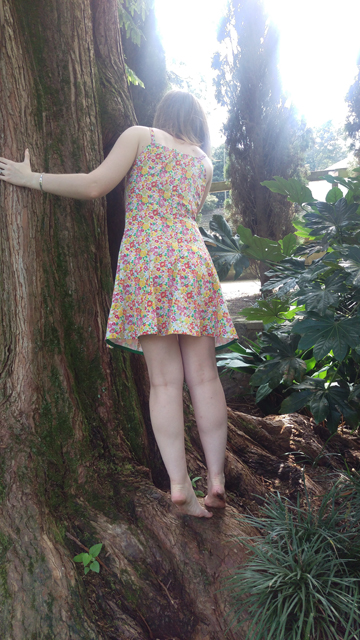
I’m also really happy to be following along with Gillian’s Better Pictures Project, which is aimed at taking better blog photos even if you don’t have a fancy camera or fancy training. This month’s prompt was to step away from the blank wall and take pictures out and about. This is something I love to do anyway, so it wasn’t out of my comfort zone to visit the Raleigh Rose Garden for these photos. And, in an effort to increase the number of usable photos that came out of the shoot, I had Justin take a ton. People, he took 187 photos. Is that not crazy? Here are several more that I liked:

2015-09-10_13_Garden-Party-Dress

2015-09-10_14_Garden-Party-Dress

2015-09-10_15_Garden-Party-Dress

2015-09-10_16_Garden-Party-Dress

2015-09-10_17_Garden-Party-Dress

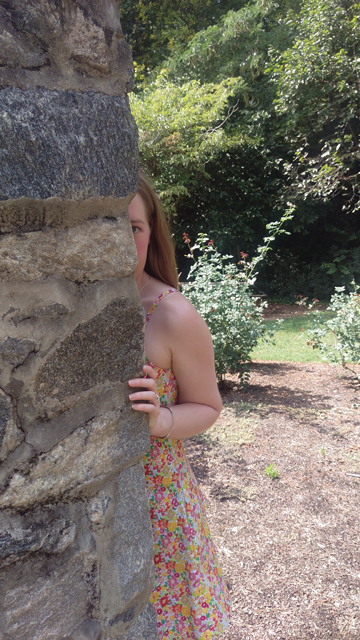
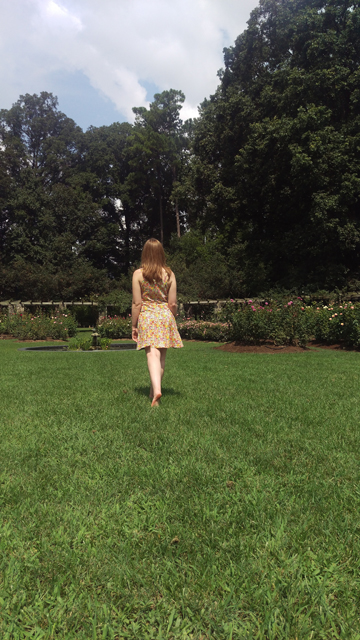
And tied for absolute favorite:

2015-09-10_18_Garden-Party-Dress

2015-09-10_19_Garden-Party-Dress

Fixing a (Knitted) Cable

When last we left the Outfit Along, I was lamenting the fact that I made the cable on either side of the front opening travel too soon, which meant that it wasn’t in position to line up with the pattern on the bottom band. I could have modified the pattern on the bottom band—in fact I did try it, but I didn’t care for how it looked—but in my heart of hearts I knew it would bother me. So I set out to fix it.

Since my cable was not crossed in the wrong direction, instructions for duplicating stitching over it or (egads!) cutting into the knitting to reverse the crossing were not going to solve my problem. Instead, I learned that you treat it like any other mistake: isolate the offending stitches, drop them off the needles, and then gently tug free the strand of running yarn on each row until you get down to problem row. Correct the mistake(s), then use your knitting needles to re-knit (or a crochet hook to latch up) the stitches until you’re back on the working row.

I had very much hoped to photograph my steps, but the lighting just wasn’t cooperating. Instead, may I recommend Yarn Harlot’s and Twist Collective’s handy photo tutorials? I referenced both and would definitely recommend them if you find yourself in the same boat as me.

To their excellent advice, I would add the following four suggestions:

  1. Thread a DPN through the target row of the isolated stitches. Don’t worry if you don’t catch all of them, or you pick up the wrong arm of a stitch. Once you’ve unraveled most of the rows and are close to the row with the mistake, you can use one of your knitting needles to slip stitches off and on the DPN until all of them are accounted for and oriented correctly. Keeping them on a holder stops additional rows from unraveling, which is more common for tight knitters like me, and which is the #1 cause of knitting-induced panic around here. No need to make the fix more complicated or stressful than it needs to be, right?
  2. Count each loose strand of running yarn as you unravel it to make sure you know what row you’re on. Cables can be difficult to read, especially if they haven’t been blocked yet and are all scrunched up under their own tension. I had a pretty good idea about where I went wrong in the cable chart, but I made sure to count each row I unraveled to be sure I landed on the correct row for my fix. It also allowed me to confirm that the fix was happening on the side of the knitting that I intended (in this case, the public side) and that when I went to reknit I knew exactly where to pick up the pattern in the chart. The last thing I wanted was to go through all of this trouble only to be off by one row the whole way through and have to do it all over again.
  3. Use a smaller needle to hold the stitches to be worked; use the needle size needed to get gauge to work them. Even though the section of sweater I was dealing with was 9 stitches wide and worked on US 10 needles, it was tight and difficult to maneuver. I was concerned that in every row, the first few reknit stitches would be correctly sized and tensioned, but the last few would end up too tight and too small as I struggled to catch the dwindling span of the running yarn for the row. To mitigate this issue, I put the stitches to be worked on a US 8 DPN, and I did the actual knitting with a US 10 DPN. This did mean that each time I successfully reknit a row, I had to transfer the new stitches from the US 10 to a US 8 to work the next row, but the extra time was worth it because the reknit stitches are a pretty close match to the surrounding stitches that were left untouched. If you use interchangeable circulars, you could put a different sized tip on each end of a longish cord and eliminate the transfer step.
  4. Use a cable needle or DPN to rearrange the stitches for the cable cross, and then knit the entire row. If you try to knit part of the row, move stitches to a cable needle for the cable cross, knit half the cable, transfer the stitches back and knit them (or knit directly from the cable needle), and knit the remainder of the row, you’re in for a struggle. The cross is liable to be tight to the point of straining, the stitches will be scrunched up and difficult to work, and there’s a good chance you’ll end up stabbing yourself. Again, it takes a little extra time to rearrange things, but the payoff in appearance (and painlessness) is worth it.

The process was time-consuming, but the result was deeply satisfying: the cables are now correct, and it’s nearly impossible to tell that they were ever wrong; any remaining vagaries in tension/stitch size can be resolved during blocking. Best of all, by being patient and following the four steps above, I was able to avoid any weeping, gnashing of teeth, or questionable language. (I also wasn’t tempted to turn to booze and/or ice cream, which most certainly would not have improved the outcome.)

Have you ever had to fix a mistake in a cable? How did it go? Do you have any tips to add?

Wardrobe Architect Week 14: Overcoming Editing Hurdles

It’s fitting that the final assignment of the original Wardrobe Architect series would be about editing. As a writer, I’ve heard all the aphorisms and pithy advice about the importance of revision, that the real work—and real success—comes not from writing but from re-writing. Once you have both the idea and the raw material, you have to lay one over the other and trim away all the little bits that don’t line up. You change one to fit the other; in the end, you’ve changed both. It makes sense that cultivating a wardrobe is much the same: you’re continually trying to shape what you have to match what you want, or reconsidering what you think you want in light of what you’re actually buying/making.

I know these things, but man! is it hard to live them. This is probably because, as a writer, I am a terrible editor. Wait, I retract that statement in favor of this one: I am a terrible self-editor. I can be absolutely brutal when I’m revising someone else’s work, scratching out words and rearranging sentences or paragraphs with cruel efficiency, with no regard for the author’s feelings. But when it comes to my own work? I’m basically useless.

You would probably assume—completely understandably—that this is because I think my work is too precious to be changed, or because I can’t take criticism. Not so! (Okay, a little bit so for the second one, but I’m working on it.) Really, it comes down to how I write. I’m a slow writer. A really slow writer. (The last time I clocked myself on a creative writing assignment was in college, but I remember that it took me an hour per page. The pages were double-spaced.) I deliberate over each sentence, each word, because I crave coherence, and I need each part to hang together with all the rest. I can’t move forward if something doesn’t make sense or doesn’t flow. I tend to edit as I go; in fact, I tend to edit before anything actually makes it out of my brain and on to the page screen. So when I come back afterward to do that all-important second pass for revision, it’s hard to imagine things written any other way.

It’s a little bit like that with clothes, for me. I don’t shop for clothes very often. I never have. I usually buy things in small groups: a pairs of slacks and a couple tops for work, a handbag and a pair of shoes to match a dress I own, or a sweater in three different colors. The items in these bundles usually work with each other, but they don’t always work so clearly with other things I have. Sometimes I’m in a pinch for something specific, like warm tops in winter, or there’s a sale, so I buy something that’s not quite right. I don’t usually fall prey to trends (at least not in the sense that I-must-have-this-only-because-it’s-popular), but I’ve certainly bought things I didn’t love to fill a hole or score a deal without a lot of consideration for the long-term.

And because I don’t buy clothes very often, it’s hard to get rid of things. It took time to accumulate what I do have, so if I give something up, my brain reasons, it will take a long time to replace them. It’s faulty logic, of course. If I’m barely wearing something anyway, and I don’t particularly enjoy it when I do wear it, it’s no great hardship to give it up. Even if it were, if I have a clearer idea of what I want instead, I can deliberately seek out or make a well-made, well-fitting replacement, rather than hoping to stumble upon something or continuing to fill up my closets piecemeal with whatever seems important in the moment.

After repeating these things to myself a few times, I scoured my closets and drawers and came up a little pile of clothes.

2015-07-08_01_Clothes-for-the-Outbox

The only thing I’m really bummed about are the two pairs of light grey slacks toward the bottom. They’re two different cuts and fabrics, but they’re identical to several other pairs of slacks I have in black and brown. But for some reason, they’re just tighter in the waist and shorter in the rise than the other colors, which makes them just too snug for comfort. I can only assume that they’re on the extreme end of the sizing tolerance. If I thought I could let them out I would, but they’re not exactly a high-end brand, so they don’t really have seam allowances to work with.

To be safe, I’m not going to get rid of these garments immediately. Instead, I’ll let them marinate in the Outbox until I have a chance to go to a used clothing or thrift store. That will give me a chance to rescue anything if I change my mind. But most things that go into the Outbox don’t come out again, so I’m pretty confident I’ll finally be letting these go. It feels a bit tough now, but I know it will be a relief later. I’m looking forward to things that will take their places, because they’ll be thoughtfully planned and carefully sewn me-mades.