FO: Vanilla

Before I post my (overdue) reflections on Me-Made-May, I wanted to catch up my records by sharing the projects I completed during the month. The first is below; the others will be combined in another post.

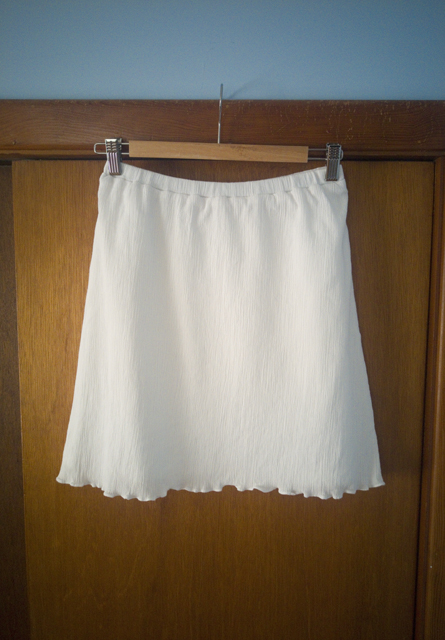
When I was a teenager my parents paid for my clothing, and because they allowed me a fair amount of latitude in picking out what I wanted to wear, I didn’t have much impetus to buy clothing myself. The first time I can distinctly recall paying for a garment that I wanted with my own money was in high school. I don’t remember now what I’d originally gone to the mall to buy—I wasn’t the type to shop recreationally—but I ended up bringing home a white cotton gauze A-line skirt that had been on sale for only $10. It hit around knee-length and had an elastic waist and slightly stretchy lining, all of which made it wonderfully comfortable and allowed me to sit crossed legged without flashing anyone. From a design standpoint it was nothing special, but in my eyes it was pretty much perfect, and I adored it.

I wore the skirt through high school and then college; I don’t remember the exact reason that I eventually got rid of it, but the only reason I would have parted with it was that a) it had acquired an indelible stain, or b) it had completely fallen apart from endless wearing and washing. I’ve wanted to replace it ever since, but somehow never mustered up the gumption to actually do so.

As the weather warmed up throughout May, however, I finally pulled out a crinkled poly-cotton I scored at Hancock’s going-out-of-business sale and Simplicity 1662 and set to work.

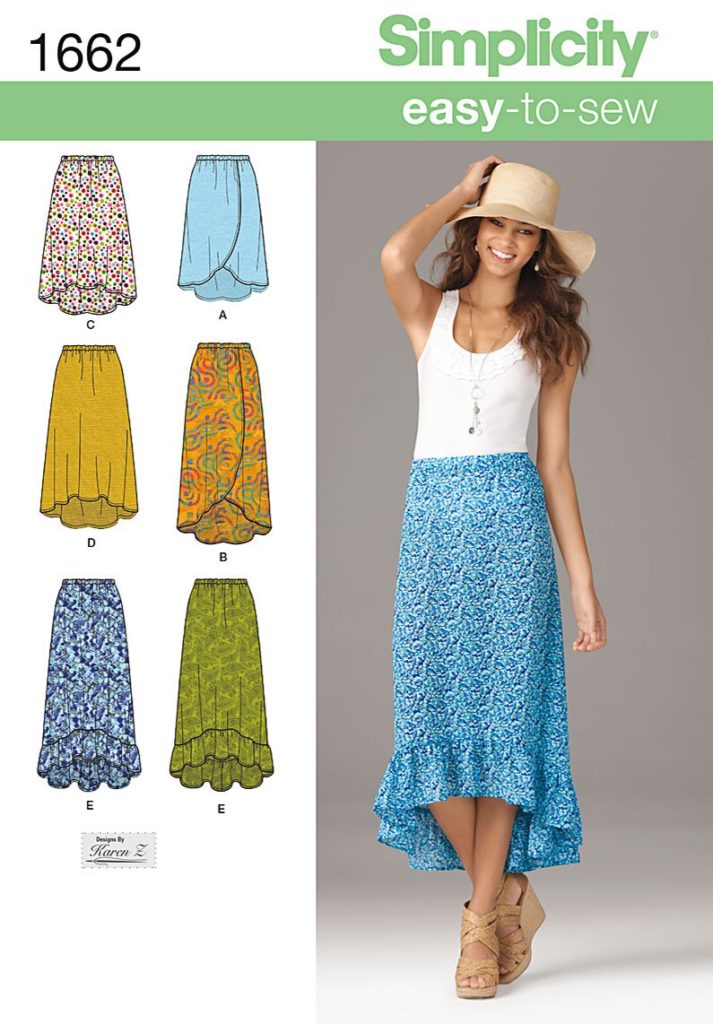
This pattern doesn’t really mimic the shape of the inspiration skirt that well, nor is it a great match for the fabric, but I had it in stash already and it has an elastic waist—arguably my favorite feature of the original—so I went with it to avoid the perils of trying draft something myself. (I know that an A-line skirt should be about the easiest thing to draft after a dirndl or a circle skirt, but I have an exceptional ability to over-complicate the drafting process, so I decided not to chance it. I wanted something easy.)

I traced view C, but rather than have it rise in the front and dip in the back, I cut it straight across at the side seam, perpendicular to the center front/center back. I cut a size small based on my waist measurement, with the intention of stretching it to sit at the top of my hip bones.

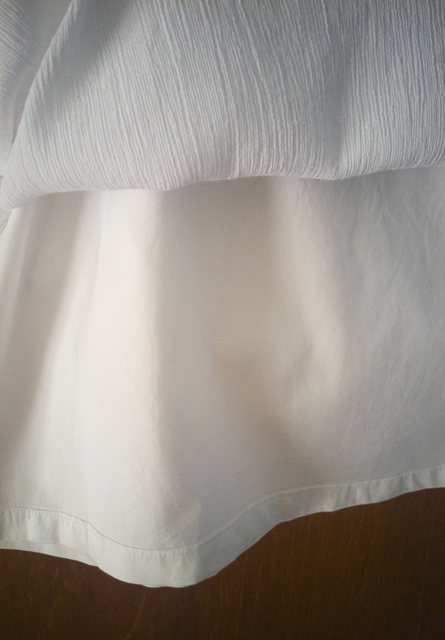
I prepped the fabric by washing it in cold water and tumbling dry on low heat, which caused its already crinkly surface to pull in even further, making it much too narrow for the pattern pieces. After consulting a few discussion threads online, the only advice I could find was to relax the fabric with steam. I was dubious—wouldn’t it ruin the very thing about the fabric that attracted me to it in the first place?—but after aggressively steaming the yardage and even gently tugging/prodding it until the selvages were straight again, it was wide enough to use and still had those characteristic crinkles, albeit less deeply furrowed. Like the gauze of the original, this fabric is sheer when the light hits it, so I decided to line the skirt with leftover white cotton sateen I had in stash from lining my Garden Party Dress.

I attached the lining by serging it to the shell and the waistband, simultaneously securing the lining, creating the casing for the elastic, and finishing the edge. The serging is invisible because it ends up sandwiched between the shell and lining when everything is turned right-sides-out.

After the success of my super simple tartan scarf, I decided to finish the skirt hem with my rolled hem foot. The act of pulling the stretchy material taut to feed it through the foot led to the lettuce edging, which I should have expected but ended up pleasantly surprised by. It will take a little practice to achieve a consistently ruffled edge, but I’m happy with the outcome.

The lining was turned up 3/4″, then turned up again 1″ and edgestitched, for a deep hem and a clean finish.

For the elastic waist, I ended up changing the length of the elastic to get a snug fit, but I forgot to write down by how much. Whoops. I did follow the tip included in the instructions to use little strips of fusible interfacing to glue down the side seam allowances within the waistband, to make it easier to thread the elastic through the casing, and it worked a treat.

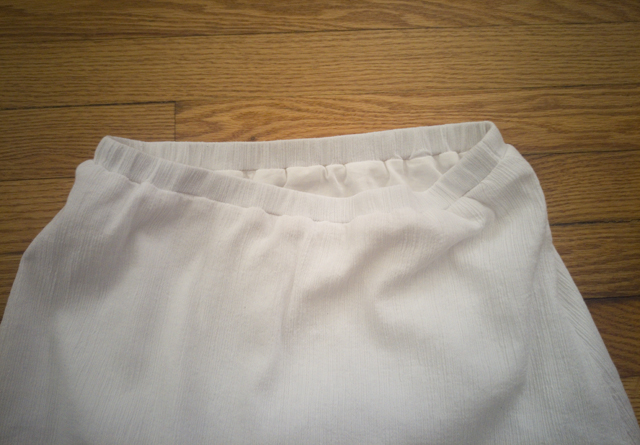
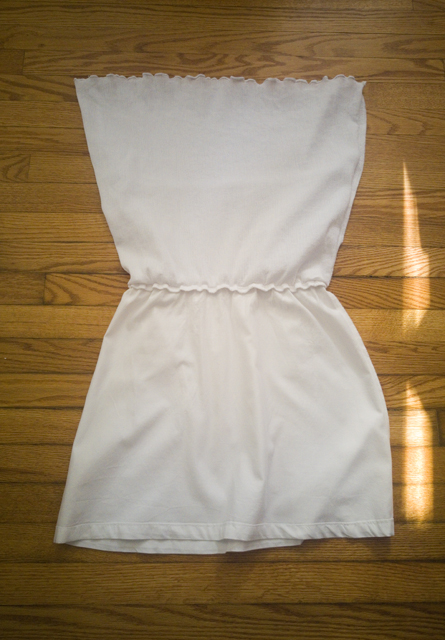
At this point, you may well be wondering why there are no modeled shots, especially given the attention to detail in both the sewing and the posting. The truth is, after wearing it one time for Me-Made-May, I realized that something is wrong with the waist. Instead of lying smoothly when stretched the way its predecessor did, it has this weird puffiness right below the elastic that stubbornly refuses flatten out. Maybe it’s because the fabric is slightly gathered, or maybe it just has more body than my beloved older skirt did, but in any case, it looks horrible under the fitted and semi-fitted shirts I prefer. Maybe it would look okay under a boxy, drapy tee, but that’s not a combination I see myself wearing. So it’s probably destined for the donation pile, in the hopes that someone else will love it when I can’t, and I’m back to the drawing board for the perfect summer skirt.

What’s your perfect summer skirt look like? Is it something you own already, or are you still on the hunt for it?

FO: Oxidation

With the leftovers from Justin’s cabled hat and my own, I had exactly enough yarn to create a third hat. I’d hoped for as much when I bought the yarns—just ask Rebecca at Warm ‘n Fuzzy—but it was a huge relief when my little yarn scale confirmed it.

Rather than knit more stripes, because I’ve had enough of stripes for a while, I decided that there was no better time than now to try my hand at stranded knitting. Since I knew my yarn was limited, I didn’t bother trying to find a pattern, and instead improvised based on my most recent hat and some guidance from Ann Budd’s The Knitter’s Handy Book of Patterns.

I’ll admit I felt a bit of trepidation, which is silly, because I didn’t feel a single flutter of anxiety when I first tried cables. Maybe it’s because my very first knitting project was cabled, and I didn’t know enough to have the slightest idea what to worry about. Now that I’ve knit a while, I know what to fret about: Tension. Color dominance. Insufficient contrast.

There was nothing I could do about the combination of colors, since I was already committed to using up the yarn, and tension would only be solved with  practice and patience, so the only thing left was color dominance, which I was aware of and could easily look up online. Ysolda has a great introduction to the theory of color dominance on her blog, but the one thing she neglects to mention is the more practical question of how to carry the yarns so that the dominant and subordinate colors aren’t switched accidentally. Enter Dianna of Paper Tiger, who helpfully explains which yarn is dominant when knitting with one color held in each hand, both colors held in one hand, and with one color at a time. Thanks Dianna!

I knit continental, and I was tempted to hold both yarns in my left hand to keep things familiar. But I’ve heard that, once you get used to it, holding one yarn in each hand is quite speedy and prevents the yarn from getting twisted or tangled, so it seemed like it would be worth the effort to learn to do it that way.

It was pretty awkward. As expected, I struggled to keep the tension even. My tight-knitting tendencies are so strong that the blue stitches, which should be dominant/larger, are in several places dwarfed by the background copper stitches. Every time I started to get into the rhythm of alternating hands, I’d notice that things were moving a little more smoothly and promptly lose focus and knit the wrong color or drop the yarn.

But wouldn’t you know, it flew off the needles anyway. Anyone who’s ever said that there’s an addictive quality to knitting colorwork was definitely on to something. Before I knew it, I’d run out of blue yarn and it was time to decrease the crown and cinch it up.

If you’re curious about the knitting specifics, you can check out the notes on my project in Ravelry. The only thing of note is the crown, which has eight sections instead of the typical six. This was purely down to the number of stitches I’d cast on at the beginning. It does work, but I think there’s a good reason that six sections is the norm: this crown doesn’t lie down as smoothly, and it has a tendency to make the whole hat ride up a smidge, which you can see in the close-up above and the two pictures below.

The scarf I’m wearing is also me-made. It’s a lovely, drapey 100% rayon in a pattern and colors that I love that I snagged from Jo-Ann several months ago. Sadly, I should have purchased a longer piece than I did, because the woman at the counter did a poor job cutting it, so I lost a fair amount straightening up the edges. Once the corners were squared, though, it was a simple matter of rolled hemming the long edges, zig-zag stitching the short edges, and then removing weft threads to create a fringe on the ends.

There are several suggestions online for sewing a rolled hem. Grainline Studio recommends sewing a line of stitching to use as a guide for pressing, stitching, and trimming before pressing and stitching a second time. Craftsy suggests using a teeny tiny strip of interfacing to encourage the first several inches of the fabric to roll properly. I chose to take Megan Nielsen’s advice, which is to sew a few stitches without feeding it through the rolled hem foot, pull the fabric free without cutting the threads, and then use the thread to guide the fabric into the foot and sew.

I can confidently say that, after sewing the edges of this scarf, I am about two iotas better at using the rolled hem foot. Megan’s advice certainly helped to get things started, but keeping the hem even as you go along seems to come down to firm and steady tension applied to the fabric and a keen eye to keep it from veering too far into or out of the foot. So, practice.

Luckily, I got a to try my hand at it again on my next make, coming up next week. Today, I’ll leave you with my favorite photo from this shoot:

FO: Floral Sorbetto

Back at the beginning of January, I wanted to sew up a two-yard cut of navy corduroy that I bought during Hancock Fabrics’ going out of business sale into a button-front skirt. Strangely reluctant to spend money on a suitable pattern, such as the Pauline Alice Rosarí, and apparently incapable of judging the value of my own time as well, I embarked on a daring adventure to hack Simplicity 1465, which is a pencil skirt with a facing instead of a waistband, front and back darts, an invisible zip in the back, and no lining, into a pegged, button-front skirt with a lining attached to integrated waistband-and-button-placket facings. Several evenings and weekends went toward making flat pattern adjustments and baste-fitting the pieces to get the styles lines I wanted and the correct dart sizes and hip curves.

Things were going swimmingly until I had to install the lining into the shell. Suddenly, things went from fitting well to being too small to close in the front by several inches. Unsure whether it was a drafting, cutting, or sewing mistake (or all three), and lacking the fabric to re-cut all of the pieces, I fell into a sewing funk. I’d wanted the finished skirt very badly, but even after several days of cooling off didn’t feel like I had the wherewithal to sort out the mess.

Wanting to get out of my rut, I cast about for an easy project that I could accomplish quickly with few or no adjustments to boost my confidence. Conveniently, Colette had launched the New Sorbetto, an update to their original free top pattern, and I had a remnant of cotton lawn from my Garden Party Dress lingering in my stash that I felt was destined for better things than just pocket bags.

Because Colette drafts for a C cup, I cut a size 4 and did a 2″ SBA, which I prefer to think of as a Sufficient Bust Adjustment rather than a Small Bust Adjustment. Tutorials for bust adjustments abound online, but I went ahead and used the one offered by Colette on the Sewalongs website.

Side note: Measuring as an A cup for this pattern made me laugh, because I’m currently in need of new bras and I’ve recently determined that I’m not a 34B, nor even a 32C, but probably a 30D. (In fact, if I were to follow A Bra That Fits’ Bra Size Calculator, I’m on the cusp of 26E/28DD.) This isn’t to suggest I think that Colette’s sizing is wrong, but rather to highlight one of the many instances where two clothing-based industries use the same terminology—cup size—but arrive at it using two different sets of measurements: Colette is interested in the difference between one’s high bust or upper torso measurement and one’s full bust measurement, whereas bra companies are interested in the difference between one’s full bust and one’s underbust measurement. Just a little reminder that it pays to understand how a clothing manufacturer or a pattern designer approaches measurements and sizing schemes if you want to nail your fit.

My remnant was L-shaped with narrow legs, so I had to sacrifice the center pleat in order to get the front and back pieces to fit. I did, however, have a square large enough to make continuous bias tape to bind the neckline and armholes. I like that continuous method of making bias tape, but struggle to make my bias tape a consistent width when using it, so instead of binding the edges as instructed I created bias facings on the outside of garment, like the ones on the Sewaholic Dunbar, and then edgestitched them down as instructed using a dark gold all-purpose thread that matches the darker yellow flowers in the top. The bottom has a narrow hem, folded under twice and topstitched down with the same dark gold thread.

The fit is a little more boxy than I’d like, but about what one would expect from a pull-on woven top in a lightly structured fabric. I’d really like to take a crack at this in a drapier fabric like rayon challis or even a lightweight jersey; I have a few sleeveless Portofino shirts from Express that I live in during the sweltering summer months, and I’d love nothing more than to fill my closet with a pared-down version of them using this pattern.

You can’t tell here, but the fabric is slightly sheer, and the armholes are a tad low, so I’m wearing it over a white camisole. That’s how I plan to wear it to the office, but I have no doubt that on the weekends when the temperatures climb I’ll ditch the cami. In future less-sheer versions I’ll probably shave a little off the top of the straps in order to raise the armholes and bust darts slightly to avoid the need for a cami entirely.

I know the Sorbetto is old news in the sewing world, but for anyone who, like me, didn’t sew it up the first time around, I offer up this warning about the new pattern: the instruction file is really, really long, coming in at 36 pages. While I have no doubt that novices or less confident stitchers might find things like the detailed cutting layouts useful, the sheer volume here is a bit overwhelming, and it’s also a bit of a nuisance to get to key pieces of information (size charts are buried on pages 11-12, and the actual sewing instructions don’t start until page 26). Once you’ve sewn it once it would be easy enough to dispense with the instructions entirely, but if you need to quickly check for confirmation of a seam allowance or what have you, CTRL F is your friend.

Overall, I accomplished what I set out to do: I used a pattern and fabric I had on hand, made minimal adjustments, finished in a few leisurely evenings, and ended up with a top that I can wear throughout the warmer months. I’m feeling refreshed and ready to tackle more sewing projects. Hurray!

Me-Made-May ’17: My Pledge

What’s this?

I, Caitlyn of Practice Makes Pretty, sign up as a participant of Me-Made-May ’17. I endeavor to wear a self-made garment at least four days of each week for the duration of May 2017.

That’s right. No more sitting on the sidelines while this great maker community supports, encourages, and celebrates one another. No more watching the parade of lovely handmade garments and accessories and lamenting my own lack of me-mades. No more hollow self-consolation, telling myself “I’ll be ready next year.”

I want in, and I don’t want to wait any more. Time to stop holding myself back.

Am I ready? I don’t think so, not yet. But I will be. I know that Zoe is firmly opposed to panic-sewing, but as she points out in her MMM’17 announcement, “if you want to use taking part in the challenge as the kick in the butt you need to finally hem that half-finished skirt, or rework an ill-fitting garment, then great.” I’d like to think this includes projects that you have the materials for and want to make, but haven’t started yet.

So, during the month of April, I’m (unofficially) committing to carving out time every day to work through as many of my queued patterns and stashed fabrics as I can. I’ve had garments lingering on my to-make list for months, just waiting for me to sit down and sew. But I’m extremely susceptible to indulging the thrill of planning and the borrowed satisfaction of imagining a finished project, then not following through. So I’m done planning. There is no plan, just sewing. (And knitting.) With a focus on finding joy in the process, and on placing more value in the fact that I finished something than the fact that the thing is good.

Consider the fire lit.

Maker Moment: Make Do and Mend

Throughout the late fall, winter, and early spring months, I live in Express Columnist pants and basic V-neck sweaters for work. Each year I’ve purchased one or two new colors of each, so that now I can go about a week and a half wearing nothing but that uniform before needing to do laundry. The constant wearing and washing eventually takes its toll, however, and over the years I’ve had to mend the occasional dropped hem or split seam.

At some point this past year, I started to let the mending slide. A hidden button came loose, and instead of immediately reattaching it, I put it in a safe place and set the pants aside, intending to deal with them before the next wash. Instead, as soon as I was at the bottom of the drawer and in need of something to wear, I pulled the pants back into rotation, deciding that the button wasn’t really needed anyway and I’d fix it after they’d gone through the wash.

You can see where this is going.

Soon, I found myself pinning up the dropped hem of a pair slacks every time I wore them, each time telling myself that I’d get to them just as soon as they were clean and pressed again. It was important to me that I didn’t look sloppy, but apparently not important enough to take the time to fix the problem properly. Meanwhile, more buttons popped off, pocket bags frayed open, and one by one my sweaters developed holes in the underarms. My pile of to-be-mended garments kept growing, until it started to feel like there were more items in it than out of it. (Not really true, but it certainly felt that way when that’s where all of my most-worn garments were living.)

During the winter’s first (and quite likely only) snowfall, I decided there was no better way to spend a house-bound afternoon than finally buckling down and doing the mending. And as soon as I settled in with needle and thread, I was reminded of how much I actually enjoy hand-sewing. Others may find it tedious, but I find the slow, meticulous, and repetitive nature of the work soothing, especially when accompanied with a hot mug of tea.

In a couple of hours, I was able to hem two pant legs, close up three pocket bags, and repair holes in five sweaters, including invisibly fixing a hole in the middle of a sleeve by grafting the edges closed. When I finally tied off the last thread and announced my success, Justin quipped, “It’s like you have a whole new wardrobe!” When I mentioned my project to a coworker, she had the exact same reaction.

A bit of a stretch? Sure. But they captured the spirit of the thing, which is that giving life back to your favorite garments—whether it’s by mending them or by some other trick, like upcycling—gives you the thrill of “having things to wear,” with the added bonus that you did it yourself.

Have you shown any of your favorite garments, me-made or otherwise, a little love lately? They’ll pay you back for the effort, I promise.