Wardrobe Architect Week 10: The Capsule Palette

Easily the best part of the Wardrobe Architect series is the way each assignment builds upon the previous ones. No task feels frivolous, and as I’ve worked through them my confidence in my choices, in my overall direction, has grown. Back in Week 5 I identified a color palette that speaks to me; in Week 6 I organized my palette into neutrals, nearly neutrals, and statement colors; and today I’m going to narrow my palette down to the colors I want to focus on for my spring/summer wardrobe.

Neutrals

2015-05-27_1_Neutrals

White was a given. Next I added Camel, but when I started thinking about the other colors I wanted to include, I realized that Khaki makes more sense, so I made a substitution. Justin suggested adding Graphite, but I went with Smoke instead for something a little softer and, I think, more suited to warmer weather.

Nearly Neutrals

2015-05-27_2_Nearly-Neutrals


This was a no-brainer: I knew weeks ago that my palette was going to be anchored by and revolve around Navy. I feel happy every time I look at it.

Statement Colors

2015-05-27_3_Statement-Colors

I kid you not—I agonized over this section at first, which is silly, because the whole point of this exercise is to make wardrobe-building less stressful.

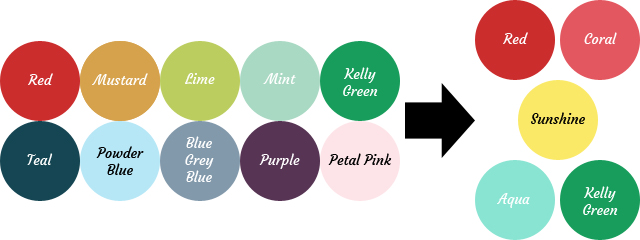
Initially I was thinking Red, Mustard, and Kelly Green, but I felt like I needed a fourth color and I couldn’t settle on one that matched enough of the others. I entertained the idea of adding Purple, but the truth is, while purple used to be my favorite color, and I have several pieces of clothing and jewelry that are purple, I find it difficult to pair with other colors. (This is probably because I’ve avoided yellow for a long time. I thought I couldn’t wear yellow because I’m a fair-skinned blonde, but I’ve since been disabused of that notion by my dear mother and husband.) I’m happy to have a few special purple pieces, but I just wasn’t excited by the prospect of making a bunch of things in that color.

Next I considered Powder Blue, Mint, and Petal Pink. I consider them all solid spring colors, and I’d definitely like to have them represented in my closet, but as the high heat of summer approaches, I’m craving bright, peppy colors instead of pastels.

I started to wonder if I’d made a horrible mistake when assembling my initial palette, since I was no longer feeling certain about the options I’d given myself to work with, and then I found Crafting a Rainbow‘s Me-Made-May 2013 wrap-up, which included a palette with several of the colors I’d been considering, plus a few I hadn’t thought of. So I shamelessly lifted some of her choices. (Thanks, Gillian!) Suddenly, everything clicked into place and I felt confident once more.

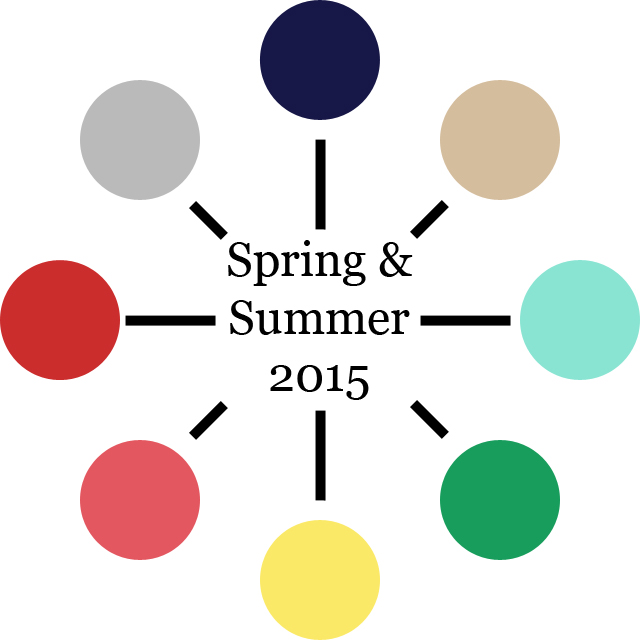
With that solved, I assembled a final palette showcasing the colors I’ll be aiming to work with over the next few months:

2015-05-27_4_Spring-Summer-2015-Palette

Seeing it all in one place makes me so excited, I kind of want to squee. I’m already daydreaming about the outfits I’ll be able to create, but I’m resisting the urge to purchase any fabric or yarn until I’ve got a more concrete plan. Soon, soon…

Maker Moment: Cross-Pollination

Justin and I are both creative people, but we have very different hobbies. Whereas I gravitate toward pursuits that produce tangible results like sewing, knitting, writing, painting, and building, he prefers activities that are more experiential. He especially loves games. He plays board, card, and video games with equal fervor. He’ll play solo, one-on-one, or in big groups; he’s equally comfortable playing with close friends and total strangers. He collects games, curates them, and shares them. He’s nostalgic for the games of his childhood, but also loves to keep up with what’s new. He has a soft spot for games that are historically or culturally significant, even if they’re bad.

I also enjoy games, but to a different degree than he does. He likes to help me with my DIY projects, but he doesn’t have the same dogged determination about them that I do. As you can imagine, we each sometimes struggle to appreciate what is so compelling about the other’s hobbies, since we’re attracted to such different kinds of experiences.

Nevertheless, he’s incredibly supportive of my crafts, even if he’s not particularly interested in doing them himself. So on Thursday when I told him that I got an email saying that Hancock was having a sale on McCall’s patterns for $1.49 each (seriously, go check it out—it’s almost as good at the 5-for-$5 Simplicity patterns they sometimes offer), he had his shoes on and his car keys in hand before I could look up from my phone to see if he’d go with me.

To make things fun, we decided to look through the patterns separately and then compare notes on which ones we liked. I was pretty sure that we’d pick at least a couple of the same patterns, but there was no overlap at all, despite the fact that I had pulled out about 20 and he’d grabbed 7.

With nearly 30 patterns on the table, I had to do some serious culling to stay within the 10-patterns-per-customer limit. Justin very helpfully offered to buy 10 as well, but once I started cutting contenders it got easier. First, I set aside anything that didn’t excite me or that felt aspirational: styles that I want to like because they’re popular or easy to wear, but don’t fit my lifestyle or my dressing habits. Next, I looked for duplicates: any patterns that were similar to others on the table or others I knew I had in my stash did not survive the chopping block. Finally, with a few patterns left to eliminate to get within the limit, I considered which patterns were the most efficient (for lack of a better word): ones that I would make or wear over and over again, ones that fill holes in my current wardrobe, ones with multiple styles options or the potential for pattern hacking. The inefficient patterns went back in the drawer to be found and loved by someone else.

As is usually the case when I’m working on a project and Justin is nearby, I narrated throughout the process, occasionally soliciting his opinion or advice. When I got to step two, where I was concentrating on weeding out duplicates, he said, “This is just like deck-building.”

In competitive card games like Pokémon or Magic: The Gathering, at least 50% of the game consists of assembling one’s deck of cards before playing. Players select an assortment of character, resource, or event cards that they can then play, individually or in combination, against their opponent in order to achieve the game’s objectives (which, in Pokémon and MTG, consists of “attacking” one’s opponent until their health counter reaches zero and they’re knocked out). Much of the discussion for these games revolves around different strategies to win and which cards work well together or can be played in more than one way. Once a player puts together a deck, they’re often encouraged to consider what the weakest or least effective card in the deck is, and how they might replace it with a more effective card or eliminate it entirely.

Watching me weigh various options, Justin saw someone who was building a “deck” of patterns, where the goal was to create a wardrobe of outfits that suit the kind of activities I do while looking and feeling good to wear. (Bonus if they’re also fun to sew.) Just like in deck-building, options that didn’t really fit in with the others I was looking at were bypassed in favor of ones that created a more cohesive set, and options with more than one use were preferred to ones that were more limited.

I had never thought of pattern shopping in this way, had never considered that our two apparently disparate hobbies could share a common language. It’s fascinating to think that a system so specifically crafted in one context could be so readily applicable to another context that it does not overlap in any way.

Of course, there are certainly elements of each context that have no analog. For instance, while many decks are built to win, there are also decks that exist simply because they’re fun to play, with little to no chance of success; in sewing, even just-for-fun pieces, like costumes, or impractical pieces, like a dress made entirely of fringe, would need to fit well enough for someone to wear.

But by finding this common language, I was able to communicate my goals more clearly, and Justin was able to offer more constructive advice. I have a new way of thinking about my own purchasing process—and who knows? Maybe next time it will make things even faster and easier. If nothing else, we both walked away with a better understanding of why the other is so intrigued by the complexities of our respective hobbies. 

Have you ever experienced a moment of cross-pollination like this? Do you have two unrelated hobbies that share an unexpected connection? Does your passion for something help you to better understand someone else’s passion when you otherwise just wouldn’t get it?

Wardrobe Architect Week 9: The Capsule Wardrobe

Like Sarai, I was initially skeptical of the capsule wardrobe, a collection of 20–33 items of clothing that function as the basis of your wardrobe. Her issue was a lack of confidence and, as a result, enthusiasm: she was never sure if she’d picked the right items to make up her capsule wardrobe, so she tended to deviate from her plan, which perpetuated the issue of having nothing that went with anything else.

My issue, which stemmed from a misunderstanding of how it works once assembled, was concern that it would stifle creativity, both in dressing and in shopping/making. Since capsule wardrobes are often talked about in the context of minimalism, there’s a lot of stress on “paring down” or “purging,” and an unspoken expectation that once you’ve completed your capsule wardrobe, there’s little need to buy or make new things except for special occasions. In fact, there’s nothing left to do but cycle through perfectly mixed-and-matched outfits every day and breezily exclaim about how much easier it is to get dressed and how much time you’ve saved (or something like that).

Of course, none of these things are entirely or necessarily true. The truth is that a capsule wardrobe doesn’t have to be the end of your wardrobe unless you want it to be. It’s simply the thing you’re trying to match up to when you’re considering buying or making a new garment and ask yourself, “What would I wear this with?” It would, in theory, provide most or all of the pieces you needed if you had to make an emergency weekend trip and had 15 minutes to pack your bag.

To get the most out of a capsule wardrobe, you can and should set your own rules. The number and type of items isn’t something to be handed down by an “expert;” it varies based on the number and variety of activities you’re regularly involved in. You can re-visit and tweak your capsule wardrobe at any time. You’re not even limited to a single capsule wardrobe—based on your climate, you might have two, three, or four capsules to reflect the seasons.

And the best part about it? Having a capsule wardrobe is not incompatible with sewing frosting, or splurging on the perfect accessory that only matches one outfit. The capsule wardrobe is a foundation that you can build upon with more unusual or niche pieces. It’s not all-or-nothing. Whew!

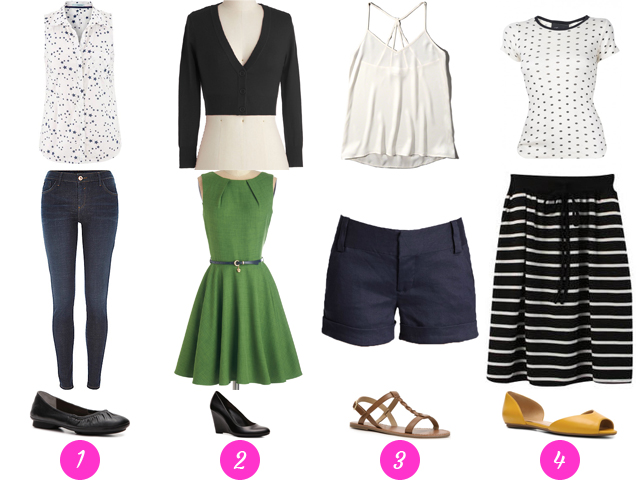
With that said, here are some silhouettes that I’ve been thinking about for building a Summer 2015 capsule wardrobe:

2015-05-20_Capsule-Wardrobe-Silhouettes

Following Sarai’s example, these aren’t the exact outfits I want to make or the colors I’d want them in—for instance, I’m not sure if I’m keen on the neckline of the dress, but it was the best example I could find of a fit-and-flare dress with a circle skirt not modeled by a person—but I think they capture the spirit of the things I like to wear in late spring and throughout summer. I’ll probably throw in drapey cardigans as well. (The only reason I didn’t include them here is that I thought of them after I’d already started to put together my collage and didn’t want to disrupt the symmetry.)

I got stuck after two silhouettes, even though I knew I wouldn’t be satisfied with so few, so Justin very helpfully suggested #3. That, in turn, reminded me that a coworker had been wearing an outfit very similar to #4, and I took notice of it because I liked it so much, so I added that as well.

Reviewing everything together, I feel like I have solid options to work with. I can hardly wait to start matching silhouettes to colors and patterns so I have a guide for future fabric shopping and sewing projects!

Wardrobe Architect Week 8: Hair, Makeup & Beauty

Now there’s a loaded topic if ever there was one. Rather than waxing philosophic about the whys or why nots, let’s stick with the facts: what I do, what I don’t do, what I’d like to do, and, let’s be honest, what I’d like to do but probably can’t be bothered with. Sarai provided a very helpful list of nine questions as a jumping off point, so I’m going to start with those and see where it takes me.

1. What hair style has been most flattering and comfortable for you? How did it make you feel about yourself? Did it invoke any of the words you came up with in our core style exercise?

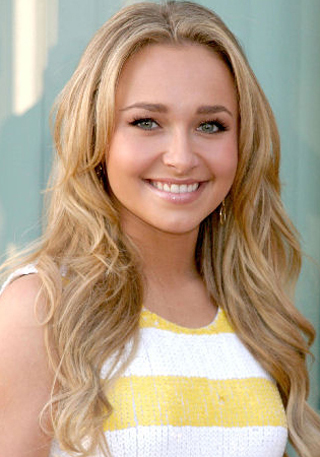
Apart from growing my hair out until I could sit on it and then lopping it all off when I was nine—I got a pixie-ish haircut that was wedge cut in the back—I’ve kept my hair between shoulder and chest length all of my life. Anything shorter than that doesn’t feel like me, and any longer than that is just too difficult to manage. I love layers but don’t wear bangs. My two favorite haircuts looked like this:

2015-05-13_12015-05-13_2

If I could master doing my own hair, or had unlimited access to someone who would do it for me (a girl can dream!), it would look like this:

2015-05-13_4Source

2015-05-13_3Source

Long hair has always felt versatile to me, which is why I like it. Want to keep things simple? Blow it out straight and wear it loose. Want to exude classic elegance? Pull it into a sleek bun or French twist. Want to feel glamorous? Style it as a cascade of curls or waves. Too tired or too busy to fuss with it? Messy buns and claw clips are your friend.

My favorite hairstyles, on good hair days, make me feel like a supermodel. Or a superhero. I feel unselfconscious, feminine, poised. I’m ready for anything. Bring on the wind machine!

2. How much makeup are you comfortable with?

If I feel like wearing makeup, then I’ll do a full face: primer, foundation, powder, blush, eyeshadow primer, eyeshadow, eyeliner, and mascara. (I seldom wear lipstick, even with a full face, but that’s mostly because I haven’t found the right shades yet or the best way to get it to stay put.) But most days I don’t feel like wearing makeup. Even with some practice, I’m not as fast as I’d like, or as creative, or as skillful, and most mornings these days I’d rather hit the snooze button.

This is something I’d like to change, though. I like the way I look in makeup. I like the expressive potential. And some days, I like that it feels like armor against the stresses of dealing with overbearing sales people or socializing with strangers. I—and this is just me talking about my personal experience, not making normative statements or passing judgment—see wearing makeup as another component of feeling put together in my daily life. It’s another element that gets added up with dressing well according to a sense of personal style, being prepared, speaking confidently, and acting decisively. Not wearing makeup isn’t a pass/fail switch; it’s just one more thing that can add to or detract from my sense of being capable of getting my act together. Since it’s a thing that takes time and attention, the fact that I have makeup on means that I deliberately made time for it and gave it my attention.

3. How does your makeup and hair reflect your personal style? What do you feel they say about you and your aesthetics?

My hair and makeup routine are about 50% there in terms of reflecting my personal style. I’ve found the length and general style I prefer for my hair, and feel comfortable trying variations within those parameters. Likewise, I’ve found a couple of color palettes that work well with my complexion and my favorite outfits, and I’ve begun experimenting with different combinations of things like eyeshadow and blush.

Thus far my attitude about hair and makeup has been pretty flexible: I don’t like to agonize over either, and I’ve been okay having a couple of days a week where I put in little or no effort. They’ve reflected my belief that I don’t have to do anything I don’t want to, and that applies to both ends of the spectrum: I don’t have to wear makeup (or fancy clothes, or a perfectly coordinated handbag) if it feels like work instead of fun, and I don’t have to feel guilty if I want to lavish time on myself to perfect a look (via makeup or aforementioned clothes and handbag). I’ve more than proven to myself that I’m comfortable keeping things simple even when those around me are decked out; now, I’d like to take everything up a notch by learning to consistently execute my favorite looks.

4. How much product do you want to own? Do you like collecting products, or would you rather just have a few essentials? How much bathroom clutter are you OK with?

Moderation rules when it comes to my beauty products. I’m not a collector, but neither do I find minimalism particularly appealing (and I have no interest at all in enforcing an arbitrary minimalist policy). I gravitate toward the practice of having a core group of products that I keep coming back to, supplemented by a small, changing collection of products that I’m trying out or only using seasonally/sparingly/for specific occasions.

5. What requirements do you have for the products you buy? Do you stick with all-natural products? Are there ingredients you avoid?

My only requirement for beauty products right now is performance: I choose whatever does the best job for me. Sometimes this is an all-natural product, often it’s not. I’d avoid any ingredients that irritated my skin, but I’ve not found any yet that produced a severe reaction.

6. What colors feel best near your face? How do they relate to the color palette you created?

I love how teal makes my eyes look more blue, which is probably why it’s included in my color palette. Rose gold and peachy shades were a surprising discovery for me, although for now I think I’m more comfortable with makeup in those colors than clothes.

7. What colors never look right near your face? What colors have you tried and given up on before?

Cool pinks and purples don’t work for me, at least not in makeup form. I’ve always viewed yellow and orange clothes as suspect, although that stems more from a fear that they’ll look bad than from any bad experiences.

8. How much time do you realistically want to spend getting ready in the morning?

About an hour, including time to shower, dress, brush my teeth, do my hair and makeup, and find my shoes, which are never where I thought they put them.

9. What types of scents do you gravitate towards? Do you wear perfume? Other scented products? What do you feel the scents you like communicate about your personality?

Fresh, crisp scents are my favorite. I like the smell of clean cotton sheets, fruit (except peaches), foliage, and delicately scented flowers. I avoid anything that smells like baby powder. I don’t care for spicy fragrances and heavy florals; anything too rich tends to feel more mature (if you know what I mean) or more sexy than I care for and not really me. I like perfumes that convey youthfulness without being overly sweet. While I want my clothes to communicate that I’m a bit polished and classy, I want my perfume to suggest that I’m not fussy or forced.

Of these questions, I found #2,#3, and #8 most helpful to think about, but I’ll admit I’d never even thought about #9 and scents as an element of personal style before. Which question do you find the most interesting? Do you think about your beauty routine the same way you think about your wardrobe?

FO: Sage Pleated Skirt

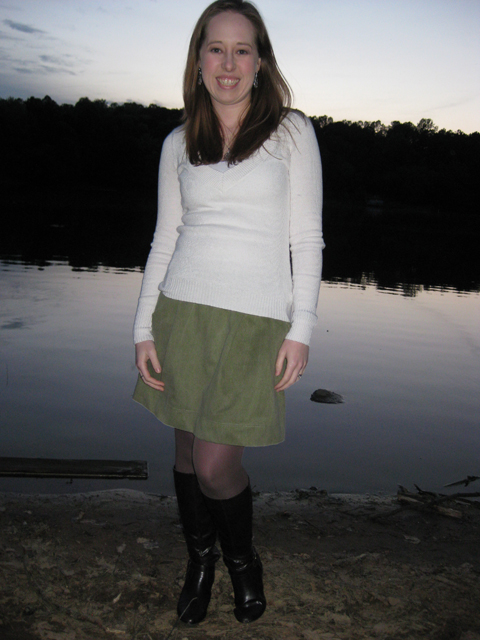
2015-05-11_01_S-2226_Modeled-Skirt-Front

Or, proof that I actually sew things!
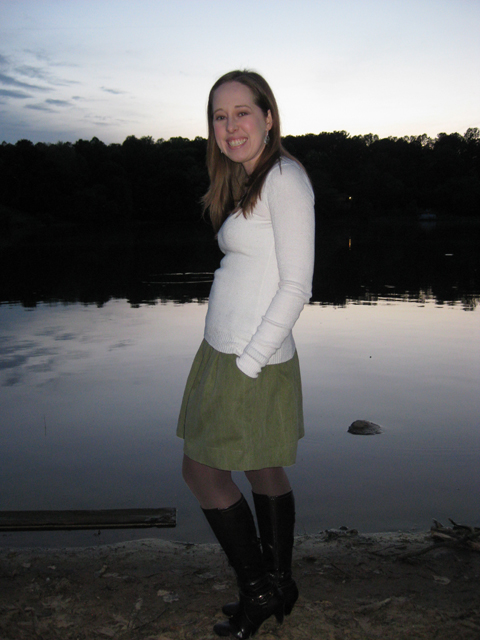
2015-05-11_02_S-2226_Modeled-Skirt-Side

And not just any things—clothes!

2015-05-11_03_S-2226_Modeled-Skirt-Back

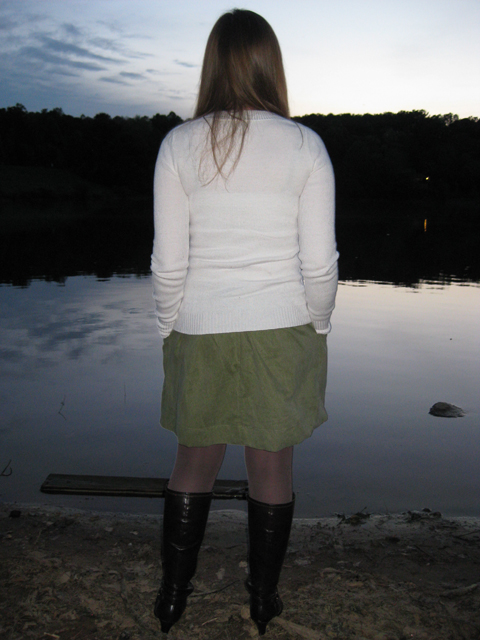
Real clothes, the kind that will keep you decent in public places like Shelley Lake Park.

Almost two years ago, when I was still living in Virginia and had access to an independent fabric store but had not yet heard of the bounty that is five-for-$5 Simplicity pattern sales, I decided I was going to buy a couple of versatile basic patterns and some pretty fabric and start making my own clothes. One of those patterns was Simplicity 2226, a simple pleated skirt with pockets and belt loops and an optional sash belt.
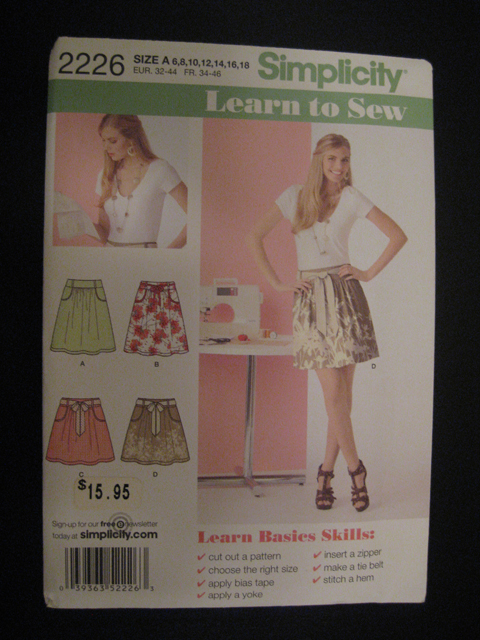
2015-05-11_04_S-2226-Pattern-Envelope

I paid full retail price for the patterns (ouch!), bought entirely inappropriate fabric (stiff quilting cotton anyone?), pre-washed everything, then promptly chickened out and put everything in a box to be largely ignored.

When I pulled out that box a few weeks ago, I realized that I had everything I needed to complete at least one of those projects, which would serve the diverse purposes of using up a sizable fabric remnant, adding a skirt to my closet (which currently has no fall/winter skirts), trying a few techniques that I’d seen on blogs but never used before, and getting friendly with my serger. It also gave me a chance to break a long streak of being too afraid to start anything in case I stalled or failed. It’s true: I have the opposite of startitis, and it’s the #1 enemy of my sewing and knitting. One of my resolutions this year is to conquer this irrational fear.
2015-05-11_05_S-2226_Skirt-Front-Outside

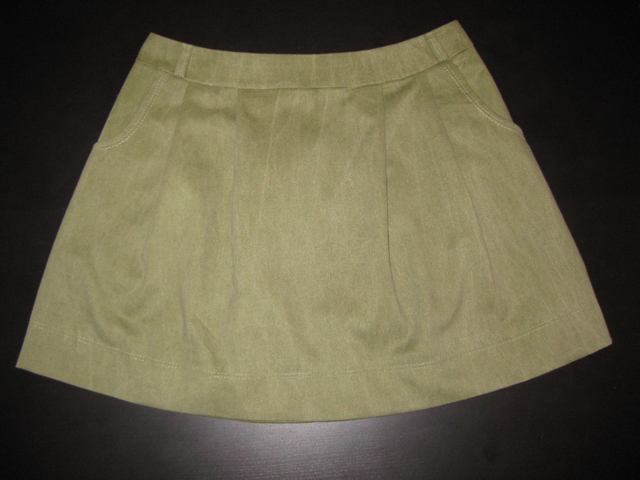
The pattern, as I said, is Simplicity 2226. I made View A, but cut it to the length of View B/C/D. I used a sage green brushed cotton twill, which I originally purchased more than five years ago to make a doublet for a Renaissance faire costume, for the main fabric. I largely relied on the pattern for guidelines on construction order; I know it’s a beginner pattern, but I still found it lacking in more than a few areas and ended up tweaking it to suit my fabric/equipment and to incorporate better techniques I’ve seen others use.

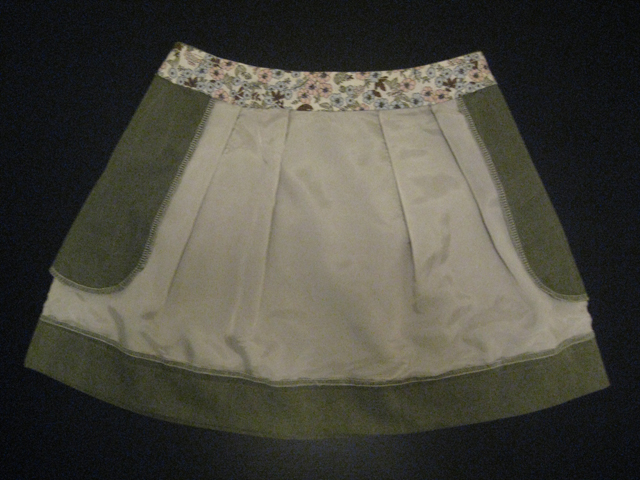
Based on my initial fabric choice, I decided to buy a cream rayon bemberg to underline the skirt and a Liberty-like floral quilting cotton for the waistband facing and pockets. The pattern doesn’t include instructions for lining or underlining— a somewhat shortsighted decision since it recommends fabrics like twills, sateens, and wools—and I knew my twill would cling to tights, so I basted the underlining to the main fabric immediately after cutting out all of the pieces, and left them basted together until I seamed/hemmed each of the edges. The pattern also calls self-facing the waistband and yoke/pockets—again, somewhat ill-advised given many of the suggested fabrics—but I knew the twill would be too heavy for that to work well, so I substituted the quilting cotton.
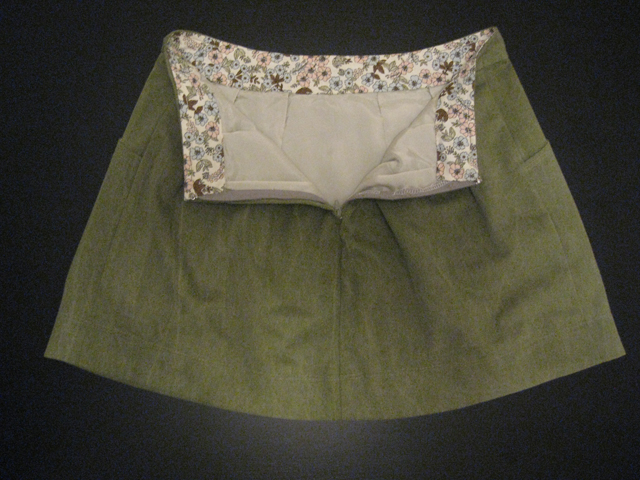
2015-05-11_06_S-2226_Skirt-Unzipped

2015-05-11_07_S-2226_Skirt-Front-Inside

The first major change I made was to choose a size based on wearing the skirt at my hips (my preference) rather than at my natural waist (as intended). I went to the pattern envelope expecting to find the finished waist measurements so I could choose a waist size close to my hip size, but the only finished measurement is the length. I guess that would be important to some people, but it certainly didn’t help me any. Next I went to the pattern pieces, expecting to find the familiar plus-in-a-circle with the key measurements next to it. No dice. What? Nowhere on the pattern or envelope can you find finished waist and hip measurements, nor can you find any indication of how much ease the pattern incorporates—not even generic terms like close-fitting or loose-fitting. Simplicity wants the sewist to stick to the body measurement chart and trust the company’s ease choices.

Since we all know how that story ends, I whipped out a flexible tape measure and measured the waistband piece, accounting for seam allowances and whatnot. I fell between a 16 and an 18, so I cut the larger size to be safe. This ended up being overkill, for reasons I’ll explain shortly.

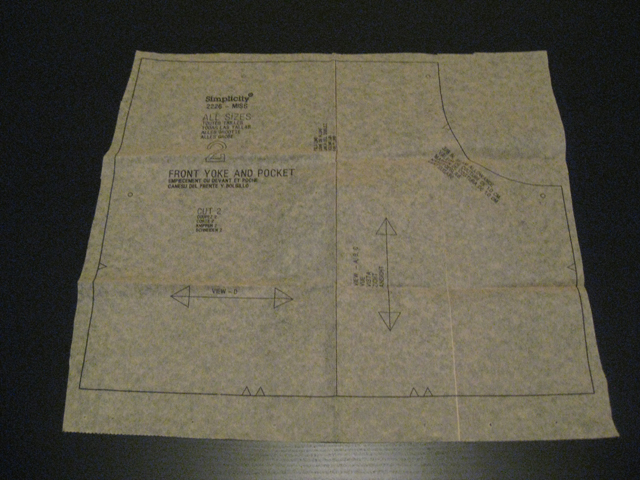
The other major change I made was to the Front Yoke and Pocket piece. This is supposed to be a pattern for absolute beginners, but I think that, in an effort to make things easier, the pattern actually makes the construction more complicated because it’s harder to visualize. I know it took me way longer than it should have to understand what was supposed to happen.

Here’s the Front Yoke and Pocket pattern piece:
2015-05-11_08_S-2226-Front-Yoke-Pocket

And here’s what you’re supposed to do with it:
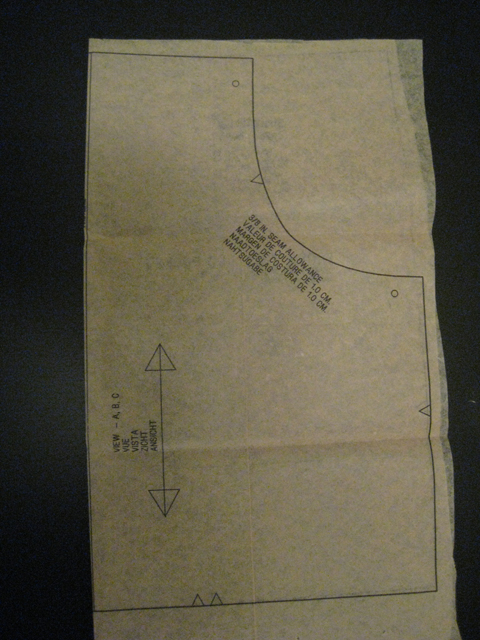
2015-05-11_09_S-2226-Front-Yoke-Pocket

It’s a little difficult to see in this photo, but by folding it in half and stitching around the bottom and side, the fabric creates the yoke and pocket all at once. Okay, so it’s not exactly masterwork fabric origami, but I’ve never encountered a pattern or a piece of RTW clothing with this manner of construction. Sure, it eliminates the need for separate yoke and pocket pieces, which reduces the overall number of pattern pieces by one, and cuts down on the number of edges that need to be sewed, but it also creates a pretty bulky, shapeless pocket.

Since I was using a heavier bottom-weight fabric for my skirt, I knew this was just not going to work, so I borrowed the yoke and pocket pattern pieces from Simplicity 2451 instead. To make sure everything would line up around the pocket opening and side seam, I laid the new pieces over the originals, lining them up as closely as possible, and traced them off.

I assembled the skirt using both my serger and my sewing machine. Before I started reading sewing blogs I had no idea you were supposed to finish your seam allowances (aside: let’s agree to never look at the guts of any of the costumes I’ve made, shall we?), and I’ve always liked the look of serged seams on RTW items, so I went a little crazy and serged everything I could.
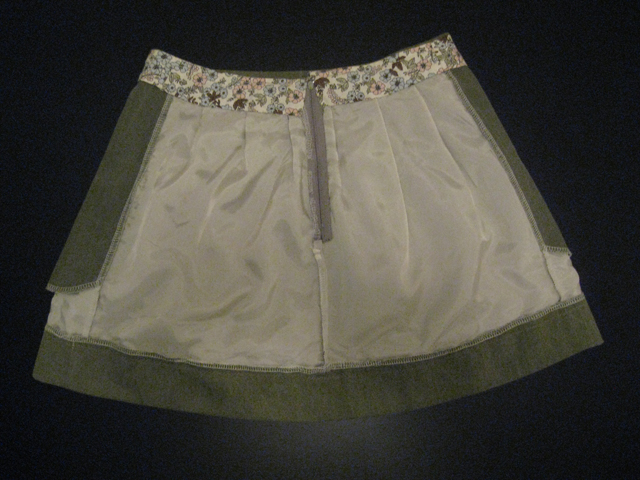
2015-05-11_10_S-2226_Skirt-Back-Inside

The instructions weren’t written with a serger in mind, though, so there are a places where I should have serged before assembling, like the zipper.
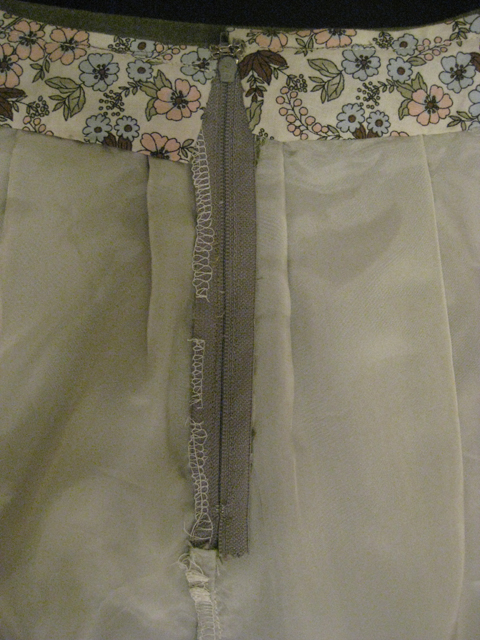
2015-05-11_11_S-2226_Zipper-Close-Up

I had to pick apart some of the serging because I’d accidentally sewn the zipper shut. I’m just glad I didn’t chew any irreparable holes in the fabric. Live and learn.

Oh, and speaking of learning! That’s the first time I’ve done a lapped zipper. I had no idea I was in for one until I got to that step—I even thought I’d bought the wrong zipper by mistake, since I’ve only done invisible zippers up until now. I’ll admit it was tricky to get my head around at first, but after reading the pattern instructions and the instructions that came with the zipper about 50 times each, I finally decided to just follow each step and see where I ended up. As it turns out, following the instructions is a pretty solid path to success. I was a little surprised, considering the weirdness surrounding the yoke and pocket, but the pattern instructions delivered. And I have to say, I think I like the look of the lapped zipper. I wouldn’t use it all the time, but it seems like it’s a better choice for this skirt than a more delicate invisible zipper would have been. The top of the zipper isn’t even, but I think that actually has less to do with my zipper insertion and more to do with my waistband hacks. (Also, I can’t see it, so I’m not really bothered by it.)

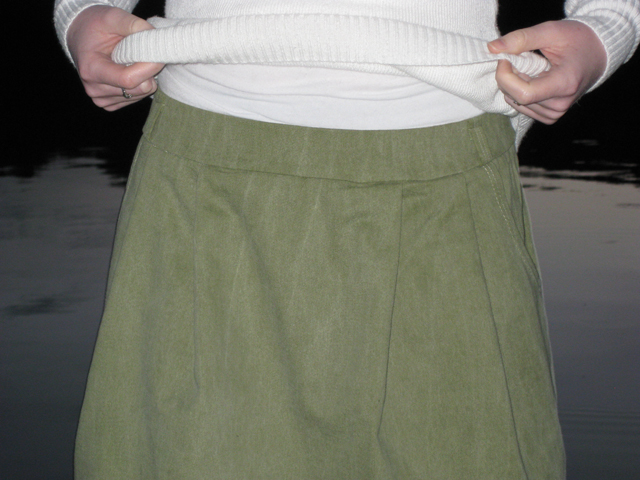
See, after I attached the waistband to the skirt, I decided it was too tall at 3 inches, so I cut it down to 1.625 inches. If you remember geometry at all (or have passable spatial manipulation abilities), you know that when you cut the top edge from a curved shape the new top edge is longer. Since I hadn’t accounted for this change in the flat pattern, the skirt ended up several sizes too large. Luckily, it was a relatively simple matter to pinch out and remove about 3.5 inches from each side at the center back seam. I did lose a pleat on each side of the zipper, which brought the next pleat on each side very close to the zipper and pulled the side seams toward the back, but I think it still looks fine. It probably goes without saying, but I also shortened the belt loops accordingly.
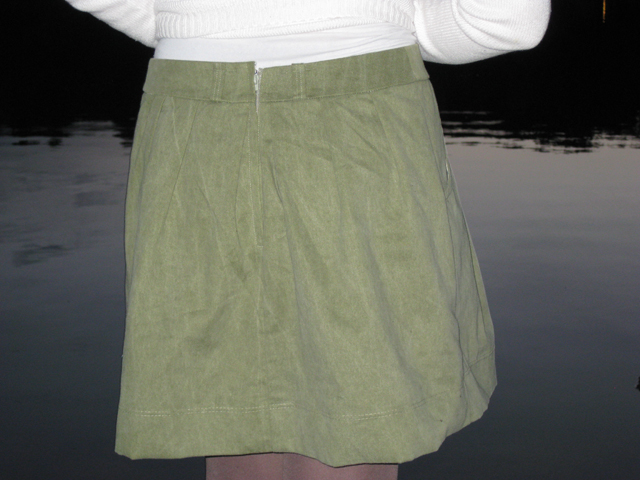
2015-05-11_12_S-2226_Modeled-Zipper-Close-Up

The pattern actually calls for gathering at the waist, but when I tried it (using the clever trick of sewing a zigzag stitch over dental floss) it was way too bulky and puffy. Not a good look. So I converted the gathers to pleats. The distance between the seams was twice as long on the skirt as on the waistband, so I had plenty of material to work with and it divided evenly into four pleats on the front and three on each side in the back. I used a combination of basic math and eyeballing to get the final arrangement you see here.
2015-05-11_13_S-2226_Modeled-Waistband-Close-Up

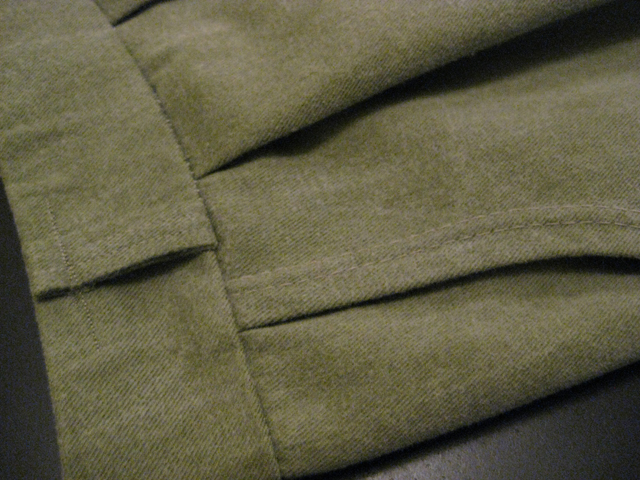
The shorter length was still a bit too long, so I folded up an extra-deep hem to make it hit above my knees instead of cutting across them. The hem was topstitched with a twin needle, as were the pocket openings. In hindsight I wish I’d bought heavier thread for the topstitching; all I had was all-purpose thread, but I wasn’t about to make a trip to the fabric store for it—that way lies impulse buys—so I settled for a longer stitch length. I also debated whether I should have used a single row of topstitching across the top and bottom of the waistband, but since it will likely be covered most of the time it probably doesn’t matter one way or the other.
2015-05-11_14_S-2226_Topstitching

All in all, it’s a cute and comfy skirt that will pair nicely with tights and boots. I’ll need to work on finding or making more tops to go with it, but since the temperature here shot from the 60s to the 80s in the course of a week, I don’t think I’ll be pulling this back out until October or November.

Will I make this pattern again? I don’t think so. I want variety in my skirt selection, and while I think this would work just fine in other fabrics, I think there are other shapes I’d rather have more of—or at least try out—first.

Would I recommend this pattern to others? Meh. I think the yoke and pocket construction as written is dumb, but the instructions are otherwise clear and well-illustrated for the most part (with the exception of maybe one diagram in the lapped zipper insertion section). The construction is straightforward without being completely boring, but it still really bugs me that there are no finished measurements anywhere on the envelope or pattern. You could undoubtedly do worse for patterns, but I also feel like you could do better. If you have the pattern already I think it’s worth making up, but if you don’t, I wouldn’t go out of my way to buy it.

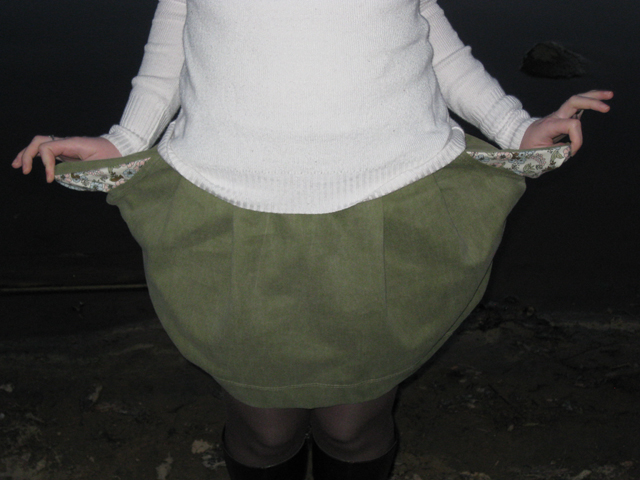
Before we say a final farewell (for the next five or six months at least), here’s a fun picture with the pockets turned out as far as they’ll go. Imagine they’re waving goodbye to winter and hello to spring/summer.
2015-05-11_15_S-2226_Modeled-Pockets