For Halloween, Justin and I like to choose a specific theme rather than going with broadly scary. In past years we’ve dressed as Alice and the Mad Hatter, Sora and Kairi from Kingdom Hearts, Agent Coulson and Agent Hill from The Avengers, and Bill and Zoe as part of an awesome from Left 4 Dead group costume. In 2016, as I was thinking back to movies and games we’d enjoyed over the previous 12 months, I decided that it would be fun to do Star Wars: The Force Awakens. I was keen on being Rey, but Justin wasn’t really feeling either Finn or Poe, and I have to admit that putting together either of those costumes would have been a lot more challenging than I was ready or willing to tackle. So after tossing out a few other ideas, Justin suggested Pokémon. He watched the show a lot as a kid, Pokémon GO was tricking motivating him to exercise more than any other activity, and it would be instantly recognizable, so he was heavily invested in the idea. I figured there were plenty of costume opportunities, so I said yes.
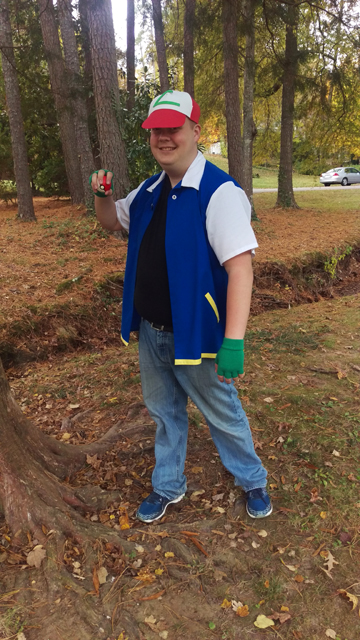
Justin decided to be Ash Ketchum, the hero of the story and easily one of the most recognizable characters after his Pokémon companion Pikachu. Ash’s outfit is simple, so I chose to start with it to warm up for more involved sewing. I looked for the simplest men’s button-up pattern I could find, one with short sleeves and a plain (not notched) collar and without a yoke, pleats, or collar stand, and I came up with Simplicity 8180. I cut View B in size XL but straightened the bottom hem, borrowed the collar from View A, and omitted the pocket and buttons. I also added a center back seam to mimic the character design from the show. I cut the two back pieces to include the selvage so I wouldn’t have to finish the edges—the first time I’ve tried this shortcut—and I rather like it. While it’s not the most impressive finish, it’s perfectly suitable for this kind of project, and gives you the peace of mind that the edges of the fabric won’t fray to bits while you’re handling everything.
The pattern bills itself as a 3 hour™ design (sewing time only, they are hasty to clarify on the envelope), and at the outset I would have agreed. However, when I reached the instructions for the collar—which come quite early in the assembly process—I found myself confused and uncertain. Now, I confess that I’ve not sewn a man’s shirt before, so collar construction is new territory for me, but these instructions do the sewist no favors. For example, they tell you to apply interfacing to one of the two identical collar pieces, do a bit of stitching and clipping, and then sew the facing to the collar. But they never identify which piece is the facing and which is the collar, and this matters, because your next steps involve pressing the facing and seam away from the collar and understitching. If you don’t know which piece is which, how are you supposed to know which way to press and which piece to understitch? I certainly didn’t.
I spent a not-inconsiderable amount of time trying to follow the diagrams and mentally (and physically) manipulate the pieces to figure out the correct answer, then hazarded a guess that the piece with the interfacing applied to it was the facing—a reasonable assumption, wouldn’t you agree?—and quickly discovered that this is not the case. I was able to unpick and re-sew without needing to cut new pieces, but it was a time-consuming stumble that could have been avoided with a single line, or maybe even just a few words, of additional explanation.
Fortunately, the collar came out looking pretty good anway, although I wish I’d remembered to stitch across the corners rather than pivoting at the corners to get a sharper point (a tip that I think I first saw on Melly Sews).
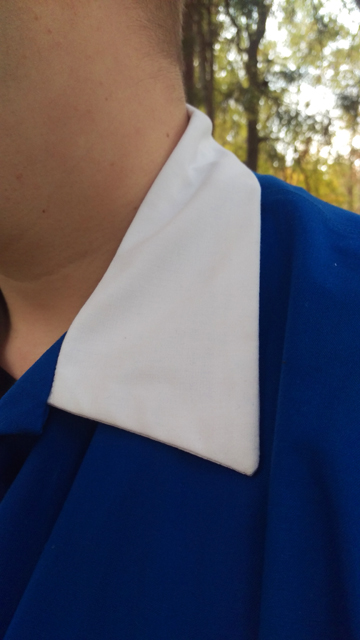
I didn’t particularly like the way attaching and finishing the collar intersects with sewing the facings for the front opening. It was bulky, awkward, and I feel like there are raw edges lurking just in the wings, waiting to pop free and unravel. I suppose the construction is probably due to the lack of collar stand, but surely there must have been a better way? It makes me want to sew a proper man’s shirt with stands and plackets and no raw edges in sight.
For the front opening, I subtracted width from the front shirt pieces and the facings to meet in the middle instead of overlapping. I interfaced the facings according to the instructions, and I pinked the free edge before folding under and stitching.
For the snap, I simply drew a square extension with seam allowances on the right front and right front facing to accommodate a Size 24 heavy-duty brass snap. I installed the snap using a basic snap setting kit and hammer. Although cutting into the finished shirt made me anxious, hammering in the snap pieces was great fun and very satisfying—I heartily recommend it.
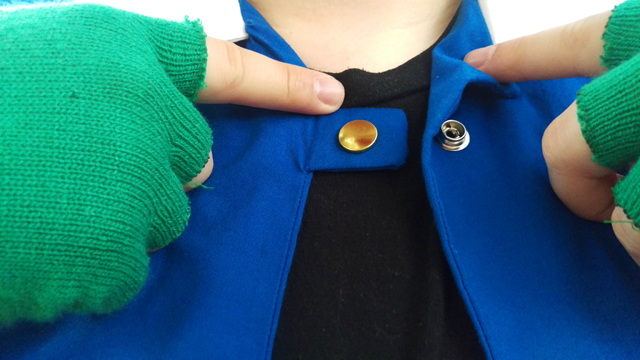
In hindsight, I wish I’d further reinforced the snap tab with an additional layer or two of interfacing. I fastened the snap one time to make sure it worked, and was a little afraid that I’d tear the fabric before I could separate the halves again. Luckily, Ash always wears his shirt open, so the snap doesn’t really need to be functional. (But it did need to be a snap, not a decorative button. I was adamant about that, much to Justin’s amusement.)
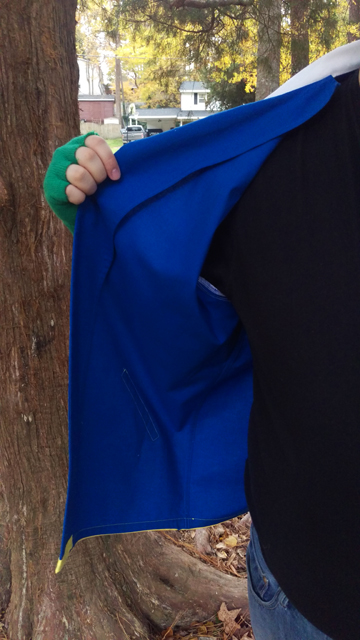
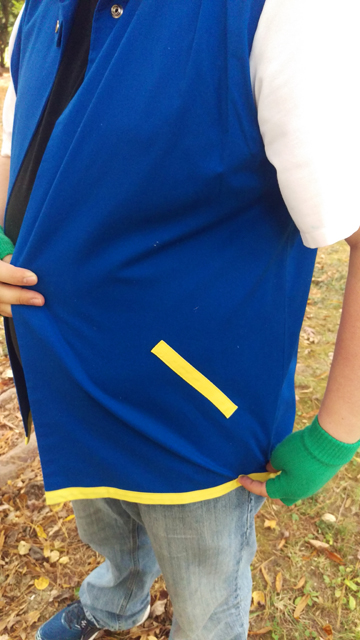
The bottom edge of the shirt is finished with self-made bias tape. In order to effectively conceal all of the raw edges and not cause issues with the front facings laying flat on the inside, I treated it like a reverse bias facing, attaching it to the inside and then turning the bias tape and the raw edges to the outside, machine stitching it down, and polishing it off with a bit of hand stitching where needed. Up close, the yellow fabric is a bit sheer and the raw edges are visible through it, but at a distance it’s unnoticeable. The faux pockets were made by stitching down strips of the same self-made bias tape.
Some final notes on the shirt:
- The instructions don’t call for it, but I flat-felled the shoulder, sleeve, and side seams because I’d never done it before and I wanted to try something new. I like having another seam finishing technique in my kit, and I look forward to applying it to future projects.
- The sleeves are a standard set-in style that requires easing, but not an excessive amount. There’s a pattern piece so that you can bias bind the seam allowances, but this seemed unnecessary; I serged them instead.
- The blue fabric for the shirt is a Kona cotton; the white fabric for the sleeves is a mystery flat-weave cotton (purchased broadcloth? recycled bedsheet? who knows); the yellow fabric for the bias tape is a cotton broadcloth.
I’m quite pleased with the finished shirt—it looks exactly like Ash’s from the original show—but I cannot recommend the pattern I used. In addition to the issues with the collar, the instructions never actually tell you to sew the front and back pieces together at the shoulder seams before instructing you to attach the collar and front facings. While it’s not impossible to figure this step out—those seams are clearly sewn in the illustration for attaching the facings—it reinforces the impression of a lack of attention to detail in the instructions. Perhaps the pattern writers, pressed for space as I’m sure they were, were streamlining the instructions and removed a line by accident. But if space was at such a premium I think I would have nixed the boxer short pattern, which to my mind doesn’t make a lot of sense with a shirt and tie pattern anyway, in favor of more thorough shirt instructions. In the future, I think I’ll use a pattern like the Fairfield button-up from Thread Theory, even if it means I need to eliminate stands, yokes, and/or pleats myself to get the styles lines I want.
As for the rest of the costume, the jeans, t-shirt, and belt are, not surprisingly, things that were already in Justin’s closet. The gloves were a convenient $3 find in the checkout line during one of my many (many) trips to JoAnn; I cut off the fingers cut and melted the openings with a lighter to prevent unraveling. The soft foam Pokéball came in a three-pack from Toys-R-Us.
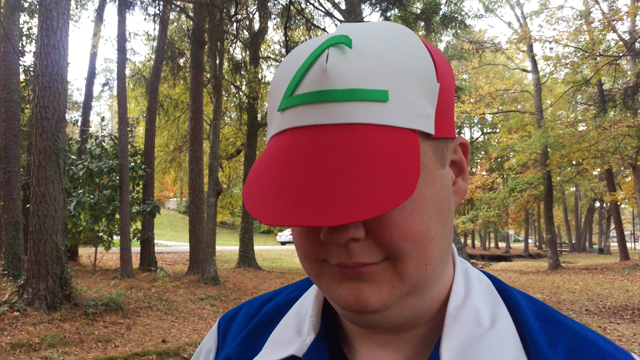
Ash’s hat is entirely Justin’s handiwork. After I failed to order a hat in time for Justin’s office dress up day, Justin took matters into his own hands and downloaded a free ball cap pattern. What I didn’t realize was that he grabbed the first pattern he could find, which happened to be designed to make paper hats for beer bottles. So, itty-bitty. With my help, he was able to scale it up to human head size, and then to his head size, which is about two inches larger than average. He cut the pieces out of craft foam and glued them together, and then cut out the symbol and attached it with double-sided tape. I wanted to butt the cap seams together and stitch them up on my sewing machine, but we were tackling this project in the hour before we both had to work, so that didn’t happen. He didn’t mind though. Turns out craft foam doesn’t breathe at all so that gaps provided some much-needed ventilation.
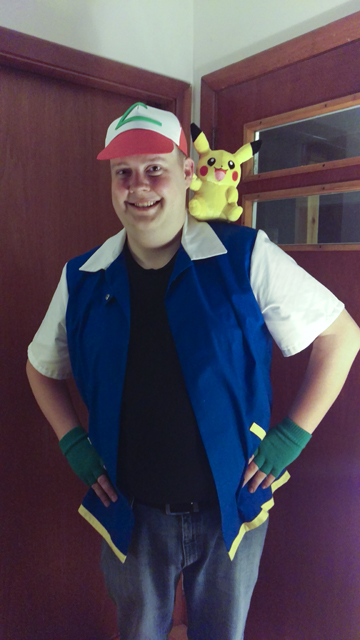
Justin was over the moon about his costume, and with the positive response he got from everyone at work and who visited us on Halloween. If you want proof, here he is showing off in between handing out candy to trick-or-treaters:
Next up, my Pokémon GO trainer costume!