A Short Entry on Pajama Shorts

When I finished muslining McCall’s 7324, I had about as much leftover fabric as I’d used for the top. And since my muslin wasn’t wearable, I thought I’d have another go at some kind of top to make up for it. Despite the fact that I myself professed this navy fabric closer to a quilting cotton than to the shirting it was marketed as, I foolishly latched onto the idea of making a ruffle top following this Megan Nielsen tutorial (and brought to my attention by this Peneloping blog post).

It was a hilariously abject failure. For starters, I didn’t actually have enough fabric, which makes for some sad not-really-ruffles. The fabric was entirely too stiff, so it hung like a paper bag. The cheerful yellow bias tape I used around the armholes was also too stiff and didn’t want to stay rolled to the inside, and even though it was mostly hidden it managed to tip the entire thing from playful and cute into clownish territory in my mind.

So…I cut both the failed top and the muslin apart again and made pajama shorts.

The front of a pair of drawstring pajama shorts hanging on a dress form

The back of a pair of drawstring pajama shorts hanging on a dress form

I used Simplicity 1520, the same pattern as my tartan pajama pants, along with my trusty pocket template. There’s something deeply satisfying about a well-sewn pocket, even a very simple in-seam one.

A close-up of the pocket opening in a pair of drawstring pajama shorts hanging on a dress form

I incorporated all of the after-the-fact modifications I made to my flannel pants, which made this relatively quick and simple to whip up. I have vague recollections of unnecessarily complicating the sewing of the elastic/drawstring casing, but I’m positive it was for no good reason whatsoever, so I won’t try to recall what I did or didn’t do here.

Everything was sewn on my regular sewing machine, and then the edges were finished on my serger. There’s both an elastic and a drawstring at the waist; the drawstring is just a strip of the main fabric with the raw edges tucked in, sewn flat, and then knotted at each end. The elastic and drawstring were threaded through buttonholes (reinforced with interfacing, which you can see peeking out in the shot below) in the casing.

A pair of pajama shorts turned inside-out on a dress form to reveal in-seam pocket bags and the stitching throughout

The finished pajama shorts fit just fine, but I haven’t actually worn them yet. We keep the house too cold in the late fall, winter, and early spring for shorts (for me, at least), and even in the warmer months you’re more likely to find me wearing loose, lightweight pants than shorts indoors. If I don’t find myself reaching for these come summer, at least they’re made well enough that I wouldn’t feel guilty about donating them.

An Open-Front Cardigan for Transitional Weather

Caitlyn stands on her front porch smiling and wearing a denim hat, open-front cardigan, tie-front button-up shirt, jeans, and pointed-toe flats

Caitlyn is turned sideways and holding out one side of her open-front cardigan to show its drape

Caitlyn is facing away from the camera to show off the back of her open-front cardigan

A close-up shot of the twin-needle topstitching on the back hem of the McCall's 6084 open-front cardigan

When I picked up this lightweight sweaterknit during Hancock’s going-out-of-business sale, I imagined it as a relaxed-fit pullover, possibly with dropped shoulders. I happened to have just such a sweater in my closet already, and I’d noticed a couple of small holes where it had snagged on something, so I thought it might be a good idea to plan for its replacement.

The more I thought about it, though, the more I felt this fabric was going to land in that awkward territory of too light to be warm when it’s chilly outside, too thin and see-through to be worn as a t-shirt/shell, and too hot to layer over a camisole in the summer. In light of that, a cardigan to throw on indoors when the AC is too strong seemed like a more practical choice than a pullover. Plus, I have lightweight cover ups in several neutral colors—black, brown, grey, and oatmeal—but few colorful ones and nothing with a pattern. Time to expand those sweater horizons!

Picking a pattern was less a comedy of errors and more a two-part skit of failing to pay attention. See, I already had McCall’s 6084 in my stash, so I was prepared to dive right into tracing and cutting. Except that when I’d bought the pattern during some hazy late-night discount-pattern spree of the past, I’d grabbed the L/XL/XXL envelope instead of the XS/S/M I needed.

Fortunately, a quick trot to JoAnn solved that problem, but then I immediately encountered another: McCall’s 6084’s waterfall fronts are just turned under and hemmed, meaning the wrong side would be visible in the finished garment. On a solid fabric that’s probably not a huge deal, but with stripes I expected it would be a lot more obvious. I knew I’d feel compelled to try to make the stripes match at the boundary between right- and wrong-side, and I knew that caring that much would drive me mad.

Instead, I did the “less mad” thing (yes, those are sarcasm quotes) and decided to hack the pattern in arguably the weirdest way possible. By way of explanation, let me first provide the following context:

Three of the four neutral-colored cover ups I mentioned before are from Express. (You’re probably starting to notice a trend here.) Those workhouse cardigans have wide front panels that can overlap in the front but, by dint of the drape of the fabric, the shape of female anatomy, and the lack of closures, tend to hang open. The panels are attached along shoulder princess seams, and they’re level with the rest of the cardigan at the hem (rather than angled like you see on waterfall-front cardigans). Most importantly, the panels are wide strips of knitting that have been folded in half before being attached, so that not only is the edge of the front opening finished, but also if you open the cardigan you’re still seeing the right side of the fabric all the way to the princess seam where it’s attached. Basically, the panels act like bands, but very, very wide ones. I love this finish, because no matter how the fronts flop around, you never see the wrong side of the fabric.

I decided this doubled-front-panel approach was the way I wanted to go on my cardigan. There were, however, two major challenges to this. The first was that McCall’s 6084 doesn’t have princess seams, just a shoulder dart that subtly shapes the front/neckline/collar. I considered cutting through this dart to make a princess seam, but then ran into the second issue, which is I only had two yards of fabric. I definitely didn’t have enough fabric to double the width of the front piece between the opening and the shoulder dart, nor did I have enough to cut narrower facings to attach to the front edge.

My solution? Cut the pattern as drafted, but then fold the front edge to the inside until it aligns with an invisible princess seam drawn through the shoulder dart.

I had to adapt the order of operations in order to get finished edges where and when I needed them, but apart from the mental gymnastics required this caused no major issues. The grown-on front facings, for lack of a better term, are held in place at the neckline (the fronts extend to form the collar) and at the bottom hem where they’re tacked down by the twin-needle topstitching; they hang free between shoulder and hem:

Caitlyn holds open the fronts of her cardigan to show how the grown-on facings hang on the inside

A close-up shot of the inside hem of the McCall's 6084 open-front cardigan, showing how the topstitching holds the grown-on facing in place

This works…okay. Because there’s no seam to provide structure, the fronts tend to sag and bag toward the bottom. It’s not super noticeable in these pictures, and no one is likely to notice when you’re moving around, but standing still, on a hanger, or lying flat, it’s pretty obvious. Luckily, since I’m not constantly positioned in front of a mirror or doing artsy flat-lays, the shortcomings of my hacky construction aren’t annoying enough to keep me from wearing this—once it’s on, I only notice if I think about it.

Construction-wise, I basted everything on my sewing machine and then ran everything through my serger. I spent entirely too much time matching the stripes during cutting AND sewing, but let me tell you, it paid off. Look at this side seam!

A close-up shot showing meticulous stripe matching at the side seam of the McCall's 6084 open-front cardigan

And this sleeve!

A close-up shot showing the stripe matching on the right sleeve of the McCall's 6084 open-front cardigan

And the other sleeve too!

A close-up shot showing the stripe matching on the left sleeve of the McCall's 6084 open-front cardigan

There’s nothing particularly noteworthy about the collar, but here’s a picture anyway:

A close-up shot of the back neckline of the McCall's 6084 open-front cardigan, showing how the front extensions are seamed to make a deep shawl-like collar

I used up every inch of this fabric that I could, which is incredibly satisfying. Bringing more blue and an easy-to-coordinate pattern into my closet also ticked two important boxes for me. I finally feel like I’m transitioning from making projects to making and wearing clothes. It feels good.

Caitlyn sits on her front porch next to a denim hat, smiling and wearing an open-front cardigan, tie-front button-up shirt, jeans, and pointed-toe flats

Sage Sleeveless Summer Blouse

Caitlyn is standing on residential sidewalk wearing a sleeveless summer blouse, white jeans, nude pumps, and sunglasses

Caitlyn is turned to the side to show the deep armhole, voluminous fit, and high-low hem of her sleeveless summer blouse

Now this is the kind of summer top I dream of. The fabric is a beautifully smooth, soft, and drapey mystery material that my mom (hi Mom!) gave me when she was clearing out her sewing and craft supplies. I’m not sure what she originally bought it for; I can’t recall anything she’s made out of it. The smooth hand and fluid drape remind me of rayon challis, although Allie’s Fabric Files says that wrinkles will fall out of rayon challis within a few minutes of wear, and that’s definitely NOT the case with this material. It loves a good steamy press, but also seems to wrinkle from my body heat alone. Perhaps it’s linen or a linen blend?

To keep the fabric from slithering away from me during cutting and sewing, I filled a dollar store spray bottle with homemade spray starch (made by boiling cornstarch in water) and applied it liberally while pressing. It made a huge difference in how the fabric handled: it remained crisp and even a little grippy throughout the sewing process.

The pattern is a heavily altered McCall’s 7324. I mentioned the modifications I intended to make after muslining the pattern, but here’s a rundown of the changes that happened on the final garment:

  • Cut a size 10 instead of a size 6
  • Narrow the shoulders by 1 inch
  • Deepen the armhole by 0.5 inches
  • Eliminate the vertical pleat extending from the placket
  • Eliminate the gathers along the front neckline between the placket and the shoulder, which necessitated the following compensating changes:
    • Change the shape of the placket opening from a trapezoid (narrow at the top, wider at the bottom) to a V
    • Change the length and angle of the placket bands to match the new opening, ensuring the bottoms of the bands will be horizontal when stitched in place
    • Shorten the neckband (which looks like a collar stand)

I also left the hem curve alone this time instead of trying to shorten the back. A little butt coverage isn’t such a bad thing.

Caitlyn has her back to the camera to show how the curved hem of McCall's 7324 provides full bum coverage

The top is quite voluminous. With the relaxed fit, going up one size would have been sufficient. I also didn’t account for the fact that a two-size increase would change the armhole, so while taking in the shoulder width was definitely a good call, scooping out the bottom of the armhole an extra half-inch wasn’t necessary. In fact, as you probably noticed in the second photo, raising or moving my arms reveals a peek of bra band. I don’t care that much when I’m wearing the top casually, but I’ll throw on a camisole underneath if I’m in a more conservative setting. I’d love to make an obnoxiously colored bralette to wear with it—I keep envisioning orange—because FASHION.

On the inside, I stitched everything on my sewing machine, then finished the side and shoulder seams with my serger and the armholes with self-fabric bias tape. (Starch is the only thing that made bias tape possible, and even then, I’ve got a few spots of wobbly stitching where the raw edge has come untucked. I have no idea how anyone can make bias tape out of things like silk…) The hem is a baby hem made using Carolyn’s instructions.

I think that’s everything? Here are a few up-close shots:

A detail shot of the v-shaped placket and shoulder gathers of her modified McCall's 7324 sleeveless summer blouse

A detail shot of the gathers at the back neckline of the McCall's 7324 sleeveless summer blouse

A detail shot showing the high-low hem of the McCall's 7324 sleeveless summer blouse

A detail shot showing the baby hem used on the McCall's 7324 sleeveless summer blouse

I’m much happier with the gathers on this iteration, and my topstitching on the neckband is marginally better this time. I wore this beauty about once a week from the time it was done until a cardigan wasn’t enough to make it warm. I don’t exactly look forward to summer here in the south, but being able to throw on a cool, comfortable top I made takes a bit of the sting out of it—it’s the closest I’m ever going to come to looking stylish while sweating buckets.

Muslining a Sleeveless Summer Top

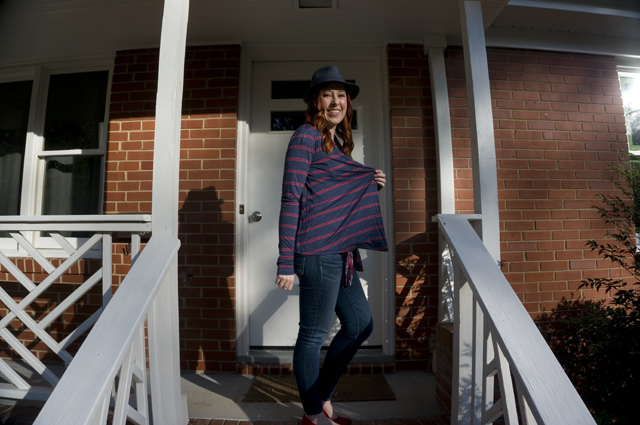
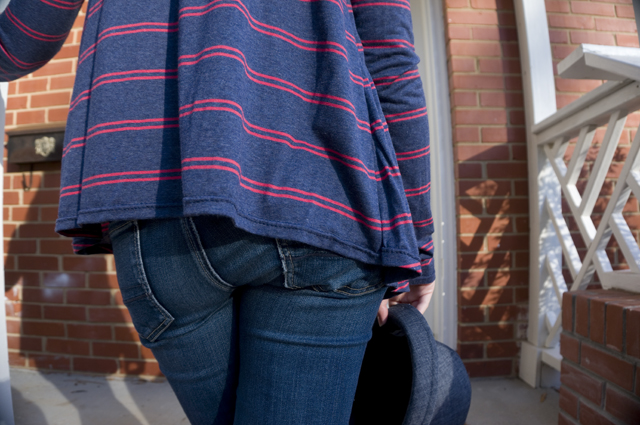
My favorite summer top is, without a doubt, Express’s sleeveless Portofino shirt. It’s 100% polyester, but it’s semi-sheer, floaty, and relaxed enough through the waist and hip that it lightly skims the body, which is good news when it’s in the 90s Fahrenheit (30s Celsius). The polyester doesn’t make me sweat, the heat and humidity do, and if I’m going to be soggy anyway I’d rather not feel the cling of spandex or the weight of cotton.

I think I’ve mentioned before that I work in a pretty casual office—despite a nominally business casual dress code, jeans, leggings, and all manner of fashion and athletic shoes have taken over swaths of the company without any pushback from management—so I can wear my sleeveless Portofinos at work with or without a coverup (though I usually throw on a cardigan to stave off the summer AC). Since they transition so easily from office to home for me, they were a logical jumping off point to expand my summer top options.

During a trip to JoAnn last summer, I picked up four top patterns that shared some similarity with my beloved Portofinos:

  • McCall’s 7324, a sleeveless popover top/tunic pattern with a (buttonless) half placket
  • New Look 6345, a sleeveless v-neck tunic with a relaxed fit around the hips (but a more defined waist)
  • New Look 6414, another A-line, v-neck top/tunic, with the option for a keyhole neckline and sleeve variations
  • New Look 6450, an A-line top that sort of looks like a pillowcase dress, but with fixed neckband and more sharply cutaway armholes

I decided to tackle the McCall’s pattern first because I was relatively fresh from the Archer making class with Lladybird and wanted to take advantage of the things I’d learned and lock those tips into my mind. I hadn’t made any woven shirt patterns from McCall’s, just a dress with a very different fit, so I thought it wise to make a muslin before cutting into a more precious fabric I already had in my stash.

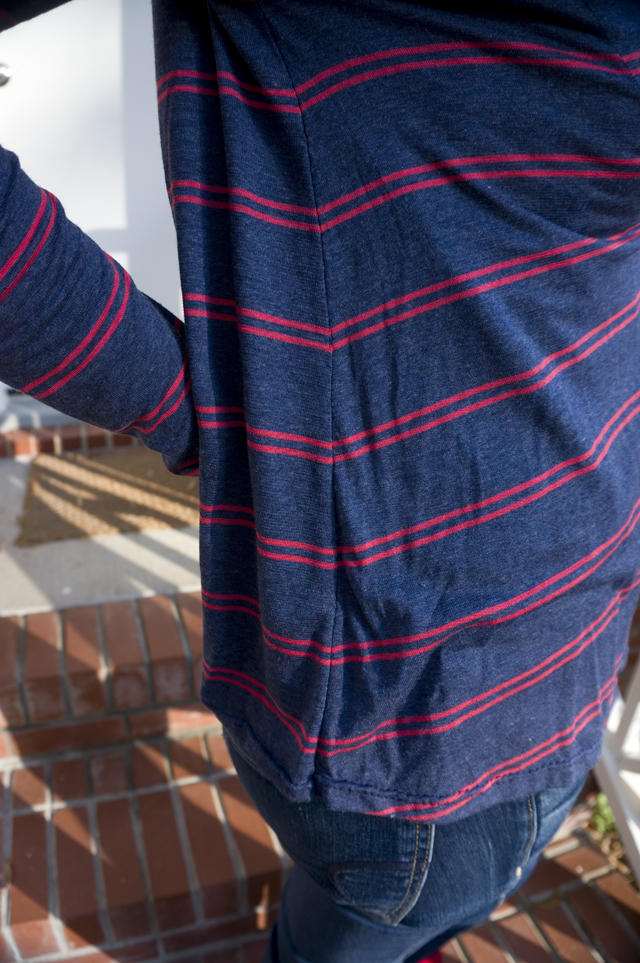
The fabric is this 57″ White Dots on Navy from JoAnn. It’s listed as a cotton shirting, but after washing and drying it didn’t soften up much, and the crispness makes it feel more like a quilting cotton than a shirting to me. I wouldn’t use it again for a shirt.

The front of a woman's sleeveless summer top with a half placket and curved hem

The back of a woman's sleeveless summer top with gathers at the neckline and curved hem

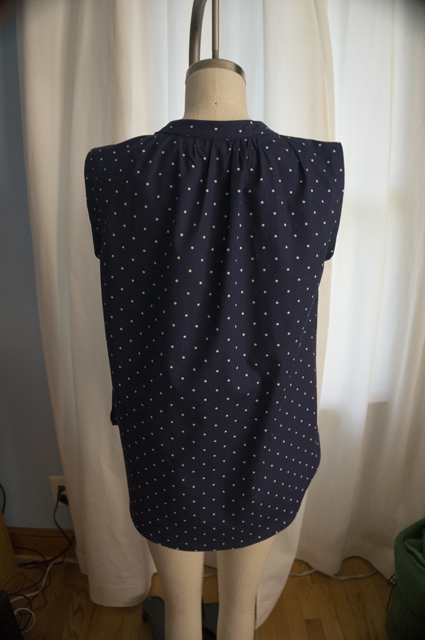
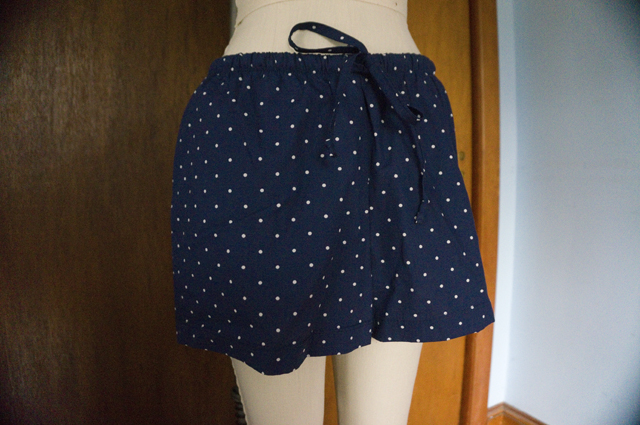
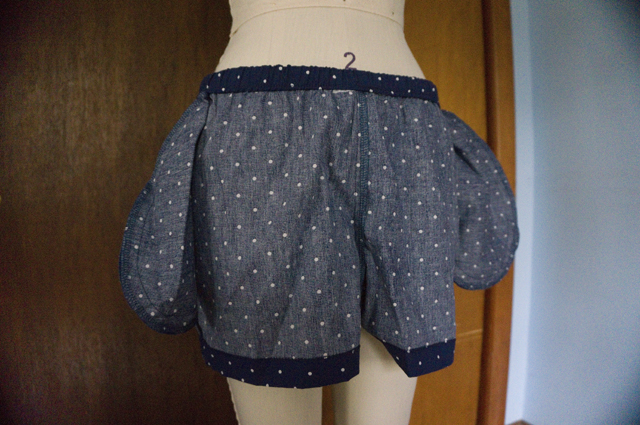
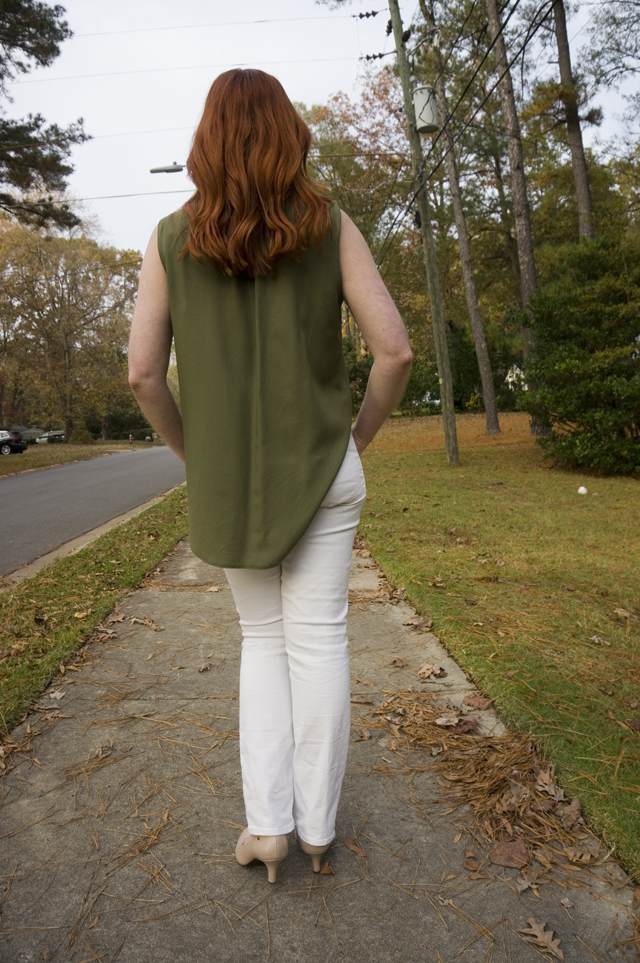
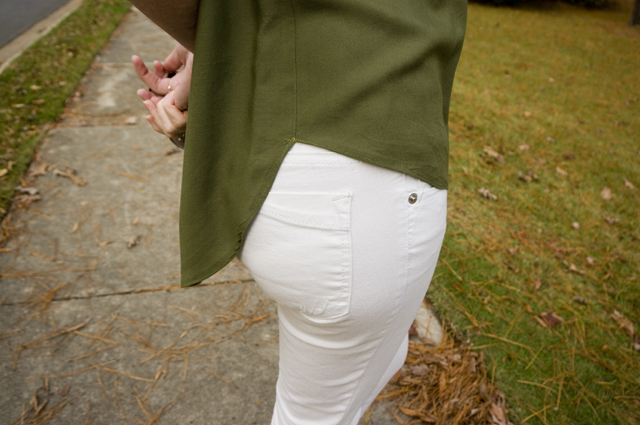
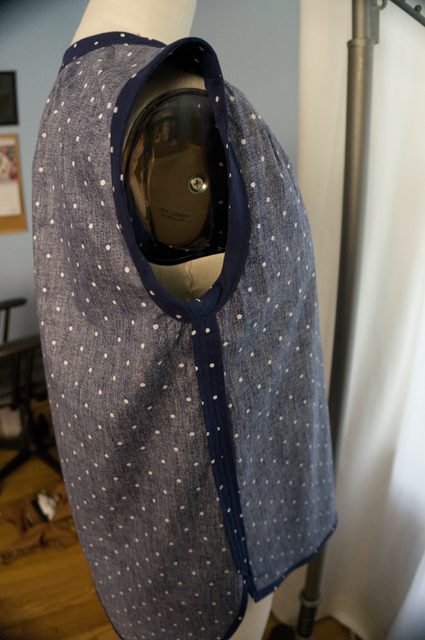
As you can probably guess from these dress form photos, this muslin didn’t turn out wearable. I chose View A and cut out a size 6 based on the finished garment measurements and the width of one of my sleeveless Portofinos at the bust. The key difference between the McCall’s pattern and my ready-to-wear garment is that the latter has bust darts. Looking at the pattern, I had reasoned that the gathers at the shoulder were just bust darts that had been rotated into the shoulder and then converted to gathers. I further assumed that most of the room in the bust came from the gathers, and not from the width of the garment. I was incorrect about this, and the whole thing ended up too snug in the shoulders and bust, and not exactly relaxed in the hip either. I also found the shoulders too wide and the armholes too high for my frame; I made a note of those things for the next incarnation, but didn’t fret over them, since they’re easy to fix on a sleeveless garment.

A close-up of the armhole and side seam of a woman's sleeveless summer top

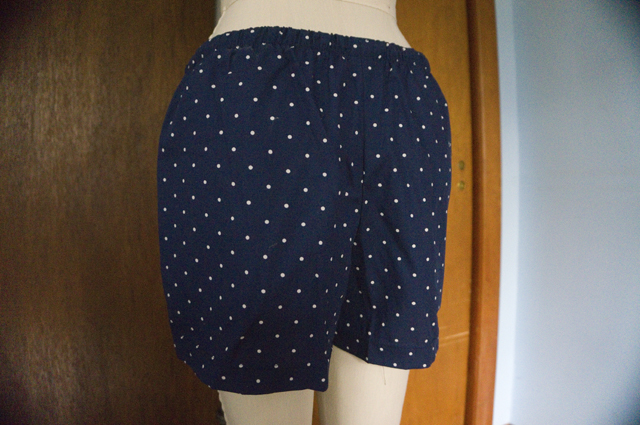
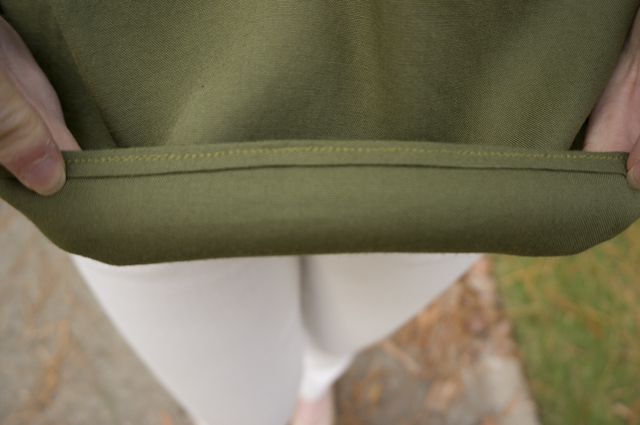
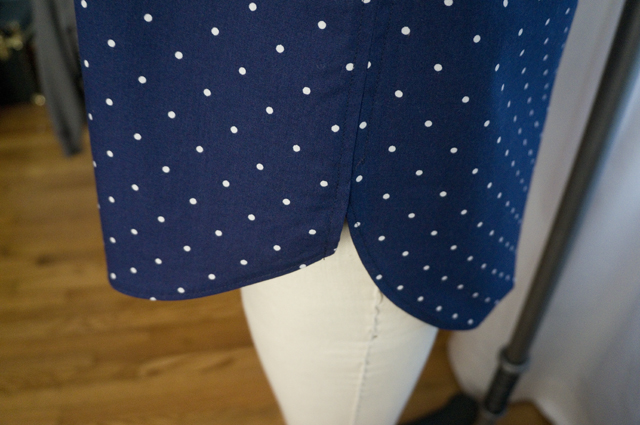
I made one other mistake, a completely brainless one that I should have been able to avoid. While tracing off the pattern, I felt the high-low hem was a little too pronounced, so I decided to shorten it to prevent walking around with a ridiculous butt flap. I did this by shortening just the back pattern piece by two inches—at the lengthen/shorten line. Cue my surprise when I go to sew up the side seams and realize that, surprise! the side seams don’t line up any more, and I have an accidental split hem:

A close-up of the hem of a woman's sleeveless summer top, showing how the front and back curves don't meet up correctly

I don’t remember now whether I sewed up the side seams first or sewed the hem first. At some point in the process I decided I wanted to finish the side seams by turning under the seam allowance and then stitching it down, rather than serging, so that made fixing the issue more annoying (and then the fitting failure made it irrelevant).

A close-up of a woman's sleeveless summer top turned inside-out, showing how the side seam is stitched down

I did, however, serge the shoulder seams (though why I dragged the machine out for just that, I don’t know) and then stitch then down as well for a mock flat felled seam.

A close-up of a woman's sleeveless summer top turned inside-out, showing how the shoulder seam was serged and then stitched down

With all of those little details covered, let’s get to my real gripes: the intersection of design choices, construction, and instructions.

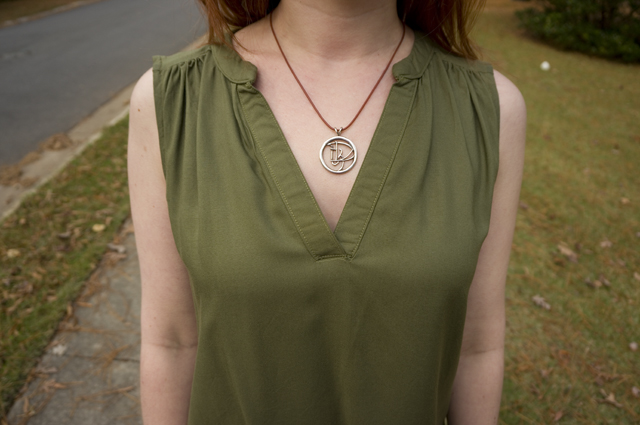
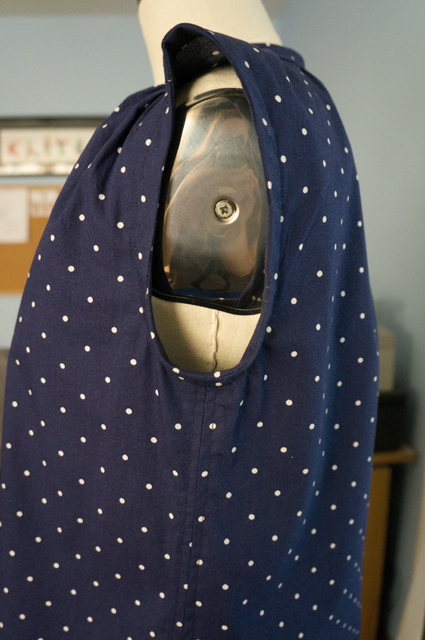
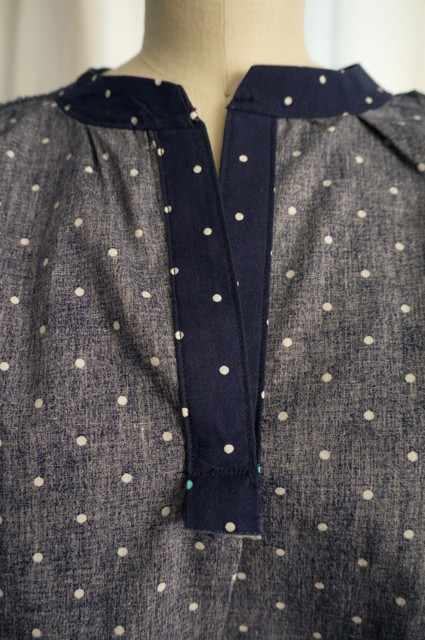
What I didn’t notice when I bought the pattern, and what you almost certainly can’t see because the fabric is so dark, is the vertical pleat coming off the bottom of the placket. On the pattern piece, the placket opening is double the necessary width so that you can hot-dog fold the front of the blouse to create that pleat. It’s unnecessary from a construction standpoint, it doesn’t add anything to the look of the garment, and I hate it. Is that an irrationally strong feeling? Yes. Did I resolve to move heaven and earth to engineer that pleat out on my next version? Also yes.

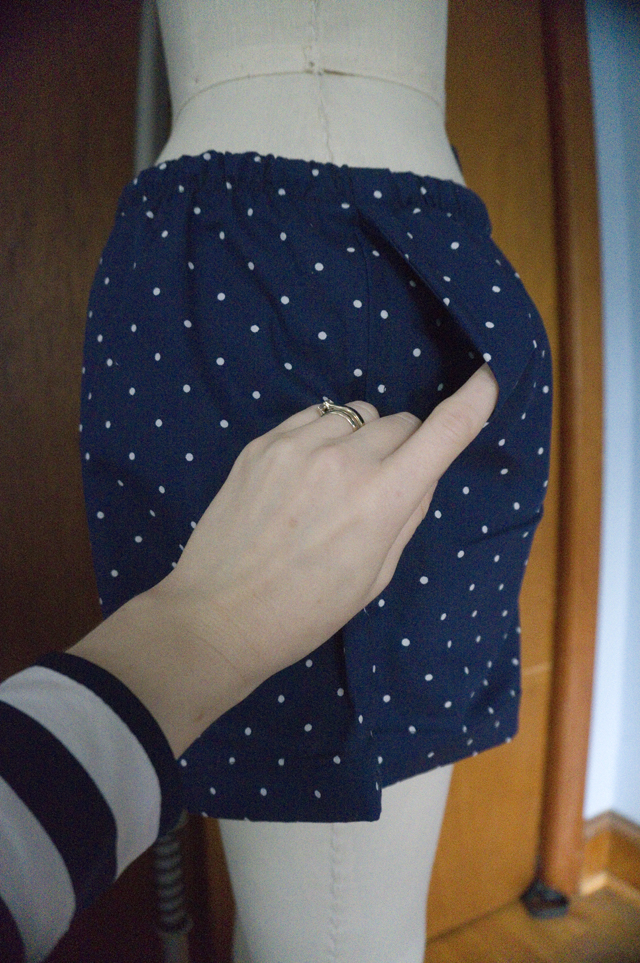
Constructing the placket was way more challenging than it needed to be, though it’s probably fair to say that’s partially my fault. After preparing and applying the bands for the placket, I could not make sense at all of this instruction: “On inside, lap left front band over right. Stitch lower edge of bands to end of opening.” Or more precisely, I understood that it was supposed to look like this…

A close-up of a woman's sleeveless summer top turned inside-out, showing the completed partial placket

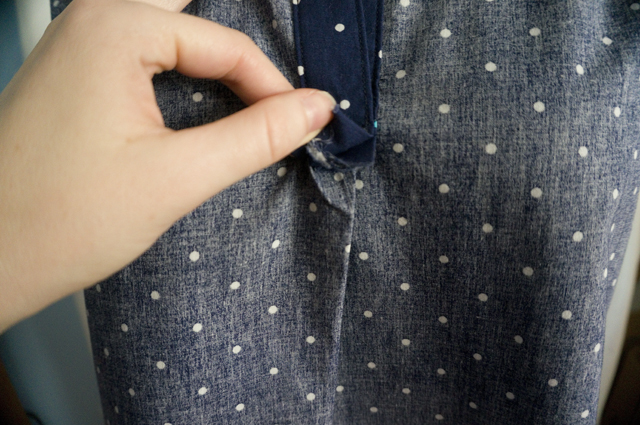
…but I could not get the bands and the opening to cooperate. After reading through Allie’s clearly written and photographed tutorial on sewing partial plackets, I finally figured out I hadn’t made the angled cuts into the corners of the opening. This step should definitely be in bold type, because if you don’t do this correctly (or at all), the origami WILL NOT work.

While we’re staring at the inside of the placket, I’d like to take a moment to complain about the unfinished ends (is this normal in RTW? I don’t have any partial placket shirts I can check) and the weird fold that results where the placket meets that stupid pleat.

A close-up of a woman's sleeveless summer top turned inside-out, showing how the placket intersects with the front pleat

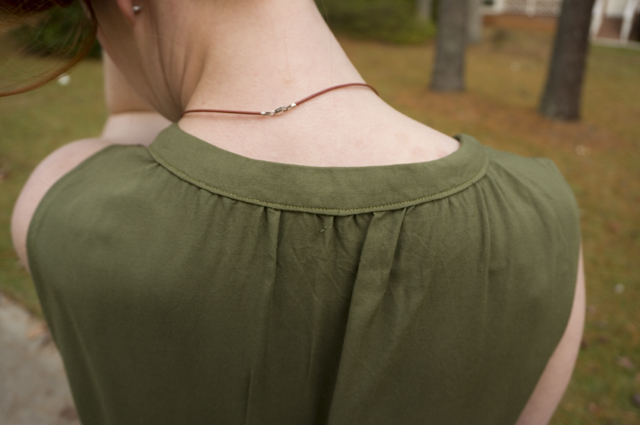
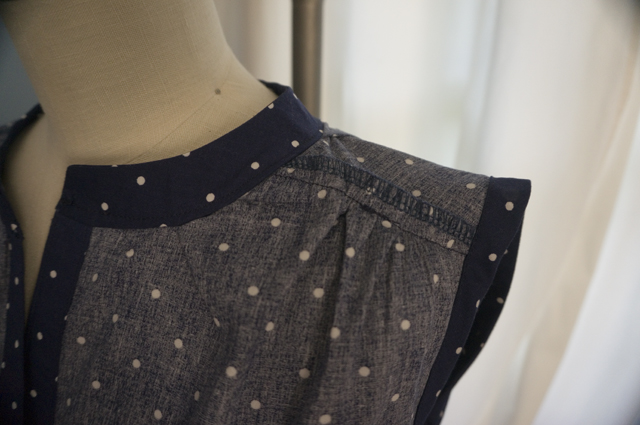
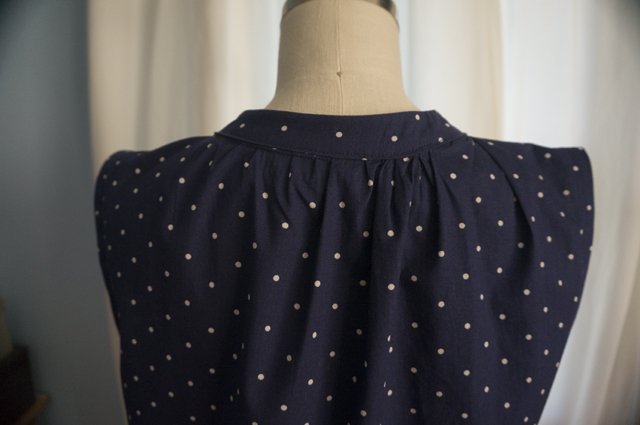
On to the gathers! There are gathers around the curve of the neckline between the placket and the shoulder seam, along the shoulder seam between the neck and armhole, and around the back neck.

A close-up of a woman's sleeveless summer top, showing the gathers at the front neckline and shoulder

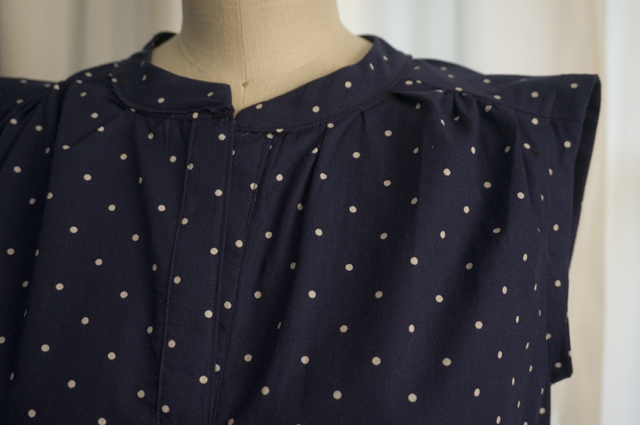
As near as I can tell, the gathers between the placket and the shoulder exist solely to pull the V of the placket open, otherwise the bands would neatly overlap each other like a normal (hidden) button placket. The area to gather is quite small, which made it difficult for me to gather evenly and ended up looking like unintentional puckers. In addition, since these gathers are at a roughly 45 degree angle to the ones coming off the shoulder seam, it results in a weird, bunchy, wrinkly mess in that area. Ugh. As with the pleat, I resolved to eliminate the gathers around the front neckline on the next iteration.

The gathering on the back neckline is fine design-wise, although I didn’t execute it well.

A close-up of a woman's sleeveless summer top, showing the gathers at the back neckline

It’s a shame that everything about this was a flop, but I really am glad that I figured out all of my the pattern’s issues before I cut into the fabric I really wanted to use, especially since my real-deal fabric was thin and slithery. It certainly didn’t hurt to practice a few techniques, either: my topstitching remains dodgy, but I’d like to think it’s just improving in very small increments.

Perfectly OK Tartan Pajama Pants

Caitlyn seated on a hearth, elbows resting on the knees of her tartan pajama pants, looking to the side and smiling

Close-up of tartan pajama pants waistband, which is held up with a silver satin ribbon tied in a bow

Legs akimbo, showing the fullness of the tartan pajama pants through the front of the hip and thigh

Side view of the tartan pajama pants with the pocket pulled open to reveal tartan pocket bags

Rear view of the tartan pajama pants showing the stripe matching across the bum

While everyone else is reflecting on the end of the year, I’m scrambling to catch up on all of my 2018 projects! I had hoped to have that done before the holidays, but a combination of work deadlines and other professional obligations, as well as a few seasonal activities, meant I was busy right up until we went out of town for Christmas. I thought I might have time to write during my vacation (the longest I’ve taken since graduating college), but because we were visiting family we were far too wrapped up in eating, sleeping in, watching movies, playing games, and exchanging gifts to have much screen time. I’m not as bothered as I thought I’d be. So what if I have to put off doing any kind of wrap up until mid-January? No one was keeping score but me, and I’ve decided to misplace the scorecard.

The only trouble with being so far behind is trying to remember what I did (or didn’t do). I actually have a lovely sewing planner that my sister gave me—the pages came from this Etsy shop, and she comb-bound it with acetate covers herself to make it more durable—but I have a devilishly hard time remembering to actually write in it. These tartan pajama pants are a great example of a project that would have benefited hugely from taking notes, because they a) were intended as a wearable muslin, b) involved several modifications to a basic pattern, and c) required a significant hack job to fit correctly because of additional alterations I forgot to make.

The pattern is, I believe, Simplicity 1520. I say “believe” because I also have Simplicity 0301, a unisex pattern that was formerly available for free on Simplicity’s site but has since been removed or very well hidden. The reason I passed over the free pattern in favor of a purchased one is because the free pattern has a simple cased elastic and a very generous fit, whereas I was looking for a slimmer cut, a combination of elastic and drawstring, and preferably pockets. The joke’s on me, however, because although S1520 appears to fit that bill, it actually has none of those features—I misread the back of the envelope and ended up with effectively the same pattern.

As best as I can remember, I modified the pattern to include buttonholes at the waist to feed a drawstring through, shortened the inseam at the lengthen/shorten line to accommodate my 5’2″ frame, and marked the placement for inseam pockets using my pocket template (AKA the pockets from Simplicity 1419).

What I notably failed to do was reduce the crotch depth, both because I’m shorter than average and because I prefer to wear my pants (especially my lounge pants) on my hips. I was blissfully ignorant of this oversight until I’d already made the buttonholes (and folded and sewn down the top of the pants to make a casing for the elastic), and I was so annoyed about it that I decided to salvage what I had instead of completely reworking it. That is to say, instead of cutting off the top of the pants at the correct height, making new buttonholes, and folding down a new casing, I lopped off the “waistband” 5/8 inches below the stitching line that made the casing, removed something like 3″ of excess fabric from the crotch, and reattached the “waistband” by stitching in the ditch. My ditch-stitching wasn’t very tidy, but you can’t really tell. The bigger giveaway is that the tartan no longer lines up near near the top of the pants, but honestly far less egregious than the (lack of) stripe matching you normally see in ready-to-wear.

Shortening the crotch meant moving the pockets down as well, but that was a straightforward change, albeit a time-consuming one because I’d already serged the seams. (Ugh, why.) I moved them a little too far down, so they’re not really useful for sticking my hands in. They still work just fine for a phone, so I could not be bothered to move them a second time.

The fabric is a lightweight flannel shirting from JoAnn. To match the tartan, I cut everything on a single layer and used a walking foot to sew my seams before finishing them with a serger. I focused on making sure the horizontal stripes matched across vertical seams, and I feel I was successful; next time, I’ll pay more attention to respecting the pattern repeat and mirroring the vertical stripes as well.

The silver ribbon was a freebie that came tied to the bag of an Aerie purchase. Instead of threading both elastic and ribbon through the casing, I took a cue from Lauren’s Margot PJ Pants and cut my ribbon in half before sewing each piece to the end of a length of no-roll elastic. I thought for sure I was going to love this, but in reality I don’t. It’s a pain to try to cinch the pants and keep the slippery polyester satin bow tied. I can’t decide if I’d rather just elastic or just a drawstring, but this hybrid jobby just ain’t doin’ it for me.

Given how badly I botched the fit initially, I don’t think these are a very good muslin, but they for sure are wearable. I’ve basically been living in them this winter, especially since I switch into lounge pants as soon as I get home from work. I have more of this flannel stashed away—my first cut shrank in the wash and was just too short for pants—that I’m hoping to use for a second cozy project. And since I could use another pair of winter pajama pants, I’ll probably take a second crack at this pattern before finally cutting into a more precious fabric that I’ve been hoarding. (Yes, precious pajama fabric. You’ll understand when you see it.)

Here’s hoping that, in 2019, I can graduate to a level of sewing where I don’t mess up pajama pants. 😂