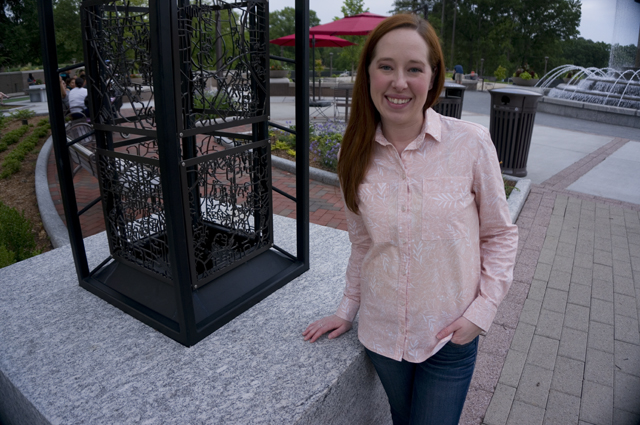
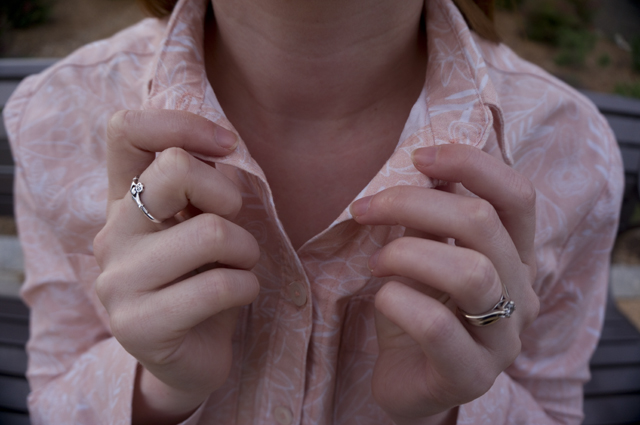
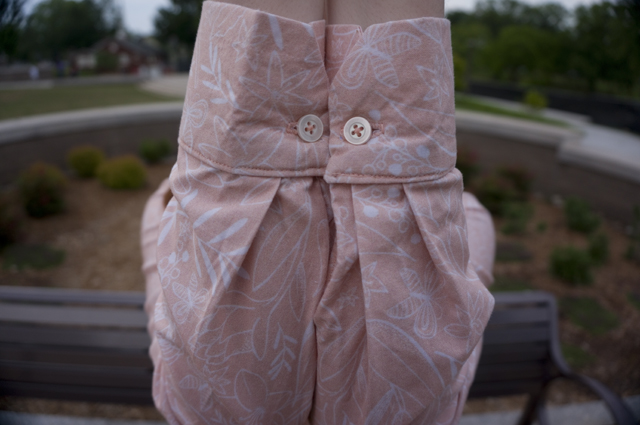

Sprout Patterns, Learning with Lladybird, and Blush Pink Floral Archer


When Lauren announced back in April she was partnering with Sprout Patterns to do a sew-along—really, a workshop—for the Archer button-up, and that it would be held just 30 minutes from where I live, I knew I had to jump on it. The event ticked a bunch of boxes at once:

  • I’d been meaning to visit the Spoonflower headquarters in Durham since I moved to North Carolina five years ago
  • I’ve wanted to try a Grainline pattern for ages but couldn’t quite justify the purchase when I have a stash of patterns and fabrics waiting to be used already
  • I’ve thought about taking a sewing class as a way to be more social while improving my skills, but most classes are aimed at absolute beginners and tackle projects I’m not interested in
  • Lladybird was one of the first sewing blogs I started reading regularly, and I couldn’t resist the opportunity to meet a sewing celebrity

Because this was the first time Sprout Patterns had done a collaboration like this, the process was a little hazy at times. For instance, there was a very limited number of spots in the class, so registration was first-come, first-served. All well and good, but when I submitted my registration through their online form, I received an email with the subject line “2018 Sprout Sew-Along with Lauren Taylor” and the sender “Confirmation Message” but a blank email body. Hmm. Did this mean that I had secured a spot, or merely that my request had been received and I was on the waiting list? Nail-biting ensues. Five days later, I received another email that confirmed I had indeed scored a coveted seat in the class. Whew, that was a relief! I assume they had to handle some portion of the registration manually and that was the cause of the wait, but a simple message up front could prevented a bit of unnecessary anxiety for those like me who did get in, and tempered the expectations of those who ultimately wouldn’t.

The confirmation email included a simple schedule (meet-and-greet on Friday night, sewing all day Saturday and Sunday), a pre-class checklist in the form of a Google Doc, and a link to video explaining how to order your pattern and fabric through the Sprout Patterns site. I confess I only skimmed the video, as the process of purchasing the materials was pretty straight forward: follow the steps to order a Sprout Pattern as you normally would and use a class-specific coupon code to get the pattern of your choice printed on Kona® Cotton Ultra with free shipping.

If you’ve spent any time on the Spoonflower site at all, you don’t need me to explain the hours I spent browsing for the perfect print for my Archer—there’s an overwhelming number of pretty, quirky, colorful, fun, bold, and bizarre designs already available even before delving into creating your own.

But I’d also suggest the severely constrained browse/search functionality on the site makes choosing a design more arduous than it needs to be. You can browse By Designs or By Color, which uses a system of categories and sub-categories, but if you select one of these you can’t narrow your criteria any further. You can do a search instead, but it’s really unclear whether this search is looking at the name of the category or categories the design is in, the name of the design itself, a set of invisible keywords, or some combination of the three. Using or not using quotation marks around your search terms does change your search results, but not in a predictable way. It’s frustrating to say the least, especially since there are plenty of models for different, successful systems.

After narrowing my favorites to around 30 designs, most of which were line art florals or dots/spots, and most of which were on a coral or blush background, I settled on Botanical Sketchbook – Floral Pink Blush by Heather Dutton. Then I popped over the Sprout Patterns site and selected the Archer pattern, View A, Size 2, and picked the design from my Spoonflower favorites. (You don’t need to browse Spoonflower first and then go to Sprout—you can browse designs directly on the Sprout site—but I found it easier to browse in the full-window view of the former as opposed to the smaller pop-up window browsing available with the latter.)

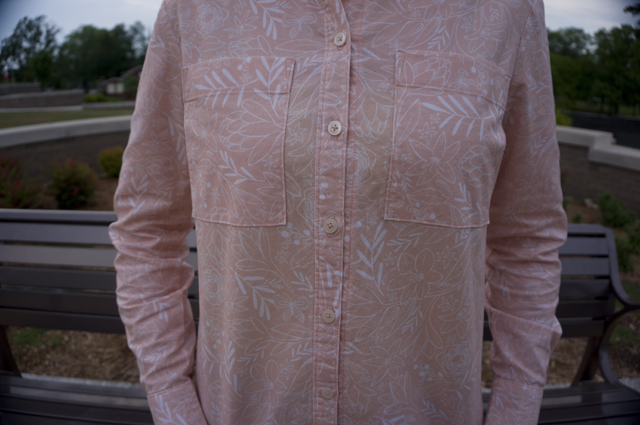
Sprout generates 2D and 3D models to help you visualize the scale of the design and determine its placement. The models are very helpful for avoiding unfortunate print placement, but the one shortcoming I see is that the pattern pieces aren’t labeled in the 2D model, so it’s possible to start dragging the print around without immediately seeing which piece you’re affecting, particularly in the case of small pieces or ones that are mostly hidden on a finished garment, such as a collar stand. In my case, I confused the pieces for the pockets and the cuffs, and it took an embarrassingly long time to figure out why I couldn’t move the large round flowers plastered over the nipples. Eventually I was satisfied with my choices, and I put the order in my cart and checked out with the coupon code with no issues.

It’s at this point I should probably mention that I felt a great deal of anxiety about placing my order, for a reason that I hadn’t expected. See, I’d received confirmation that I was registered for the class on February 28 along with instructions for ordering, and the class itself was scheduled for April 6–8. But I never actually received any guidance on how quickly I needed to place my order to allow enough time for it to be printed and shipped. The Sprout FAQ mentions that “average turnaround time for all products is 2-3 weeks,” but none of the correspondence mentioned this, or even directed students to the FAQ. I think the organizers must have assumed that everyone would want to get their patterns and fabric in hand as soon as possible, and it was never my intention to dally, but by the time I saw that key piece of information, there was a lot less than three weeks left, and I was in a bit of a panic. Again, a quick email would have done wonders here—a little “hey, if you haven’t ordered yet, you’ll want to do that soon!” would have been enough to make me commit to a decision.

Luckily, my order shipped in just two days, and since I’m in the next town over, it only took a few more days by mail to land on my doorstep. I had plenty of time to pre-wash my fabric and swing into JoAnn to pick up interfacing, coordinating thread, and basic translucent shirt buttons. In terms of tools, we were expected to bring our own sewing machines, pins, needles, snips, and so on, but scissors, cutting mats, irons and ironing boards, and sergers (for finishing seams) were provided.

On Friday night, the class gathered for a meet-and-greet with Lauren, who is exactly the person in real life that you’d expect her to be from her blog (which is something she stressed is important to her when she did her interview on the Love to Sew podcast). We snacked and drank and cut out our patterns while she chatted with us about sewing, blogging, and even gave a peek into her personal life.

Saturday and Sunday were both sewing days. Rather than do a sample project, showing us each step and then having us to it ourselves at the same time, Lauren chose to give us a short set of instructions to tackle a particular section of the shirt, and then when the first person hit a roadblock, she’d mime the steps to complete the task on that student’s pieces, folding or pointing or marking (but not sewing) as needed. If any student got behind, or needed to see the steps again, she’d walk them through it individually on their own shirt. She said she was happy to repeat herself as many times as needed, because she’d rather have students work at their own pace then be handcuffed to the rest of the class, with the speedier students feeling bored and the slower students feeling anxious. I’d say it worked pretty well: it allowed us plenty of time to socialize, observe each other’s progress, and take breaks as needed to avoid becoming tired or frustrated. (The snacks and grown-up beverages available throughout the day didn’t hurt either.)

Because our sewing time was divided up over two days and limited to about six hours each day, we ignored Grainline’s order of operations and also used a couple of alternative methods. For instance, we attached the plackets, collar stand, and cuffs to outside of the shirt and then topstitched from the inside to avoid needing to re-sew if the topstitching veered off course and failed to catch the fabric on the inside. We also used the burrito method to get a clean finish on the yoke, which I quite like.

Lauren also recommended several great tools and resources, including an expandable sewing gauge to mark buttonhole placement (always put a button in line with the apex of your bust to avoid gaping!), a buttonhole chisel, and weft interfacing from Fashion Sewing Supply. (At least, I think she recommended the weft, although the site itself advises that it’s not suitable for shirtmaking. Hmm.)

Lauren is exactly the kind of teacher I want for a sewing class: smart but not rigid, personable but able to keep things moving. I’m glad I got to take my first class with her, and hope to have the opportunity to take another class in the future (jeansmaking, maybe?)

The Spoonflower crew were also incredibly gracious hosts who were quick to offer supplies or assistance to anyone who needed them. They even made time for a tour of the facility at the end of the weekend. It’s a shame that the sew-along was the last class they had planned for the foreseeable future—the run-up to the event may have been shaky, but when it comes to day-of execution, they’re great facilitators.

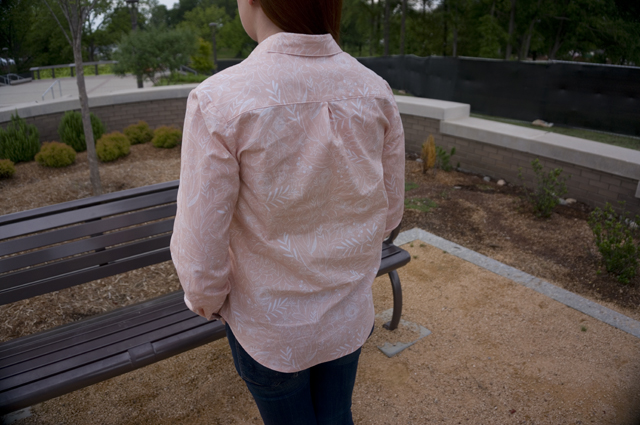
As for the Archer itself, I’m quite pleased with how it came out. I’m lucky that the Size 2 fits pretty well out of the packet; the only thing I’d definitely change is bringing in the shoulders. I love the curved hem because I don’t like to tuck in my shirts. The Kona® Cotton Ultra was easy to press and sew, but it’s thicker and stiffer than I’d prefer for a button-up shirt, and I think it may be the culprit of some of the rumpling in the back. If/when I make it again, I’ll look for something lighter like a poplin or a lightweight cotton sateen. (Probably. I’m also tempted by all the flannel for fall.)

I’ll be glad to have this shirt in my wardrobe when the weather (finally) decides to cool down, but more importantly, I’m excited to have some transferable skills in my sewing toolkit. I fantasize about being the kind of slow sewist who savors the precise construction of an impeccably fitted shirt, but I’d happily settle for becoming a halfway patient sewist who can get her pockets to match and her topstitching to stay on the fabric!

Know Your Vegetables

Over New Year’s weekend, Heather and her wife were kind enough to host Justin and me so that we could visit with the Myers family. We’ve all done our share of going out to ring in the new year, both at intimate gatherings of friends and big parties of strangers, so we were perfectly content to spend this one at home with a plentiful supply of snacks, drinks, and games.

We’re all four of us gamers, so we’re constantly on the lookout for cooperative video games to play with our spouses and as a group. While there are a fair few online co-op games you can play on separate devices—some of our favorites are Gauntlet for the PlayStation 4 and Don’t Starve and Stardew Valley on Steam—it’s harder to find couch co-op games to play with our spouses (and as a foursome when we’re all together) on one TV that aren’t party games.

Enter Overcooked, an adorable couch co-op video game where two to four players are chefs racing the clock to prepare, plate, and serve up meals like soup, burgers, and tacos. In addition to the timer, players are up against challenging kitchen environments like a pirate ship, where the rolling waves cause the prep counters to slide around in changing configurations that can block access to ingredients or tools.

Despite the cooperative nature of the game, players are often inadvertently fighting each other as they try to reach for the same knife or pan, add the wrong ingredients to the dish another person is working on, or run slam-bang into each other as they’re scrambling around the kitchen.

Justin and I had played Overcooked before, and Heather and her wife had already beaten it more than once, but we had never played all together. Since we were familiar with the game’s hazards, we decided that an additional layer of difficulty was necessary to make it sufficiently challenging. And there is, of course, no easier or more instantly accessible way to do this than adding alcohol.

Seeing as it was a holiday weekend, the fridge was conveniently stocked with celebratory libations that suited our purpose.

As we barreled through several levels without any problems, we couldn’t help but think we work pretty well together in stressful situations. A thought which, while it no doubt contained a kernel of truth, was so confidently felt by everyone in the room in a context so obviously ridiculous that it should have been a clue our faculties were waning.

Not long after, as we were scurrying around trying to keep up a steady rotation through all of the tasks and not collide with each other, Heather called out for an onion for the soup she was making. One of us—I can’t remember who, and I wouldn’t stoop to naming them here if I did—had the misfortune to grab the wrong vegetable and then shove it at her with fervent abandon.

“That’s a tomato, you fuck,” said Heather, with the calm condescension you’d expect from the damned explaining the weather in hell.

Gales of uncontrollable laughter obliterated our concentration and ensured swift and total failure. We tried to soldier on, but alcohol-induced hubris and humor claimed us in the end.

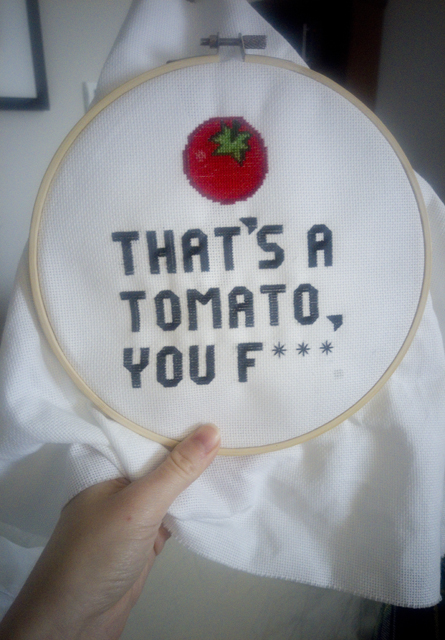
And so, when Heather’s birthday rolled around in April, I could think of no better gift to celebrate her hospitality, handmade-worthiness, and general hilarity than to immortalize her words in cross stitch.

The fabric is DMC Charles Craft 18 count Aida in white; the floss is DMC. The pattern for the tomato was derived from a screenshot of Overcooked that I manually transferred to a grid in Illustrator and printed. The text is an unvention: I didn’t even think to look for an alphabet online, and instead simply charted out something that looked good to me on graph paper.

I took this photo on my phone when I finished stitching during a weekend mini-vacation in Hickory, NC. I forgot to take a true completed shot of the piece before I gave it to Heather, but I did remove the fuzz from the place where I took out the period, spot cleaned the fabric, and finished it in the frame following these instructions on the Stitch Modern blog.

(For those who might be wondering about the censorship: Heather is no shrinking violet, but she has conservative in-laws and a young nephew that she cares not to upset, so I opted for something that would be easier for her to display openly if she chose.)

After the success of Heather’s handmade socks, it was no surprise—but also no less gratifying—that she gleefully embraced a bit of cheeky home decor.

A Little Handmade Christmas, Part 2

Content with the handmade cheer I’d poured into our home, I set about lavishing it on a few of my loved ones. My sister-in-law and dear friend Heather is a collector of mismatched socks, and it only felt right that she should have a truly special handmade pair in her sock drawer. I’d entertained the idea of making her socks last year, but chickened out at the last minute—I had no doubt she was knitworthy, but I thought there were other things she needed and would enjoy more.

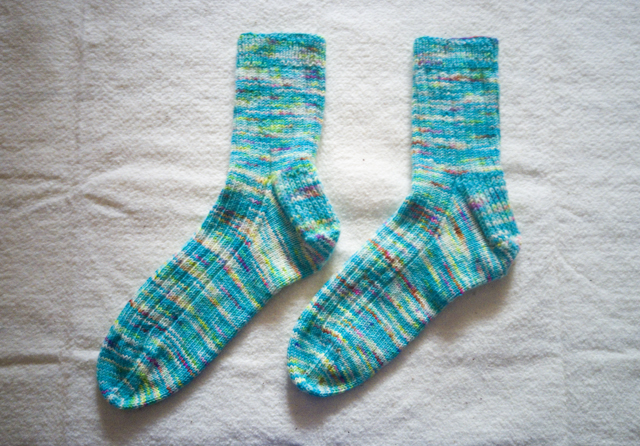
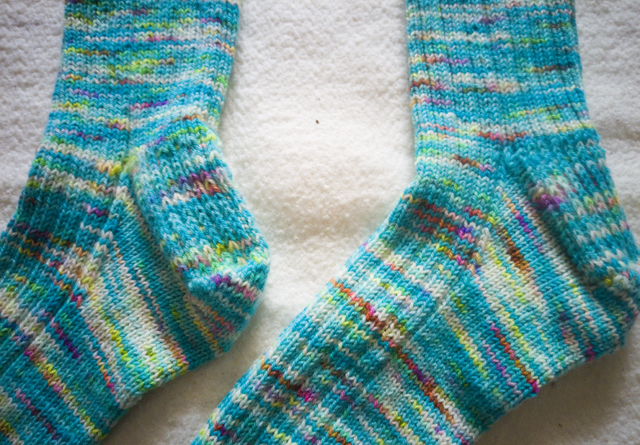
With Justin’s encouragement, I threw my doubts aside and cast on Glenna C’s A Nice Ribbed Sock. The yarn is Hedgehog Fibres Sporty Merino in color Bubble, from my beloved LYS Warm ‘n Fuzzy. I made my usual adjustment of going up a needle size, but otherwise knit the pattern as written. Details (like the length of the leg and foot to fit a women’s size 9.5 shoe) can be found on my Ravelry project page.

I was lucky enough not to suffer second sock syndrome, although I was a little rushed to finish them before we got on the road to see everyone for Christmas. I managed to make my right wrist and forearm rather sore for about a day, which is all the warning I need to take it easy on future projects!

Heather loves them and has hinted that she wouldn’t mind another pair, if I felt so inclined. I’m a bit jealous, though, as I don’t have any handknit socks of my own, so she may have to get in line!

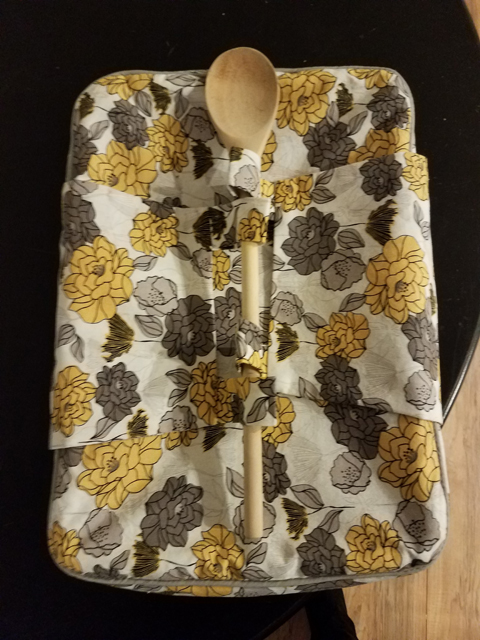
My second gift, and the biggest undertaking of my four Christmas projects, was a casserole carrier for my sister, Loren. She loves to cook, and on many occasions she’s taken meals to friends: to celebrate special occasions, to take care of them when they weren’t able to cook for themselves, or simply to enjoy their company. Transporting a steaming pan of lasagna or enchiladas across town isn’t exactly a cakewalk, though, and last year she casually mentioned that she was looking for a carrier to make it easier to bring hot dishes to potlucks and the like.

As with Heather’s socks, I thought a lot about making her this gift, but again, I lost my nerve. I doubted my sewing was up to the task, feared she wouldn’t like pattern or fabric I picked. I settled for other things I knew she wanted, things that felt easy and safe.

You have to understand, though, that my sister is really, really good at giving gifts. She’s attuned to everyone’s changing hobbies and evolving interests. She’ll be out shopping and see something that reminds her of you, and she’ll bring it home. Maybe she sets it aside for a birthday or holiday; maybe she gives it to you right now, just because. She also has a knack for searching out something you want and, when she can’t find the exact thing, picking something else that you end up liking even better.

I felt I’d let her down when didn’t make her the casserole carrier, but she graciously didn’t say anything more about it, and I squashed the feeling until it didn’t bother me anymore.

It bubbled up again—boiled over, really—when, a full year later, she mentioned a casserole carrier again among the things on her wish list. She was quick to qualify her wish by saying it didn’t need to be handmade, purchased would be fine too if handmade was too difficult—but handmade would be very nice.

Well. That settled that. I wasn’t about to buy this thing when I could, after all, make it. I had my brief; I set to work.

Photo by Loren

The pattern is Simplicity 1236, which offers carriers for a 9″ x 13″ rectangular baking dish and a 2.5-quart oval dish, round bowl covers in three sizes, and soft-sided dishes similar to a key tray or bedside catch-all.

Photo by Loren

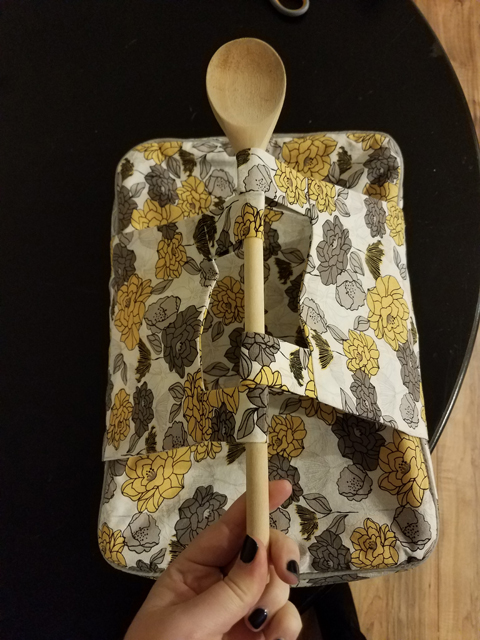
The rectangular casserole carrier has a quilted lining, double-zipper closure, decorative piping, and loops to hold a wooden spoon or dowel to create a handle.

Photo by Loren

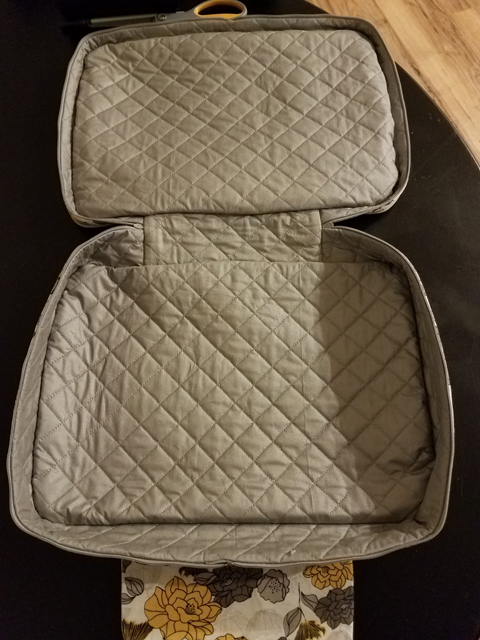
The pattern calls for “quilted ironing board cover fabric” for the lining. The only ironing board fabric I could find (at JoAnn) was un-quilted. Instead of searching online, placing an order with another vendor, and waiting for it to arrive, I did the only logical thing I could think of at the time: buy twice as much fabric and a package of cotton batting and quilt all of the lining myself.

Indeed, it was probably the most logical thought I had at all, considering I was in my second JoAnn store of the day and having a hunger-fueled meltdown trying to select the fabric for the outer shell. (It was very important to me to get it right, and I could not be persuaded that any number of fabrics would be “right.” Suffice to say that I have a very patient husband.)

Photo by Loren

I relied on my walking foot with quilt guide to get the lines spaced evenly at 1 inch apart on the bias. Initially it was quite easy and mindless to sew, though by the end I definitely got bored and was ready to move on.

Since I knew I’d committed a fair amount of time to making the lining, I went ahead and purchased coordinating piping rather than making my own, and I have no regrets about that. I was able to get a pretty good match between the piping, zippers, and light grey flowers.

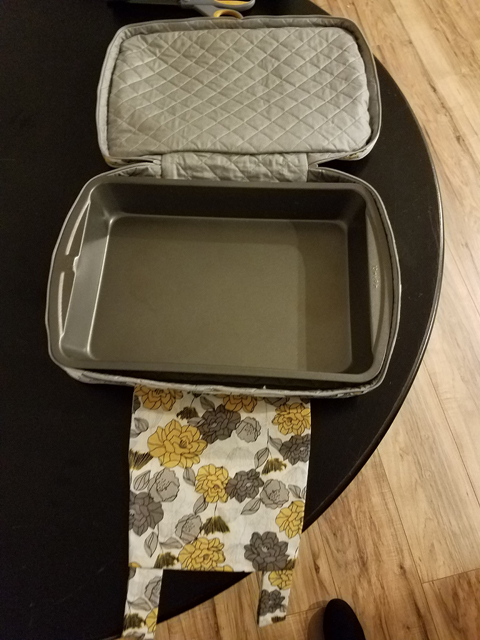
I followed the assembly instructions to the letter, and I’m happy with how neatly things came together overall, especially considering I don’t have a lot of experience doing three-dimensional corners. As you can see above, the entire inside is clean finished; there’s only a small amount of hand-sewing needed at the “hinge” to accomplish it.

There are only two things I would do differently. The first thing would be to interface the handles, which felt a bit flimsy. (I entertained the idea of making a second iteration out of a sturdier material like canvas, but I’m afraid that it would get too bulky to manipulate at the end, especially easing the corners).

The second thing would be to find a way to invisibly (or at at least subtly) tack the lining to the shell. As designed, the two are connected at the edges but not the centers, which provides that lovely clean finish but means that the two have a tendency to separate. I don’t think it’s even noticeable when there’s a dish in the carrier, but again, it makes the whole thing seem a bit flimsier than it probably is.

Loren seemed genuinely delighted when she opened this up on Christmas morning, and excited to put it to use. I hope that it holds up well and stands her in good stead through many family-style dinners and special gatherings.

A Little Handmade Christmas, Part 1

‘Tis the season for overdue 2017 project posts! On this, the one month anniversary of Christmas, I have a few holiday-inspired projects to share. Today I’ll share two things I made for us at home, and tomorrow I’ll be back with two gifts that I made for family.

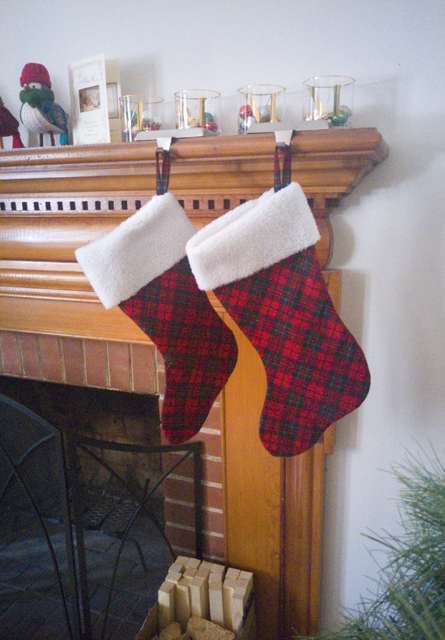
The first things I made were new, matching Christmas stockings for Justin and me. My own childhood stocking is very dear to me because it was sewn by my mom, but it’s often too small for the things intended to go in it: it doesn’t fit a paperback book well, which is a perennial favorite filling. Justin’s stocking, which he got after we were married—his childhood stocking still lives at his parents’ house—is larger but store-bought.

I’d wanted to make new stockings for several years, but each time I ran out of time or energy and had to let go of the idea. This season, however, I was overflowing with holiday spirit, and I was determined not to let it go to waste.

I polled Justin on what he thought the stockings ought to look like, and he was overwhelmingly in favor of tartan bodies with a fur or fuzzy cuff. He ended up picking out both fabrics from JoAnn: a crimson and evergreen snuggle flannel (which has a printed rather than woven design) and a faux lambswool (because the faux wolf fur that he wanted was laughably far outside the budget, even for this small project). I chose to line the stockings in leftover white cotton sateen from my stash.

For the pattern, I traced Justin’s stocking and fine-tuned the shape until I’d achieved what I believe to be the Platonic ideal of stockings. I have strong feelings about the proportion of shaft length to width and the angle of the toe, and I was vocal about my opinions while browsing inspiration online—high-end and charmingly homemade stockings alike suffered my scathing opinions. It’s really no surprise I needed to make my own to get what I want.

I was pretty sure I’d figured out how to assemble everything to get a clean finish and include a hanging loop, but just to be safe I referenced this tutorial from Cluck Cluck Sew to make sure I didn’t have to tear anything apart and sew it again.

The result is exactly what we’d both envisioned, and they served wonderfully to hold this year’s goodies from Santa.

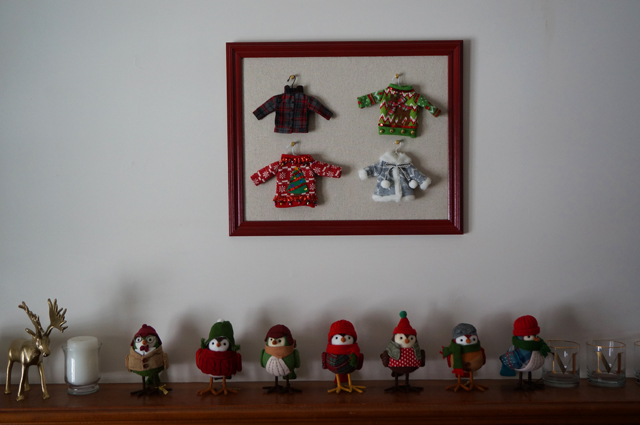
Next up is a bit of holiday decor inspired by these adorable tiny sweaters that we bought at the Container Store last year. They’re sold as gift box adornments and tree ornaments, but we hung them straight on the wall by our front door last year.

This year, I wanted to give them a little more weight and make them feel like an intentional part of the decor, so I mounted and framed them—quite inexpensively, too!

To determine roughly what size frame I was looking for, I laid out the four sweaters on the floor, spacing them comfortably, and took measurements of the minimum length and width I’d need. Then I popped into our local thrift store and perused the framed art section until I found a decent-sized frame that I liked. I think it cost me $6–$7? It held a print of a floral still life.

I removed the staples holding the cardboard backing in place, then separated the layers: glass, frame, and matted print. I set the glass aside and spray painted the frame with three coats of cherry red paint. I turned the print over so that the back was now the front and wrapped it—matte and all—in a linen-look fabric from JoAnn, stapling it in place with regular-duty office staples as close to the edge as possible.

I didn’t want to go out and buy a package of gold push pins, so I took plain white ones and painted them with a little gold acrylic craft paint I had lying around. (It took a couple of coats and was kind of a pain, but it was effectively free for this project.) When they were dry, I dabbed a little Gorilla glue (again, what I had lying around) on the flat underside of the pin that would be against the fabric and pushed them straight through the fabric-wrapped print. The points stuck out too far in the back, so I tried bending them down with needle-nose pliers, but that didn’t really work; I resorted to using the pliers to snip the tips off, and that seemed to work just fine.

Once the glue tried and the pins were firmly in place, I placed the wrapped print in the frame. To secure it, I followed the advice on Decor Adventures to use glazing points (also called glaziers points), which I purchased at Lowe’s. From there, it was a simple matter to move the sawtooth hanger to convert the frame from portrait to landscape orientation, tap a picture hanging brad in the wall, and hang both the frame and sweaters. The sweaters aren’t permanently attached to the pins, so if I ever change my mind I can easily use them in a different way.

I’m ridiculously pleased with the outcome of this little piece of art—it’s still hanging up, and it makes me happy every time I come in the house.

Fast (Re)Fashion: Polo Shirts to Polo Dress

During the first quarter of 2017, Justin was let go from his office job and was put in a position where he needed to take temporary work for a time. Options were sparse, however, and he ended up in a more a physical job than he expected, one that had him on his feet all day handling things that were frequently sharp, greasy, or caustic. There wasn’t a strict dress code, so for the first couple of months he kept wearing his favorite t-shirts and polo shirts to work. His motive was understandable: faced with mindless tasks he didn’t enjoy in the sub-basement of a company that didn’t value him as an (expendable, temporary) employee, he clung to the one thing that made him feel like a person. Who can blame him?

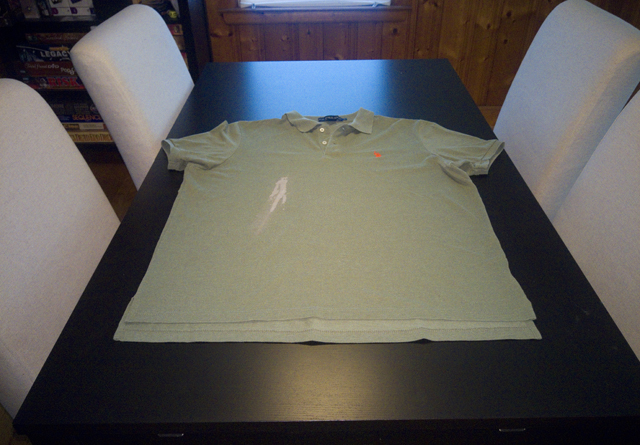
Unfortunately, several of his shirts quickly sprouted holes, grease stains, and bleach marks. One of those shirts was a particularly nice polo from Ralph Lauren, in a flattering shade of green, that he’d received as a gift for Christmas.

The stain was too large and too prominent to cover up discreetly, but I was loath to throw away a good shirt that was otherwise in pretty decent condition. After eyeballing it several times and then trying it on (it was a men’s XL), I decided I could salvage it by turning it into a dress for me. I knew the dress had to have princess seams to avoid the stain, and I didn’t have anything in my pattern stash like that.

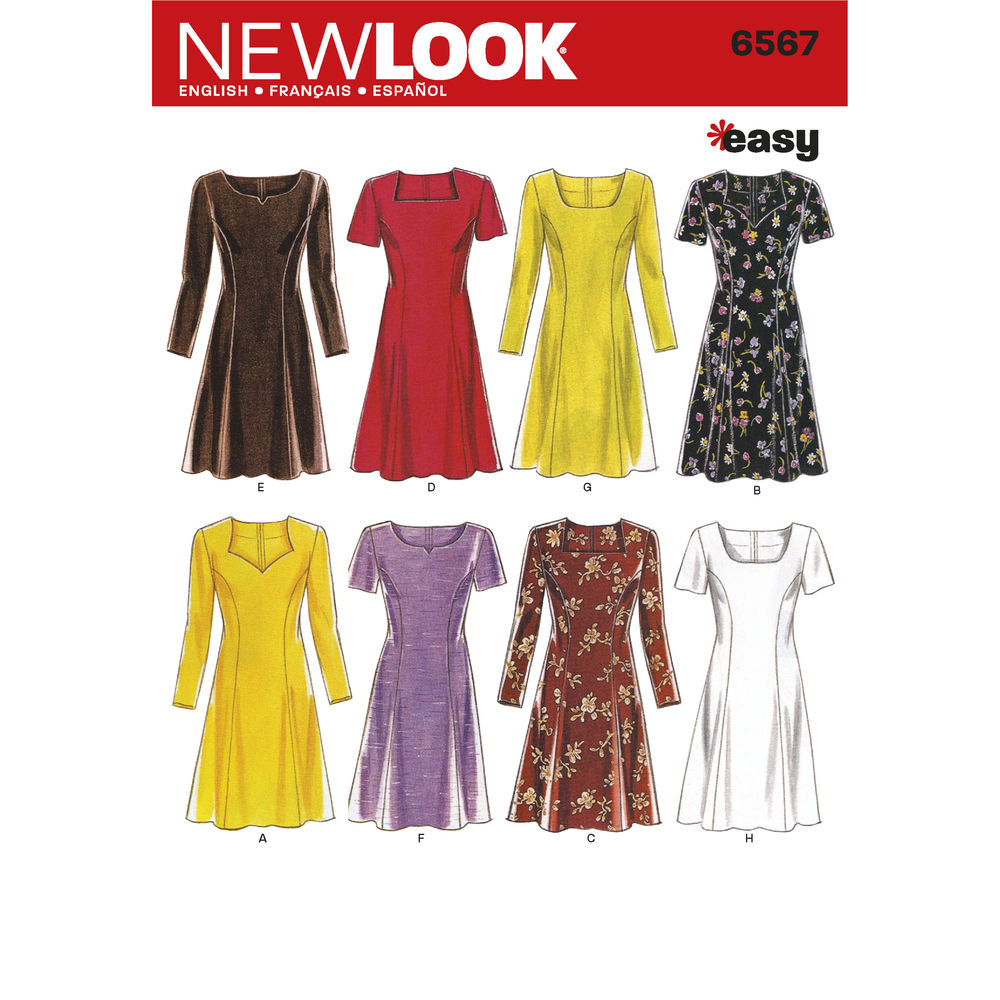
After flipping through both online and in-store pattern books, I settled on New Look 6567.

It’s designed for wovens, but it was the only pattern I could readily find that had the style lines I was looking for. I ignored the various neckline options and the back zipper, since I planned to preserve the original collar and placket and leave the dress a pull-on affair.

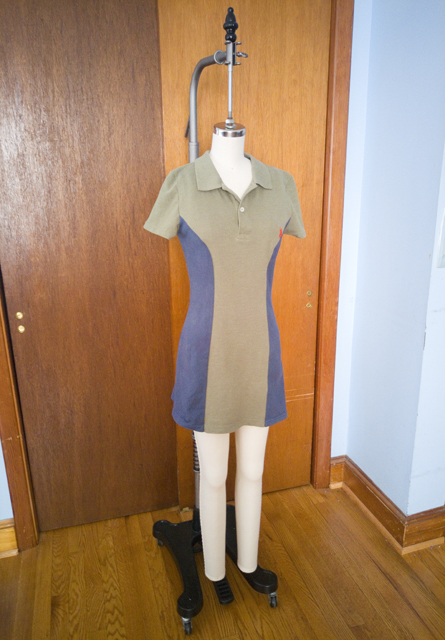
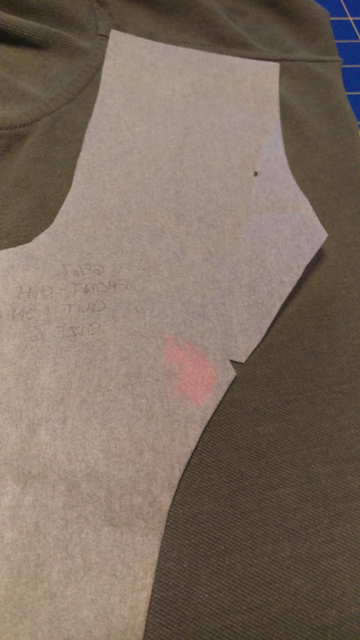
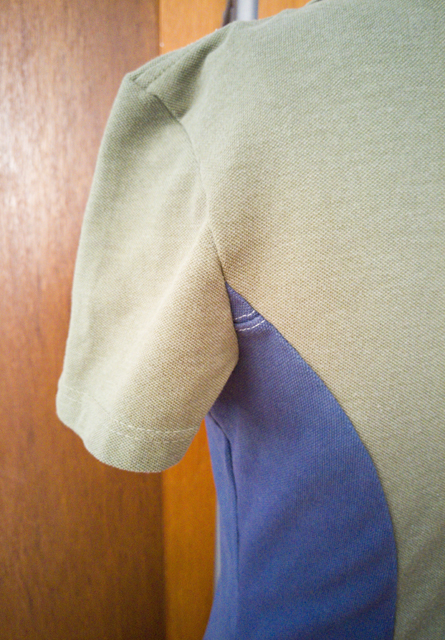
I cut the shirt apart at the side seams and removed the sleeves, but left the front and back attached at the shoulder and left the bottom hem intact. Based on my measurements and what I thought was an acceptable amount of ease, I traced a size 6, and then proceeded to shift the pattern pieces around on top of the shirt until the grainline was parallel with the center front and the slope of the shoulder on the pattern roughly aligned with that of the shirt. I had to dodge the bleach stain, and I also wanted to preserve the logo embroidery if possible—I liked the contrast of orange on green.

As soon as I started playing pattern-piece-Tetris, I realized there was a problem: although the shirt was plenty wide enough on me, I wasn’t able to fit the side front and side back pieces on the shirt and respect the grainline without losing a significant amount of length from the bottom. (I wish I had a photo showing this, but I forgot to take one.)

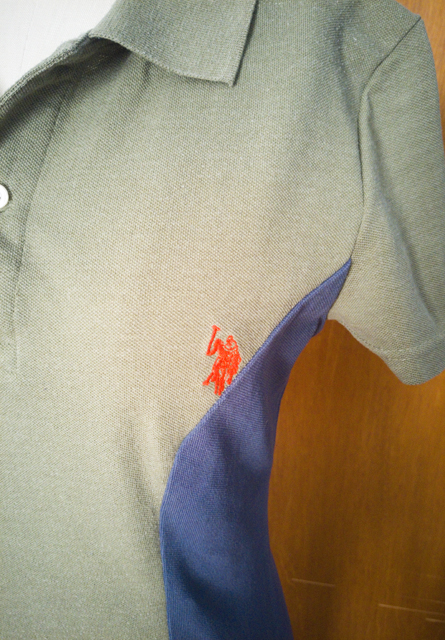
I briefly despaired, then raided Justin’s closet and dug out another polo shirt that was destined for the refashioning pile. This one was a different brand with a different cut, and it was white. The shape didn’t matter so much since I was cutting the pieces out of the middle, but I decided the white was too stark a contrast, so I over-dyed it navy using Rit liquid dye leftover from a Halloween costume project a few years ago. As with my other dyeing experiments, I used the stovetop method and it worked a treat.

With these cutting hurdles behind me, the dress sewed up quickly. I basted everything on my regular sewing machine and then sent it through the serger to seam and finish the edges. The logo just narrowly avoided being eaten by the seam.

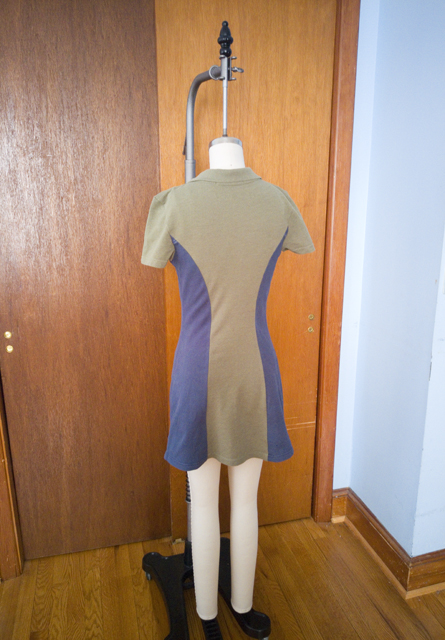
Perhaps the only thing that would give away the secret of this dress’s origins are the teeny, tiny seams near the back underarm, which were the part of the shoulder seams on the white-shirt-turned-blue-shirt.

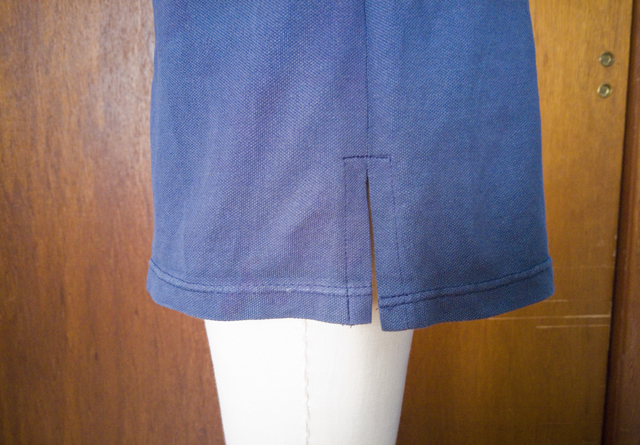
A split hem seemed a like a classic design choice. The back of the dress ended up several inches longer than the front, so I ended up cutting off the excess and re-hemming the back in coordinating thread for each panel.

Overall I like the way the dress turned out—it looks pretty much exactly like I envisioned it—but it’s just a little too snug and a little too short to feel comfortable walking around in. (These dress form shots are a bit deceiving, since it hasn’t been padded out to my measurements yet.) I can see that I overestimated how much the pique would stretch horizontally when choosing a size, and what felt long enough in a baggy cast-off is different from what feels long enough in a more figure-skimming silhouette. If I do a refashion like this again—I’m definitely interested in trying, I’d just need to thrift a couple more shirts—I’ll size up in both pattern and shirt so that I can get the fit I’m looking for.

Since I don’t know anyone smaller than me, this dress is headed to the thrift store, but at least that’s better than heading to a landfill, right?