‘Tis the season for overdue 2017 project posts! On this, the one month anniversary of Christmas, I have a few holiday-inspired projects to share. Today I’ll share two things I made for us at home, and tomorrow I’ll be back with two gifts that I made for family.
The first things I made were new, matching Christmas stockings for Justin and me. My own childhood stocking is very dear to me because it was sewn by my mom, but it’s often too small for the things intended to go in it: it doesn’t fit a paperback book well, which is a perennial favorite filling. Justin’s stocking, which he got after we were married—his childhood stocking still lives at his parents’ house—is larger but store-bought.
I’d wanted to make new stockings for several years, but each time I ran out of time or energy and had to let go of the idea. This season, however, I was overflowing with holiday spirit, and I was determined not to let it go to waste.
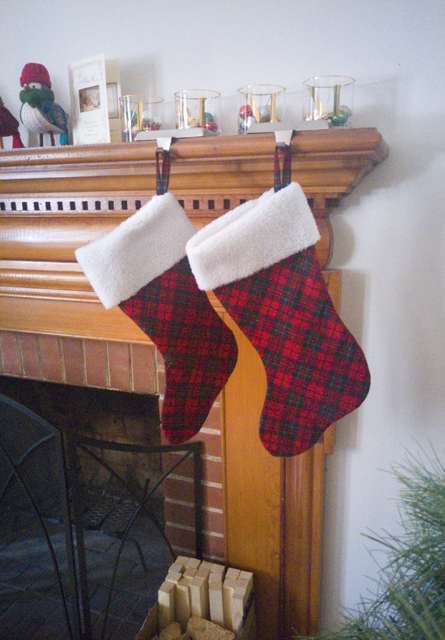
I polled Justin on what he thought the stockings ought to look like, and he was overwhelmingly in favor of tartan bodies with a fur or fuzzy cuff. He ended up picking out both fabrics from JoAnn: a crimson and evergreen snuggle flannel (which has a printed rather than woven design) and a faux lambswool (because the faux wolf fur that he wanted was laughably far outside the budget, even for this small project). I chose to line the stockings in leftover white cotton sateen from my stash.
For the pattern, I traced Justin’s stocking and fine-tuned the shape until I’d achieved what I believe to be the Platonic ideal of stockings. I have strong feelings about the proportion of shaft length to width and the angle of the toe, and I was vocal about my opinions while browsing inspiration online—high-end and charmingly homemade stockings alike suffered my scathing opinions. It’s really no surprise I needed to make my own to get what I want.
I was pretty sure I’d figured out how to assemble everything to get a clean finish and include a hanging loop, but just to be safe I referenced this tutorial from Cluck Cluck Sew to make sure I didn’t have to tear anything apart and sew it again.
The result is exactly what we’d both envisioned, and they served wonderfully to hold this year’s goodies from Santa.
Next up is a bit of holiday decor inspired by these adorable tiny sweaters that we bought at the Container Store last year. They’re sold as gift box adornments and tree ornaments, but we hung them straight on the wall by our front door last year.
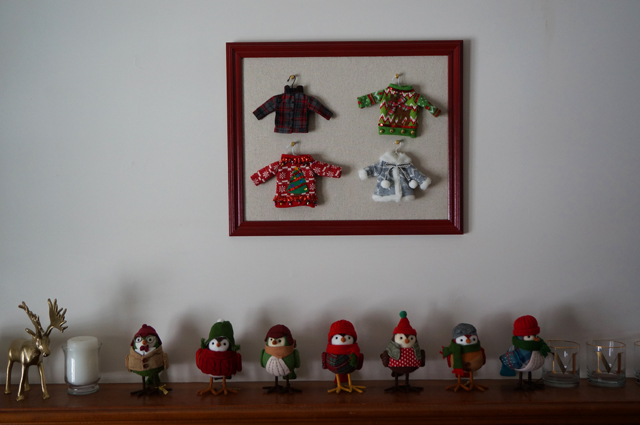
This year, I wanted to give them a little more weight and make them feel like an intentional part of the decor, so I mounted and framed them—quite inexpensively, too!
To determine roughly what size frame I was looking for, I laid out the four sweaters on the floor, spacing them comfortably, and took measurements of the minimum length and width I’d need. Then I popped into our local thrift store and perused the framed art section until I found a decent-sized frame that I liked. I think it cost me $6–$7? It held a print of a floral still life.
I removed the staples holding the cardboard backing in place, then separated the layers: glass, frame, and matted print. I set the glass aside and spray painted the frame with three coats of cherry red paint. I turned the print over so that the back was now the front and wrapped it—matte and all—in a linen-look fabric from JoAnn, stapling it in place with regular-duty office staples as close to the edge as possible.
I didn’t want to go out and buy a package of gold push pins, so I took plain white ones and painted them with a little gold acrylic craft paint I had lying around. (It took a couple of coats and was kind of a pain, but it was effectively free for this project.) When they were dry, I dabbed a little Gorilla glue (again, what I had lying around) on the flat underside of the pin that would be against the fabric and pushed them straight through the fabric-wrapped print. The points stuck out too far in the back, so I tried bending them down with needle-nose pliers, but that didn’t really work; I resorted to using the pliers to snip the tips off, and that seemed to work just fine.
Once the glue tried and the pins were firmly in place, I placed the wrapped print in the frame. To secure it, I followed the advice on Decor Adventures to use glazing points (also called glaziers points), which I purchased at Lowe’s. From there, it was a simple matter to move the sawtooth hanger to convert the frame from portrait to landscape orientation, tap a picture hanging brad in the wall, and hang both the frame and sweaters. The sweaters aren’t permanently attached to the pins, so if I ever change my mind I can easily use them in a different way.
I’m ridiculously pleased with the outcome of this little piece of art—it’s still hanging up, and it makes me happy every time I come in the house.