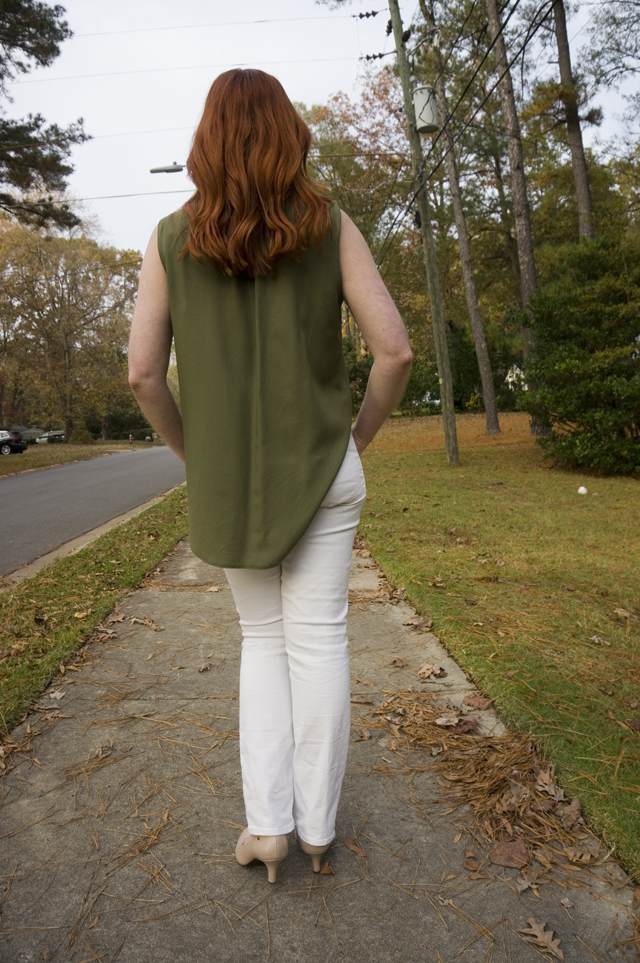
Now this is the kind of summer top I dream of. The fabric is a beautifully smooth, soft, and drapey mystery material that my mom (hi Mom!) gave me when she was clearing out her sewing and craft supplies. I’m not sure what she originally bought it for; I can’t recall anything she’s made out of it. The smooth hand and fluid drape remind me of rayon challis, although Allie’s Fabric Files says that wrinkles will fall out of rayon challis within a few minutes of wear, and that’s definitely NOT the case with this material. It loves a good steamy press, but also seems to wrinkle from my body heat alone. Perhaps it’s linen or a linen blend?
To keep the fabric from slithering away from me during cutting and sewing, I filled a dollar store spray bottle with homemade spray starch (made by boiling cornstarch in water) and applied it liberally while pressing. It made a huge difference in how the fabric handled: it remained crisp and even a little grippy throughout the sewing process.
The pattern is a heavily altered McCall’s 7324. I mentioned the modifications I intended to make after muslining the pattern, but here’s a rundown of the changes that happened on the final garment:
Cut a size 10 instead of a size 6
Narrow the shoulders by 1 inch
Deepen the armhole by 0.5 inches
Eliminate the vertical pleat extending from the placket
Eliminate the gathers along the front neckline between the placket and the shoulder, which necessitated the following compensating changes:
Change the shape of the placket opening from a trapezoid (narrow at the top, wider at the bottom) to a V
Change the length and angle of the placket bands to match the new opening, ensuring the bottoms of the bands will be horizontal when stitched in place
Shorten the neckband (which looks like a collar stand)
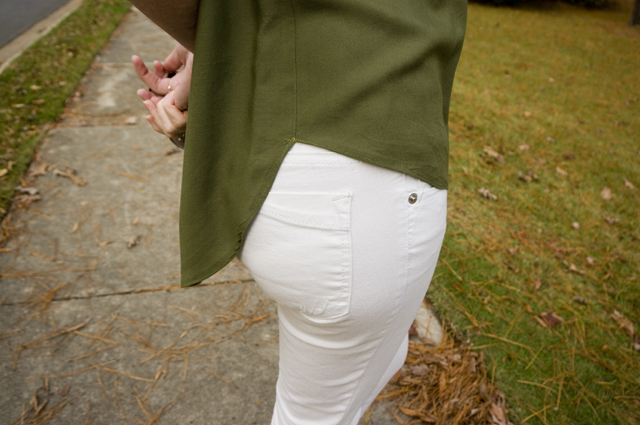
I also left the hem curve alone this time instead of trying to shorten the back. A little butt coverage isn’t such a bad thing.
The top is quite voluminous. With the relaxed fit, going up one size would have been sufficient. I also didn’t account for the fact that a two-size increase would change the armhole, so while taking in the shoulder width was definitely a good call, scooping out the bottom of the armhole an extra half-inch wasn’t necessary. In fact, as you probably noticed in the second photo, raising or moving my arms reveals a peek of bra band. I don’t care that much when I’m wearing the top casually, but I’ll throw on a camisole underneath if I’m in a more conservative setting. I’d love to make an obnoxiously colored bralette to wear with it—I keep envisioning orange—because FASHION.
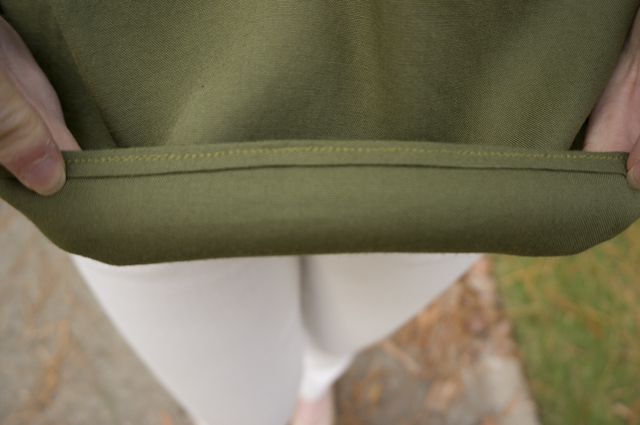
On the inside, I stitched everything on my sewing machine, then finished the side and shoulder seams with my serger and the armholes with self-fabric bias tape. (Starch is the only thing that made bias tape possible, and even then, I’ve got a few spots of wobbly stitching where the raw edge has come untucked. I have no idea how anyone can make bias tape out of things like silk…) The hem is a baby hem made using Carolyn’s instructions.
I think that’s everything? Here are a few up-close shots:
I’m much happier with the gathers on this iteration, and my topstitching on the neckband is marginally better this time. I wore this beauty about once a week from the time it was done until a cardigan wasn’t enough to make it warm. I don’t exactly look forward to summer here in the south, but being able to throw on a cool, comfortable top I made takes a bit of the sting out of it—it’s the closest I’m ever going to come to looking stylish while sweating buckets.
My favorite summer top is, without a doubt, Express’s sleeveless Portofino shirt. It’s 100% polyester, but it’s semi-sheer, floaty, and relaxed enough through the waist and hip that it lightly skims the body, which is good news when it’s in the 90s Fahrenheit (30s Celsius). The polyester doesn’t make me sweat, the heat and humidity do, and if I’m going to be soggy anyway I’d rather not feel the cling of spandex or the weight of cotton.
I think I’ve mentioned before that I work in a pretty casual office—despite a nominally business casual dress code, jeans, leggings, and all manner of fashion and athletic shoes have taken over swaths of the company without any pushback from management—so I can wear my sleeveless Portofinos at work with or without a coverup (though I usually throw on a cardigan to stave off the summer AC). Since they transition so easily from office to home for me, they were a logical jumping off point to expand my summer top options.
During a trip to JoAnn last summer, I picked up four top patterns that shared some similarity with my beloved Portofinos:
McCall’s 7324, a sleeveless popover top/tunic pattern with a (buttonless) half placket
New Look 6345, a sleeveless v-neck tunic with a relaxed fit around the hips (but a more defined waist)
New Look 6414, another A-line, v-neck top/tunic, with the option for a keyhole neckline and sleeve variations
New Look 6450, an A-line top that sort of looks like a pillowcase dress, but with fixed neckband and more sharply cutaway armholes
I decided to tackle the McCall’s pattern first because I was relatively fresh from the Archer making class with Lladybird and wanted to take advantage of the things I’d learned and lock those tips into my mind. I hadn’t made any woven shirt patterns from McCall’s, just a dress with a very different fit, so I thought it wise to make a muslin before cutting into a more precious fabric I already had in my stash.
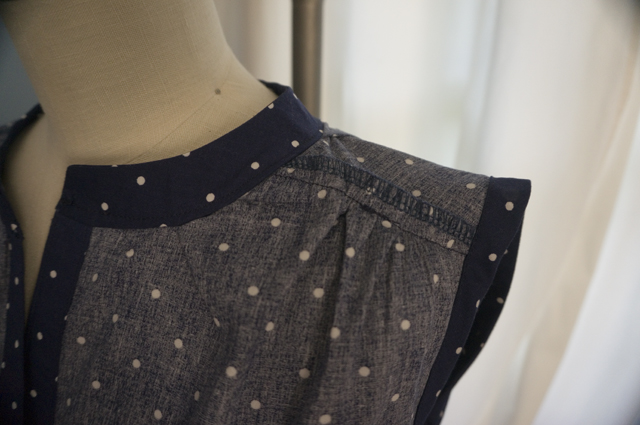
The fabric is this 57″ White Dots on Navy from JoAnn. It’s listed as a cotton shirting, but after washing and drying it didn’t soften up much, and the crispness makes it feel more like a quilting cotton than a shirting to me. I wouldn’t use it again for a shirt.
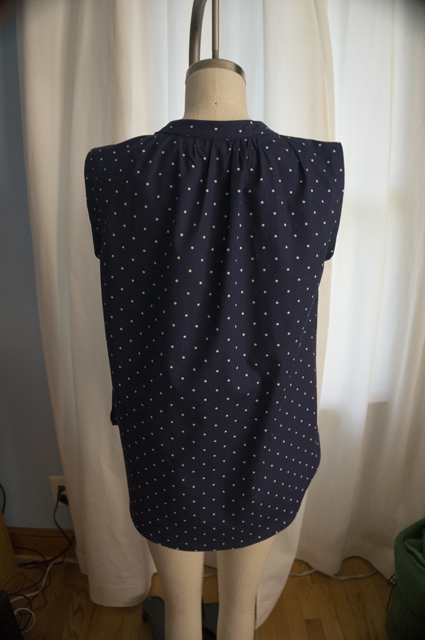
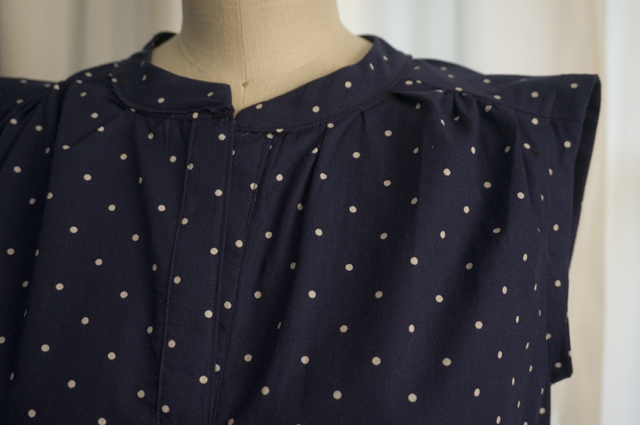
As you can probably guess from these dress form photos, this muslin didn’t turn out wearable. I chose View A and cut out a size 6 based on the finished garment measurements and the width of one of my sleeveless Portofinos at the bust. The key difference between the McCall’s pattern and my ready-to-wear garment is that the latter has bust darts. Looking at the pattern, I had reasoned that the gathers at the shoulder were just bust darts that had been rotated into the shoulder and then converted to gathers. I further assumed that most of the room in the bust came from the gathers, and not from the width of the garment. I was incorrect about this, and the whole thing ended up too snug in the shoulders and bust, and not exactly relaxed in the hip either. I also found the shoulders too wide and the armholes too high for my frame; I made a note of those things for the next incarnation, but didn’t fret over them, since they’re easy to fix on a sleeveless garment.
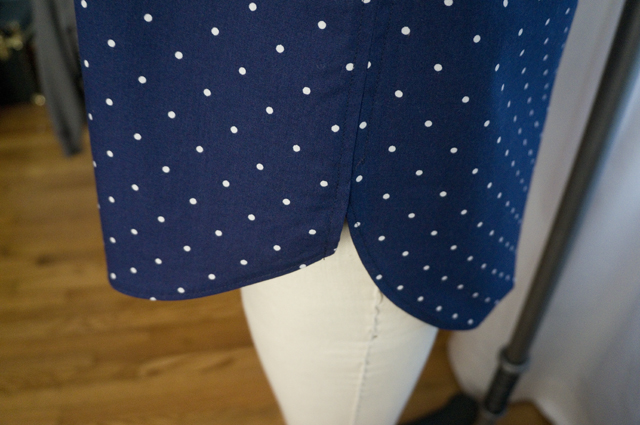
I made one other mistake, a completely brainless one that I should have been able to avoid. While tracing off the pattern, I felt the high-low hem was a little too pronounced, so I decided to shorten it to prevent walking around with a ridiculous butt flap. I did this by shortening just the back pattern piece by two inches—at the lengthen/shorten line. Cue my surprise when I go to sew up the side seams and realize that, surprise! the side seams don’t line up any more, and I have an accidental split hem:
I don’t remember now whether I sewed up the side seams first or sewed the hem first. At some point in the process I decided I wanted to finish the side seams by turning under the seam allowance and then stitching it down, rather than serging, so that made fixing the issue more annoying (and then the fitting failure made it irrelevant).
I did, however, serge the shoulder seams (though why I dragged the machine out for just that, I don’t know) and then stitch then down as well for a mock flat felled seam.
With all of those little details covered, let’s get to my real gripes: the intersection of design choices, construction, and instructions.
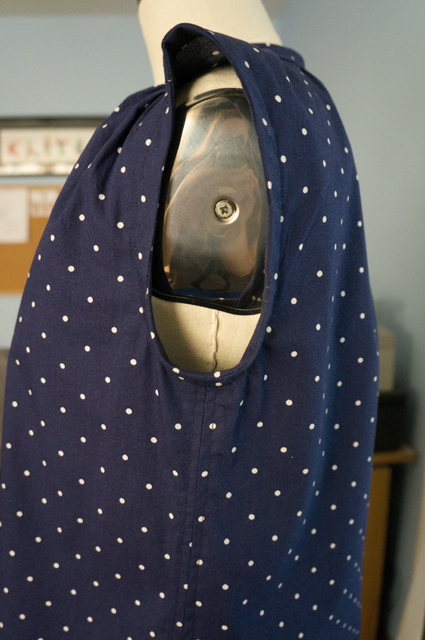
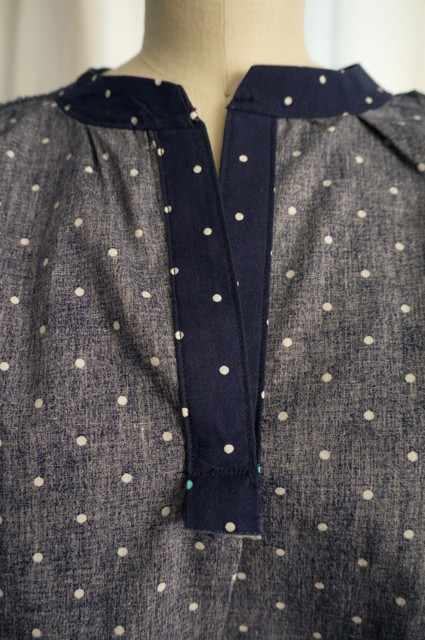
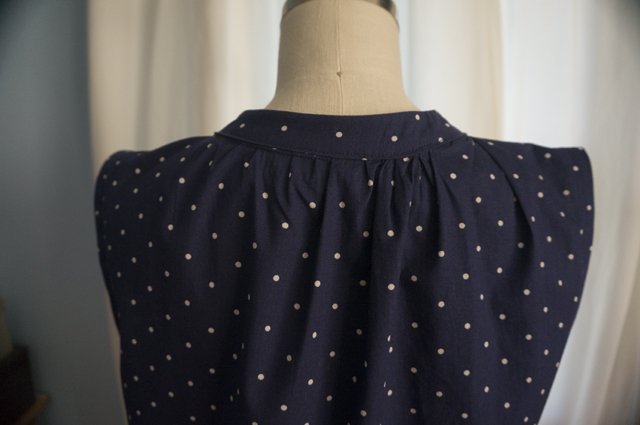
What I didn’t notice when I bought the pattern, and what you almost certainly can’t see because the fabric is so dark, is the vertical pleat coming off the bottom of the placket. On the pattern piece, the placket opening is double the necessary width so that you can hot-dog fold the front of the blouse to create that pleat. It’s unnecessary from a construction standpoint, it doesn’t add anything to the look of the garment, and I hate it. Is that an irrationally strong feeling? Yes. Did I resolve to move heaven and earth to engineer that pleat out on my next version? Also yes.
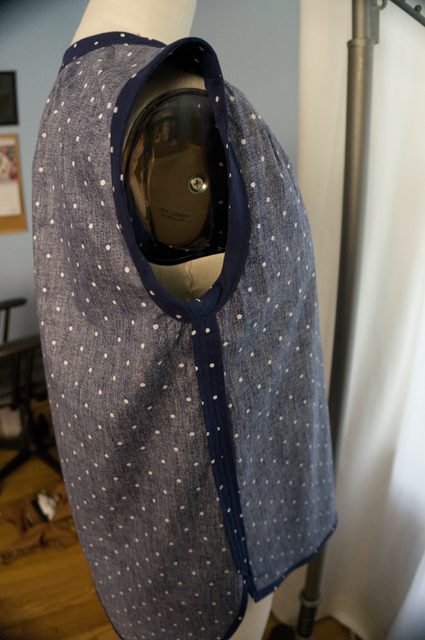
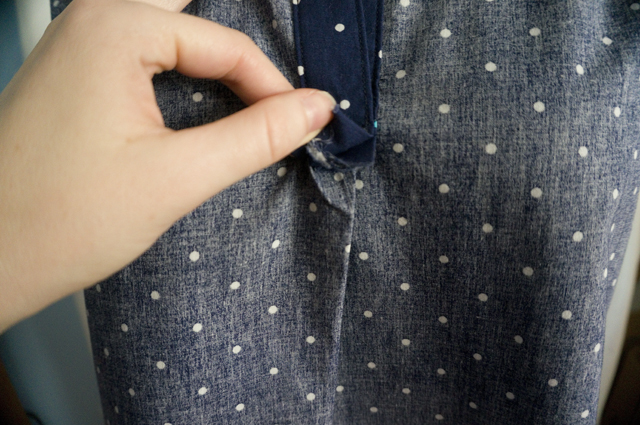
Constructing the placket was way more challenging than it needed to be, though it’s probably fair to say that’s partially my fault. After preparing and applying the bands for the placket, I could not make sense at all of this instruction: “On inside, lap left front band over right. Stitch lower edge of bands to end of opening.” Or more precisely, I understood that it was supposed to look like this…
…but I could not get the bands and the opening to cooperate. After reading through Allie’s clearly written and photographed tutorial on sewing partial plackets, I finally figured out I hadn’t made the angled cuts into the corners of the opening. This step should definitely be in bold type, because if you don’t do this correctly (or at all), the origami WILL NOT work.
While we’re staring at the inside of the placket, I’d like to take a moment to complain about the unfinished ends (is this normal in RTW? I don’t have any partial placket shirts I can check) and the weird fold that results where the placket meets that stupid pleat.
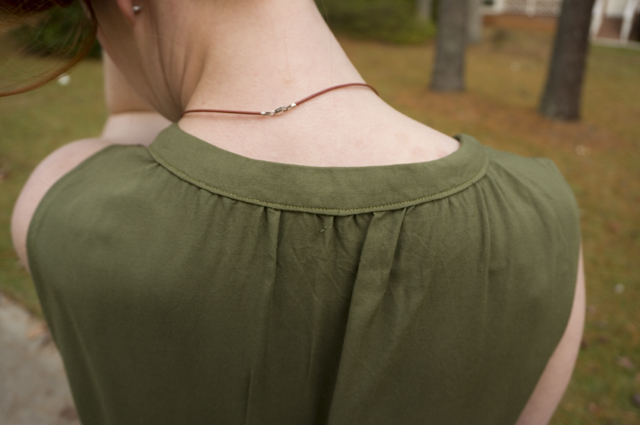
On to the gathers! There are gathers around the curve of the neckline between the placket and the shoulder seam, along the shoulder seam between the neck and armhole, and around the back neck.
As near as I can tell, the gathers between the placket and the shoulder exist solely to pull the V of the placket open, otherwise the bands would neatly overlap each other like a normal (hidden) button placket. The area to gather is quite small, which made it difficult for me to gather evenly and ended up looking like unintentional puckers. In addition, since these gathers are at a roughly 45 degree angle to the ones coming off the shoulder seam, it results in a weird, bunchy, wrinkly mess in that area. Ugh. As with the pleat, I resolved to eliminate the gathers around the front neckline on the next iteration.
The gathering on the back neckline is fine design-wise, although I didn’t execute it well.
It’s a shame that everything about this was a flop, but I really am glad that I figured out all of my the pattern’s issues before I cut into the fabric I really wanted to use, especially since my real-deal fabric was thin and slithery. It certainly didn’t hurt to practice a few techniques, either: my topstitching remains dodgy, but I’d like to think it’s just improving in very small increments.
Halfway through February already—how did that happen? Between being out of town at the end of January, launching into a fresh onslaught at work, and knuckling down to work on a side gig, there was just enough time to finish up the end of the January Cure, but not quite enough to get this final check-in done and dusted—until now!
Instead of the embarrassing anecdote I was going to share, I’m just going to write a note here that says “use things up before you go on a spree buying new ingredients for new recipes, otherwise you will be forced to cook every meal as though it’s an episode of Chopped.”
Since we moved in, we’ve had a low bookcase and an armchair along the wall by our front door. The bookcase used to hold a bunch of music and game CDs, then we had a reckoning and got rid of about 50% of them; the two empty shelves now hold our most-worn pairs of shoes. I never liked having the chair where it is—it’s too far from the couch and at an awkward angle to watch TV, but we thought it was too narrow and deep to use in the L-shaped seating arrangement I really want.
On balance, we decided that it would be smart to test the layout to see if we even like it before we spring for new furniture, so we moved the chair even though it’s not ideal. That freed up space to add a new shallow console where the chair used to be.
I’m debating moving the paper shredder from the office to the entryway, since I do most of my shredding immediately after bringing in the mail. I’m also hoping to thrift a stool that I can reupholster and tuck under the table, but so far all of my searching has yielded no success. When the weather warms up, I’ll try the Raleigh flea market.
We haven’t emptied the outbox yet. On our drive back from Virginia we were talking about some of our collections and realized that we had both independently arrived at the conclusion that we have things we need to let go of to make room for new additions to our hobbies. We already need to make multiple trips to handle what’s in the outbox, so we’re holding off until we can go through those collections we talked about and make some decisions together.
If the January Cure were scored, I don’t think I’d do very well. I never did work on my big project, and the parts of my house that weren’t part of the Cure are still overrun with disorganized stuff. Still, I feel really good about the experience. Having a handful of spaces, even small ones, that are tidy (and easy to reset when they get untidy) is like an oasis in the dessert. Our bedroom in particular is a respite: no matter how stressful the day, I feel like I can crawl into bed and relax now that I’m not surrounded by my own clutter. As far as participation trophies go, that doesn’t suck. 😀
I’m going to try to keep tackling small areas at a time over the rest of the winter and into spring. But first, I’d like to squeeze in a little sewing. I haven’t pulled out my machine since November, and I’m itching to make something before the season changes!
Back on track! After stumbling through the middle 50% of the January Cure, Week 4 felt much more successful. Was it due to a sudden burst of creative energy, a renewed sense of purpose arising from Justin’s approval of my efforts, or a continued, stubborn refusal to follow the brief? We’ll probably never know.
I don’t have any paper clutter, ha! But seriously, after doing the January Cure four years ago, and then going through the process of buying a house, I think I’ve zeroed in on what paper to keep and what to throw away. I have two sturdy containers with hanging file folders for long-term storage, which I’ve reorganized a couple of times to be easier to search. I usually end up going through them once or twice a year and shredding anything we no longer need.
We don’t get a lot of mail, but what we do get it pretty easy to sift into keep/recycle/shred piles. On most days I handle recycling and shredding immediately, but if I don’t, things never stack up for more than a few days before I deal with them. The keep pile is further sorted into file and action piles, and those are dealt with every few days to once a week. Mail requiring action currently lives in a basket in the living room. I’m thinking of swapping the basket for a cute desktop letter sorter, but the change would be entirely for aesthetics—the current arrangement works just fine.
I used to have about a hundred pounds of academic papers and early career portfolio items stored in one of our closets. That’s not an exaggeration: the paper weighed as much or more than I did. But I finally went through all of it last year and drastically reduced what I was saving.
I kept important records like transcripts, sentimental records like report cards with handwritten comments, and coursework like marked-up college research papers and creative writing assignments, but shed many, many folders of notes and exercises. I also kept any portfolio pieces that I didn’t have digital originals for, or ones where the product is something other than a plain paper document. Everything fits inside a single 18 gallon storage bin. In time, I’ll probably be able to let go of that stuff, too. For now, it takes up considerably less space than it did.
It had been too long since I’d thoroughly vacuumed our couch and flipped the cushions. They feel much fresher now, although I think I’ll be adding “professional upholstery cleaning” to my list of things to accomplish in 2019.
This is one of those good habits that I wish I had but find it weirdly difficult to cultivate. The surface sweep is definitely a tactic of mine, but I tend to do it every few days or once a week, and it tends to be in the morning. Morning cleanups are always frantic and guilt-ridden, and usually a tactic to stall going to work. We already take time to lock up and turn off electronics before bed—it shouldn’t be that much harder to put a handful of things away too. Right?
I spent my family day helping with a family situation that needed attention. Everything is okay, but no house-related stuff happened. I’m giving myself a pass on it.
I could have done this, but instead I took a tour of the Triangle’s thrift stores (the ones open on Sundays, anyway) to look for a vanity stool I could makeover for the new entryway setup. I didn’t find anything that fit the bill, but I’m not giving up just yet.
I also spent some time shopping for a secret, unselfish sewing project. I can’t share yet, but I’m looking forward to writing about it when it’s done. Which should be right after I catch up on the backlog of 2018 posts I need/want to write. Oy. January, how have you been so long and yet so short?
Another tardy January Cure check-in! Catching up was more difficult than I expected, but I was able to take off from work on Monday and that helped. Week 3, here we go!
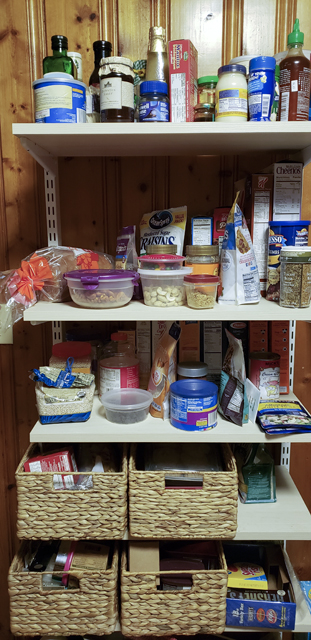
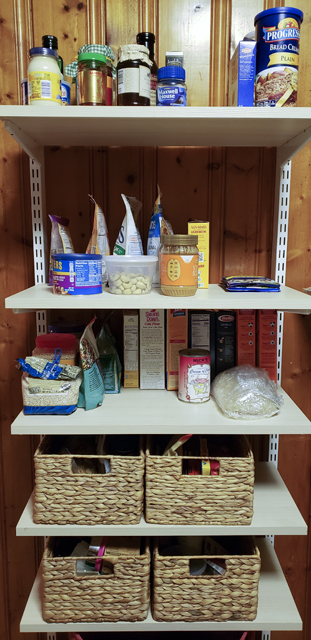
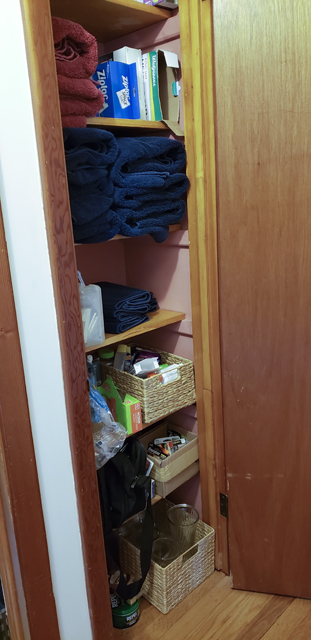
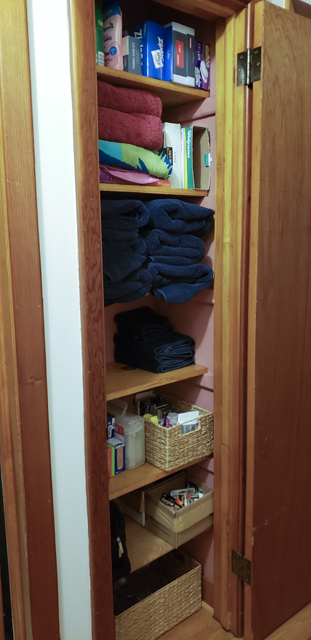
As promised, my closet cleanout focused on the linen closet in our hallway. I don’t think it’s particularly stuffed, and generally everything in there belongs there, but the arrangement inside is constantly shifting. If it’s been awhile since I’ve washed towels and there’s empty space on the towel shelf, the first aid kit or the box of bathroom trash bags has a tendency to migrate there, only to be moved again when the towels come out of dryer. It’s not a problem, exactly, but every now and then I find myself having to rearrange things in order to put other things away.
Taking a cue from Stephanie Sikora of Life Made Simple, who was on a recent episode of Young House Love Has A Podcast, I tried to put the most-used items within easy reach, and to move less-used items up top and out to the sides. A few items, like extra toilet paper and hand soap, were moved into the bathroom cabinets—it’s two steps from this closet into the bathroom, but Stephanie recommends putting everything as close to where it will be used as possible, and that sounded like a common-sense tip that’s easy to follow in our situation.
BeforeAfter
The difference isn’t dramatic, there’s no fancy new system or pretty bins, but the extra breathing room in here is nice.
I also took the opportunity to clean out the basket with our over-the-counter medications. Duplicates were consolidated and expired medications went into the outbox to be dealt with properly at the end of the month.
The kitchen didn’t really get the attention it deserved. I was strapped for time because we were having guests for brunch on Sunday, so I focused on getting the trash and recycling out, getting all of the dishes washed and put away, wiping down the counters, and wiping down the top of the stove. I really need to go back and clean the top of the fridge and the insides of the oven and microwave, but those will have to wait for another day.
No flowers again. I really want to be better about this! Fresh flowers are a treat any time of the year, but a real balm to the soul when it’s dark and cold.
We actually have two cabinets in our bathroom: a double-wide “vanity” with a single sink and a built-in cabinet over the toilet. (I say “vanity” because it’s not a freestanding piece of furniture but another built-in, and not a particularly well made one at that). I opted to work on the former, which has three cabinets and two drawers, since it holds our most-used stuff; the other is just storage for cleaners and such.
I started by taking everything out and removing the grimy, crumpled adhesive shelf liner that was still clinging in the backs of the cabinets and drawers. I found another layer of a different liner in the drawers, but it was stuck so firmly that I couldn’t lift a single corner, so I gave up trying to peel it off. I wiped everything down with Method’s all-purpose cleaner (I really like the pink grapefruit scent), then applied new adhesive shelf liner.
I sorted everything that came out into piles: stuff for hair, stuff for eyes, stuff for skin, stuff for teeth, cosmetics, and other. (Justin walked in while I was putting up sticky notes that just said “skin” and “teeth” and so on. He declared it creepy, but what else was I supposed to do? Parents keep their children’s baby teeth, and my sister-in-law accidentally received someone’s order of human hair at Christmastime. I’m not the weird one here.)
After tossing anything used up or broken, consolidating duplicates, and putting anything I knew we wouldn’t use in the outbox, I was able to reuse a three-tier organizer and a couple of recycled cardboard boxes to corral most of our stuff. Once again, I tried to think about keeping similar things together to make getting ready in the mornings easier.
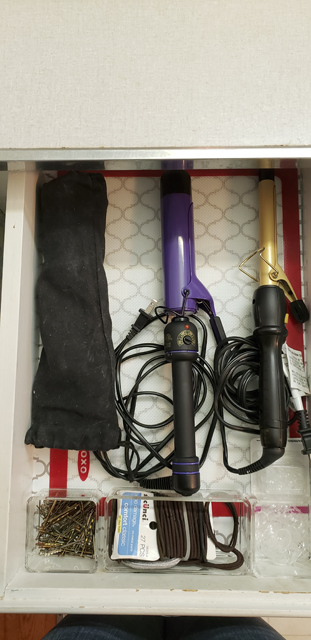
I made two major improvements to our setup. First, I realized that one of the drawers would be the perfect size to keep my hot tools (hair straightener and two curling irons) and hair accessories. After a trip to the Container Store, I landed on this:
I added a silicone baking mat rated for use up to 450°F to the bottom of the drawer. Generally I wait until my styling tools have cooled completely before putting them away, but on mornings when I’m in a rush, it’s reassuring to know that I can throw them in the drawer without worrying they’ll scorch or melt anything. The hair elastics and bobby pins are in stackable clear acrylic tubs.
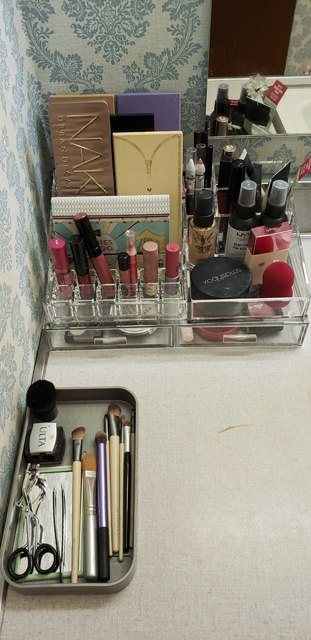
The second major improvement was taking my cosmetics out of a travel bag and putting them in a dedicated storage system:
The clear acrylic storage units are part of the Luxe Acrylic Modular Makeup System from the Container Store. The makeup organizer sits on top of two medium short drawers; the pieces don’t snap into place, but the combination of their weight and sturdy rubber feet keep it from sliding around. The grey tray actually came with a set of EcoTools brushes I got for Christmas. The rest of my brushes (mostly larger face brushes) are still in the cases they came in inside the cabinet below.
There’s a little room for expansion here, but not much, and that’s okay. I have plenty of options to choose from each day, and more than enough powder products to last through this year and the next too. In the short term, I’d like to get a couple of small cups to hold my brushes upright. In the long term? This unit is taking up an awful lot of counter space, and I’d like to move it to a dedicated battle station in my bedroom (which I don’t have, or have space for, yet).
Everything else went back into the cabinets, in what I hope is a more efficient layout. Now that I can see how things fit together, I may make a return trip to the Container Store to get a few pull-out drawers to take full advantage of the counter’s depth.
We host our D&D group anywhere from every other month to twice a month, so I don’t really need any extra motivation to invite people over. It’s actually a secret goal of mine to try to change or improve one thing about the house between every session. There are several artists in the group, but none of them seem particularly interior design-focused, so I don’t know if they actually notice. Still, it’s a silly personal challenge that keeps me excited about making improvements, even if they’re small and simple. Whatever works, right?
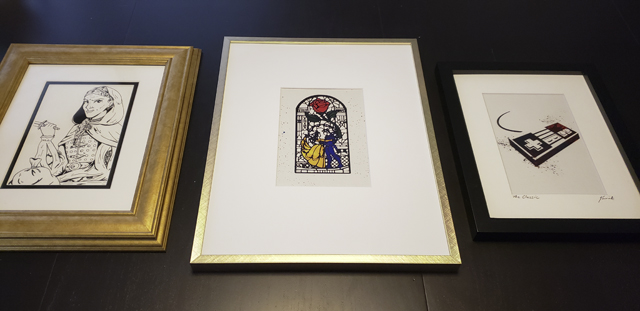
This might be my new favorite thing. Once we finally broke the seal and and bought and framed some artwork last year, it’s made us both much more open to searching for—and bringing home—art. Here are our latest additions:
The pen and ink drawing on the left is a portrait of my current D&D character, Mischa; she was commissioned by my husband from our friend Jorren for our D&D Secret Santa gift exchange. The print in the center is Beast and Belle dancing; it was a gift to me from my sister, who purchased it from Amourable Art. The print on the right is another piece of Amourable Art from my sister to Justin.
While hanging these, we also took the opportunity to hang an already-framed photograph and an unframed canvas that had been waiting on us for a permanent home. After 3.5 years, it’s finally starting to look like we live here!
Massive whiff on this one. I ended up working the Friday that had good weather, and it’s been too cold since to do anything in our guest room. Instead of cleaning out our home office, which was plan B, I got really fixated on changing up our entryway and living room. I’ve since moved an armchair, added a skinny desk, and rearranged the books and boxes on our media center to be more balanced and visually pleasing. So I didn’t complete the brief, but I’m really, really happy with what I did instead.
We cleaned most of the bathroom while we were doing the cabinet cleanout. The tub needs special attention: we have a recurring stain around the drain that I’ve learned is caused by dissolved copper in our water, which is almost certainly caused by a lingering bit of copper pipe in the wall (all of the pipe exposed in the basement has been replaced with PEX) and slightly acidic water. Replacing that section of pipe isn’t practical—we’d have to open up the wall, at which point we’d better be doing a reno of the whole bathroom—and the staining can be removed with cleaner and elbow grease, so for now I’m just looking for ways to deter more build-up to make the cleaning last longer.
As I was working through these tasks last weekend, I constantly felt like I wasn’t doing enough. Was I really doing the January Cure if I was skimping on or skipping tasks? I wanted to work faster and longer and have everything completely finished instead of having several half-done tasks (like partially cleaning the kitchen and bathroom, and leaving one cabinet empty due to a repair that needs to be made). I was beating myself up over it, until I’d listed out all the things we’d done.
Writing it all down and telling someone about it made me realize that actually, we’d touched a bunch of different places in our house and made all of them a little bit better in some way. Sure, a lot of those things aren’t permanent, either because they can get messy again or because we might need (or come up with) better solutions down the road, but we put the time into making things that much nicer, and trying to make things work better for us. Even if things don’t stay nice, there’s a chance we’ve introduced a setup or a process to make it just a little bit easier to reset things to nice tomorrow/next week/when we deep clean again. And less time spent cleaning means more time making messes, right? 😉