A Little Handmade Christmas, Part 2

Content with the handmade cheer I’d poured into our home, I set about lavishing it on a few of my loved ones. My sister-in-law and dear friend Heather is a collector of mismatched socks, and it only felt right that she should have a truly special handmade pair in her sock drawer. I’d entertained the idea of making her socks last year, but chickened out at the last minute—I had no doubt she was knitworthy, but I thought there were other things she needed and would enjoy more.

With Justin’s encouragement, I threw my doubts aside and cast on Glenna C’s A Nice Ribbed Sock. The yarn is Hedgehog Fibres Sporty Merino in color Bubble, from my beloved LYS Warm ‘n Fuzzy. I made my usual adjustment of going up a needle size, but otherwise knit the pattern as written. Details (like the length of the leg and foot to fit a women’s size 9.5 shoe) can be found on my Ravelry project page.

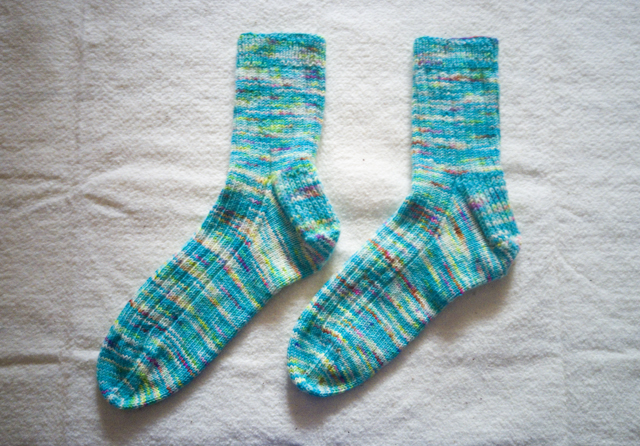
I was lucky enough not to suffer second sock syndrome, although I was a little rushed to finish them before we got on the road to see everyone for Christmas. I managed to make my right wrist and forearm rather sore for about a day, which is all the warning I need to take it easy on future projects!

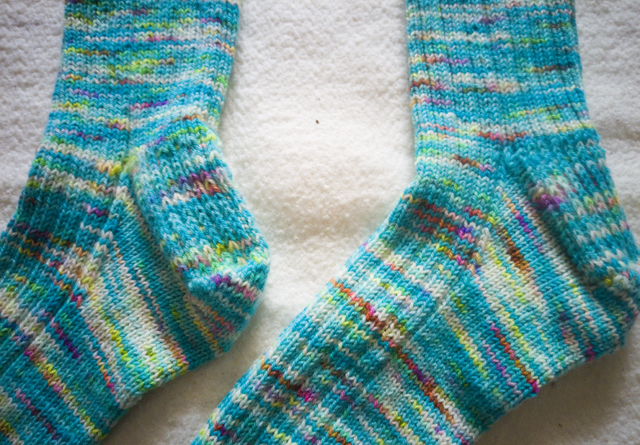
Heather loves them and has hinted that she wouldn’t mind another pair, if I felt so inclined. I’m a bit jealous, though, as I don’t have any handknit socks of my own, so she may have to get in line!

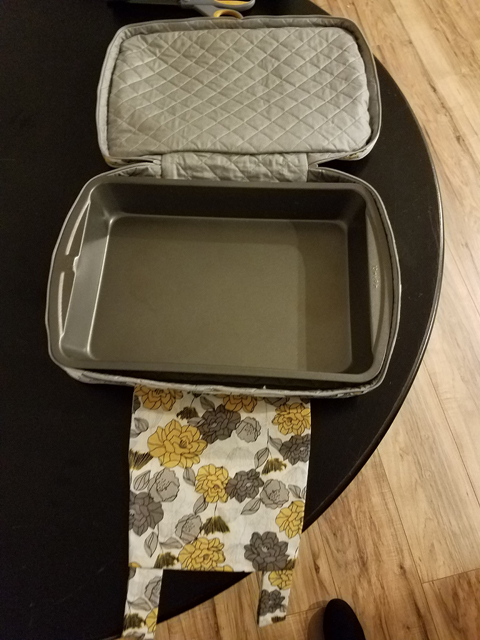
My second gift, and the biggest undertaking of my four Christmas projects, was a casserole carrier for my sister, Loren. She loves to cook, and on many occasions she’s taken meals to friends: to celebrate special occasions, to take care of them when they weren’t able to cook for themselves, or simply to enjoy their company. Transporting a steaming pan of lasagna or enchiladas across town isn’t exactly a cakewalk, though, and last year she casually mentioned that she was looking for a carrier to make it easier to bring hot dishes to potlucks and the like.

As with Heather’s socks, I thought a lot about making her this gift, but again, I lost my nerve. I doubted my sewing was up to the task, feared she wouldn’t like pattern or fabric I picked. I settled for other things I knew she wanted, things that felt easy and safe.

You have to understand, though, that my sister is really, really good at giving gifts. She’s attuned to everyone’s changing hobbies and evolving interests. She’ll be out shopping and see something that reminds her of you, and she’ll bring it home. Maybe she sets it aside for a birthday or holiday; maybe she gives it to you right now, just because. She also has a knack for searching out something you want and, when she can’t find the exact thing, picking something else that you end up liking even better.

I felt I’d let her down when didn’t make her the casserole carrier, but she graciously didn’t say anything more about it, and I squashed the feeling until it didn’t bother me anymore.

It bubbled up again—boiled over, really—when, a full year later, she mentioned a casserole carrier again among the things on her wish list. She was quick to qualify her wish by saying it didn’t need to be handmade, purchased would be fine too if handmade was too difficult—but handmade would be very nice.

Well. That settled that. I wasn’t about to buy this thing when I could, after all, make it. I had my brief; I set to work.

Photo by Loren

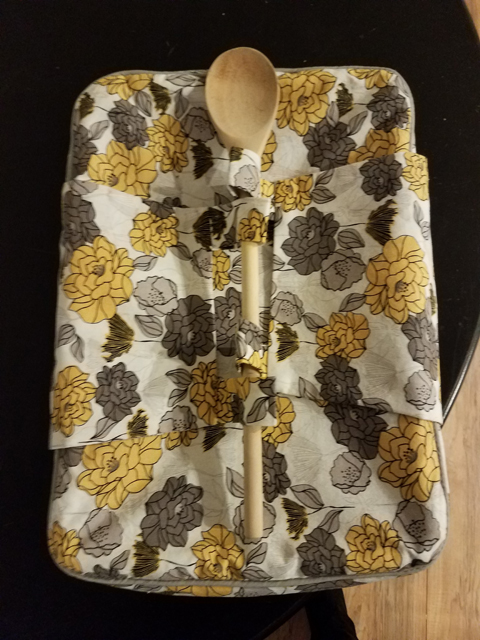
The pattern is Simplicity 1236, which offers carriers for a 9″ x 13″ rectangular baking dish and a 2.5-quart oval dish, round bowl covers in three sizes, and soft-sided dishes similar to a key tray or bedside catch-all.

Photo by Loren

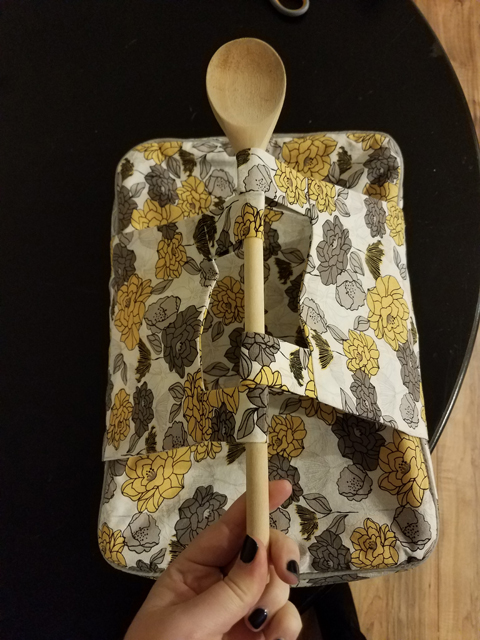
The rectangular casserole carrier has a quilted lining, double-zipper closure, decorative piping, and loops to hold a wooden spoon or dowel to create a handle.

Photo by Loren

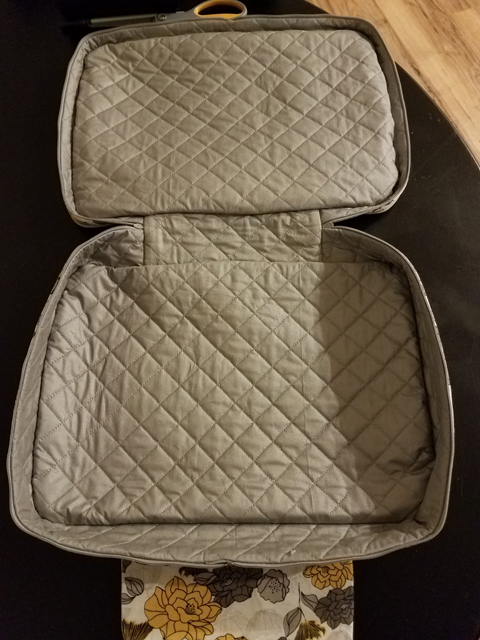
The pattern calls for “quilted ironing board cover fabric” for the lining. The only ironing board fabric I could find (at JoAnn) was un-quilted. Instead of searching online, placing an order with another vendor, and waiting for it to arrive, I did the only logical thing I could think of at the time: buy twice as much fabric and a package of cotton batting and quilt all of the lining myself.

Indeed, it was probably the most logical thought I had at all, considering I was in my second JoAnn store of the day and having a hunger-fueled meltdown trying to select the fabric for the outer shell. (It was very important to me to get it right, and I could not be persuaded that any number of fabrics would be “right.” Suffice to say that I have a very patient husband.)

Photo by Loren

I relied on my walking foot with quilt guide to get the lines spaced evenly at 1 inch apart on the bias. Initially it was quite easy and mindless to sew, though by the end I definitely got bored and was ready to move on.

Since I knew I’d committed a fair amount of time to making the lining, I went ahead and purchased coordinating piping rather than making my own, and I have no regrets about that. I was able to get a pretty good match between the piping, zippers, and light grey flowers.

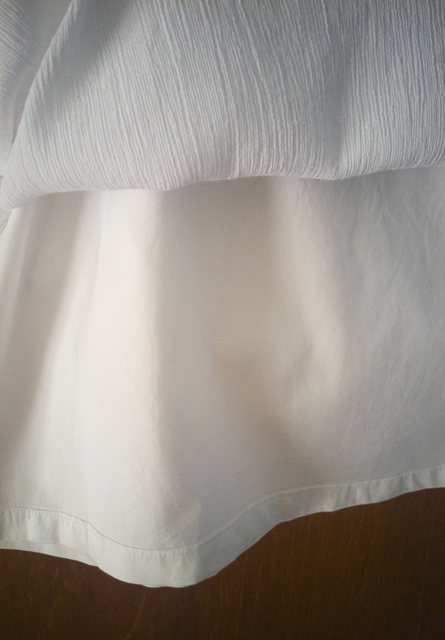
I followed the assembly instructions to the letter, and I’m happy with how neatly things came together overall, especially considering I don’t have a lot of experience doing three-dimensional corners. As you can see above, the entire inside is clean finished; there’s only a small amount of hand-sewing needed at the “hinge” to accomplish it.

There are only two things I would do differently. The first thing would be to interface the handles, which felt a bit flimsy. (I entertained the idea of making a second iteration out of a sturdier material like canvas, but I’m afraid that it would get too bulky to manipulate at the end, especially easing the corners).

The second thing would be to find a way to invisibly (or at at least subtly) tack the lining to the shell. As designed, the two are connected at the edges but not the centers, which provides that lovely clean finish but means that the two have a tendency to separate. I don’t think it’s even noticeable when there’s a dish in the carrier, but again, it makes the whole thing seem a bit flimsier than it probably is.

Loren seemed genuinely delighted when she opened this up on Christmas morning, and excited to put it to use. I hope that it holds up well and stands her in good stead through many family-style dinners and special gatherings.

Tribute Month Sewing Notes

Have you been following Tribute Month over on the Sewcialists blog? My own tribute went up earlier this week—check it out here to read how Erica Bunker inspired this outfit, and don’t forget to follow the blogs of all the creative and inspiring contributors who made Tribute Month possible! I can hardly wait for the next theme—having direction and a concrete deadline really helped to focus my sewing, especially when I came close to stalling out right before the finish.

Before these garments are too far behind me, it seems like a good idea to record some of the more technical details of what I did. I deviated significantly on both patterns, but I do hope to make them again, and I’d like the next versions to be even better.

First, the skirt. It’s Simplicity 1465 View C, a straight skirt with a waist facing, front and back darts, and a center back invisible zipper. I’ve said many times before that I’m not fond of skirts that sit the natural waist because they feel constricting to me, and because they tend to emphasize that my waist is not much smaller than my bust and hips, making it look thicker than it is and making my whole torso look rather straight-up-and-down. But I’ve also had minimal success at finding or altering patterns to be low-rise, and after ruining a lovely lightweight yardage of navy corduroy trying to make that modification, I decided to bite the bullet and give a natural-waisted skirt a try. I wagered that, since I was planning to make it in a dressier print, I’d probably only wear it for nicer occasions anyway, and if I didn’t love it, I’d only be wearing it for a few hours at a time a few times a year anyway.

I cut a straight size 12 based on my waist measurement, but pegged the bottom of the skirt by subtracting 1 inch at each side seam (4 inches total). My waist is a fraction larger than a 12, but after reviewing the pattern pieces I was confident that there was enough ease to cover that extra quarter-inch. In fact, after wearing the skirt out to take photos, I think that I could take the waist in a little on a future iterations. I don’t know if I could go down a full size, but I could probably shave a little off each side seam—and possibly a little more if I chose not to line it or chose a slightly stretchier fabric than the mid-weight stretch cotton sateen I used here.

The pattern is designed to be unlined, but I wanted the option to wear it with tights in cooler weather, so turned to Sunni’s BurdaStyle tutorials for how to create a ventdraft a vented lining, and sew a vented lining, but modifying my pieces slightly to keep the original waist facing. These instructions used to be on Sunni’s blog A Fashionable Stitch, and I vaguely recall them being easier to follow when I used them the first time. I managed to muddle through them with much reading, re-reading, and test-folding my fabric, but it does bug me (more than it should, to be honest) that they create a vent that is lapped in the opposite direction than usually you see in ready-to-wear: normally the satin stitches that tack the top of the vent in place create the appearance of the number 1. In future iterations, I’ll reverse my left and right back pattern pieces and back lining pattern pieces. I’ll also make the vent longer (taller?), because I find it shortens my walking stride a little more than I like.

One critical thing that’s not covered by the tutorial is attaching the lining to the skirt at the waist. The tutorial is written for the BurdaStyle Jenny skirt, which has a waistband, so you can follow all of the steps for attaching the lining to the skirt at the vent and then worry about attaching the lining to the skirt at the waist afterward. Because I was using a pattern with a facing instead of waistband, I figured out that I needed to attach the shell and lining at the waist first if I wanted to be able to get a clean finish, including understitching the waist facing to keep it lying flat. Once the waist was taken care of, then I could follow the instructions for attaching the lining to the vent, and then finally handle attaching the lining to the zipper tape so that it doesn’t get caught in the zipper.

And now, the top. It’s Simplicity 1425 View E, a sleeveless, princess-seamed top with a pleated peplum. Although my measurements put me in a size 12, I cut a size 10 after seeing that the pattern has 3.5″ of ease at the bust and 4.5″ of ease at the waist. If/when I make it again, I’ll go down a size; with such a contoured style, and especially in a fabric with stretch, I’d like it to fit more closely to my body than it does.

When I pulled this pattern from my stash to sew, I actually thought it was designed with a back zipper, and it wasn’t until I had cut out all the pieces and was skimming the instructions before starting to sew that I realized it has buttons. I can’t imagine making it that way; it’s not loose enough to render the buttons purely decorative, and having to do them up behind my own back—with fabric loops instead of buttonholes, no less!—is not my idea of fun.

Despite some initial trepidation about using a separating metal zipper, the entire process was painless, easier than installing an invisible zipper. I used an 18″ zipper, which ended up about 3.5″ shorter than the length of the top. I knew that the top of the skirt would come up higher than the bottom of the zipper, and if I’m wearing it casually with low-rise jeans I don’t mind the possibility of flashing a tiny sliver of skin, but if that’s a concern then definitely consider getting a longer zipper and shortening it.

For both pieces, I finished things cleanly and invisibly everywhere I could. The skirt lining has French seam; the skirt shell has serged seams (I thought Hong Kong seams, while lovely, would be too bulky and hidden anyway); the cut edge of the skirt hem is covered with a fun purple grosgrain ribbon and blindstitched in place. The top has bias facings at neck, arm, and peplum hem, all blinstitched as well. I enjoy hand-sewing, but next time I’ll draft an all-in-one facing for the bodice.

On the whole, I’m very pleased with how the entire outfit came out, and I’m very much looking forward to wearing it to a professional event in October. It’s also restored some of my desire to sew with wovens (or stretch wovens, at least), because it proved that I could find middle ground between a comfortable fit and a flattering silhouette. I doubt they’ll overtake knits in my wardrobe, but at least I can regard them with a little less prejudice.

FO: Vanilla

Before I post my (overdue) reflections on Me-Made-May, I wanted to catch up my records by sharing the projects I completed during the month. The first is below; the others will be combined in another post.

When I was a teenager my parents paid for my clothing, and because they allowed me a fair amount of latitude in picking out what I wanted to wear, I didn’t have much impetus to buy clothing myself. The first time I can distinctly recall paying for a garment that I wanted with my own money was in high school. I don’t remember now what I’d originally gone to the mall to buy—I wasn’t the type to shop recreationally—but I ended up bringing home a white cotton gauze A-line skirt that had been on sale for only $10. It hit around knee-length and had an elastic waist and slightly stretchy lining, all of which made it wonderfully comfortable and allowed me to sit crossed legged without flashing anyone. From a design standpoint it was nothing special, but in my eyes it was pretty much perfect, and I adored it.

I wore the skirt through high school and then college; I don’t remember the exact reason that I eventually got rid of it, but the only reason I would have parted with it was that a) it had acquired an indelible stain, or b) it had completely fallen apart from endless wearing and washing. I’ve wanted to replace it ever since, but somehow never mustered up the gumption to actually do so.

As the weather warmed up throughout May, however, I finally pulled out a crinkled poly-cotton I scored at Hancock’s going-out-of-business sale and Simplicity 1662 and set to work.

This pattern doesn’t really mimic the shape of the inspiration skirt that well, nor is it a great match for the fabric, but I had it in stash already and it has an elastic waist—arguably my favorite feature of the original—so I went with it to avoid the perils of trying draft something myself. (I know that an A-line skirt should be about the easiest thing to draft after a dirndl or a circle skirt, but I have an exceptional ability to over-complicate the drafting process, so I decided not to chance it. I wanted something easy.)

I traced view C, but rather than have it rise in the front and dip in the back, I cut it straight across at the side seam, perpendicular to the center front/center back. I cut a size small based on my waist measurement, with the intention of stretching it to sit at the top of my hip bones.

I prepped the fabric by washing it in cold water and tumbling dry on low heat, which caused its already crinkly surface to pull in even further, making it much too narrow for the pattern pieces. After consulting a few discussion threads online, the only advice I could find was to relax the fabric with steam. I was dubious—wouldn’t it ruin the very thing about the fabric that attracted me to it in the first place?—but after aggressively steaming the yardage and even gently tugging/prodding it until the selvages were straight again, it was wide enough to use and still had those characteristic crinkles, albeit less deeply furrowed. Like the gauze of the original, this fabric is sheer when the light hits it, so I decided to line the skirt with leftover white cotton sateen I had in stash from lining my Garden Party Dress.

I attached the lining by serging it to the shell and the waistband, simultaneously securing the lining, creating the casing for the elastic, and finishing the edge. The serging is invisible because it ends up sandwiched between the shell and lining when everything is turned right-sides-out.

After the success of my super simple tartan scarf, I decided to finish the skirt hem with my rolled hem foot. The act of pulling the stretchy material taut to feed it through the foot led to the lettuce edging, which I should have expected but ended up pleasantly surprised by. It will take a little practice to achieve a consistently ruffled edge, but I’m happy with the outcome.

The lining was turned up 3/4″, then turned up again 1″ and edgestitched, for a deep hem and a clean finish.

For the elastic waist, I ended up changing the length of the elastic to get a snug fit, but I forgot to write down by how much. Whoops. I did follow the tip included in the instructions to use little strips of fusible interfacing to glue down the side seam allowances within the waistband, to make it easier to thread the elastic through the casing, and it worked a treat.

At this point, you may well be wondering why there are no modeled shots, especially given the attention to detail in both the sewing and the posting. The truth is, after wearing it one time for Me-Made-May, I realized that something is wrong with the waist. Instead of lying smoothly when stretched the way its predecessor did, it has this weird puffiness right below the elastic that stubbornly refuses flatten out. Maybe it’s because the fabric is slightly gathered, or maybe it just has more body than my beloved older skirt did, but in any case, it looks horrible under the fitted and semi-fitted shirts I prefer. Maybe it would look okay under a boxy, drapy tee, but that’s not a combination I see myself wearing. So it’s probably destined for the donation pile, in the hopes that someone else will love it when I can’t, and I’m back to the drawing board for the perfect summer skirt.

What’s your perfect summer skirt look like? Is it something you own already, or are you still on the hunt for it?

FO: Floral Sorbetto

Back at the beginning of January, I wanted to sew up a two-yard cut of navy corduroy that I bought during Hancock Fabrics’ going out of business sale into a button-front skirt. Strangely reluctant to spend money on a suitable pattern, such as the Pauline Alice Rosarí, and apparently incapable of judging the value of my own time as well, I embarked on a daring adventure to hack Simplicity 1465, which is a pencil skirt with a facing instead of a waistband, front and back darts, an invisible zip in the back, and no lining, into a pegged, button-front skirt with a lining attached to integrated waistband-and-button-placket facings. Several evenings and weekends went toward making flat pattern adjustments and baste-fitting the pieces to get the styles lines I wanted and the correct dart sizes and hip curves.

Things were going swimmingly until I had to install the lining into the shell. Suddenly, things went from fitting well to being too small to close in the front by several inches. Unsure whether it was a drafting, cutting, or sewing mistake (or all three), and lacking the fabric to re-cut all of the pieces, I fell into a sewing funk. I’d wanted the finished skirt very badly, but even after several days of cooling off didn’t feel like I had the wherewithal to sort out the mess.

Wanting to get out of my rut, I cast about for an easy project that I could accomplish quickly with few or no adjustments to boost my confidence. Conveniently, Colette had launched the New Sorbetto, an update to their original free top pattern, and I had a remnant of cotton lawn from my Garden Party Dress lingering in my stash that I felt was destined for better things than just pocket bags.

Because Colette drafts for a C cup, I cut a size 4 and did a 2″ SBA, which I prefer to think of as a Sufficient Bust Adjustment rather than a Small Bust Adjustment. Tutorials for bust adjustments abound online, but I went ahead and used the one offered by Colette on the Sewalongs website.

Side note: Measuring as an A cup for this pattern made me laugh, because I’m currently in need of new bras and I’ve recently determined that I’m not a 34B, nor even a 32C, but probably a 30D. (In fact, if I were to follow A Bra That Fits’ Bra Size Calculator, I’m on the cusp of 26E/28DD.) This isn’t to suggest I think that Colette’s sizing is wrong, but rather to highlight one of the many instances where two clothing-based industries use the same terminology—cup size—but arrive at it using two different sets of measurements: Colette is interested in the difference between one’s high bust or upper torso measurement and one’s full bust measurement, whereas bra companies are interested in the difference between one’s full bust and one’s underbust measurement. Just a little reminder that it pays to understand how a clothing manufacturer or a pattern designer approaches measurements and sizing schemes if you want to nail your fit.

My remnant was L-shaped with narrow legs, so I had to sacrifice the center pleat in order to get the front and back pieces to fit. I did, however, have a square large enough to make continuous bias tape to bind the neckline and armholes. I like that continuous method of making bias tape, but struggle to make my bias tape a consistent width when using it, so instead of binding the edges as instructed I created bias facings on the outside of garment, like the ones on the Sewaholic Dunbar, and then edgestitched them down as instructed using a dark gold all-purpose thread that matches the darker yellow flowers in the top. The bottom has a narrow hem, folded under twice and topstitched down with the same dark gold thread.

The fit is a little more boxy than I’d like, but about what one would expect from a pull-on woven top in a lightly structured fabric. I’d really like to take a crack at this in a drapier fabric like rayon challis or even a lightweight jersey; I have a few sleeveless Portofino shirts from Express that I live in during the sweltering summer months, and I’d love nothing more than to fill my closet with a pared-down version of them using this pattern.

You can’t tell here, but the fabric is slightly sheer, and the armholes are a tad low, so I’m wearing it over a white camisole. That’s how I plan to wear it to the office, but I have no doubt that on the weekends when the temperatures climb I’ll ditch the cami. In future less-sheer versions I’ll probably shave a little off the top of the straps in order to raise the armholes and bust darts slightly to avoid the need for a cami entirely.

I know the Sorbetto is old news in the sewing world, but for anyone who, like me, didn’t sew it up the first time around, I offer up this warning about the new pattern: the instruction file is really, really long, coming in at 36 pages. While I have no doubt that novices or less confident stitchers might find things like the detailed cutting layouts useful, the sheer volume here is a bit overwhelming, and it’s also a bit of a nuisance to get to key pieces of information (size charts are buried on pages 11-12, and the actual sewing instructions don’t start until page 26). Once you’ve sewn it once it would be easy enough to dispense with the instructions entirely, but if you need to quickly check for confirmation of a seam allowance or what have you, CTRL F is your friend.

Overall, I accomplished what I set out to do: I used a pattern and fabric I had on hand, made minimal adjustments, finished in a few leisurely evenings, and ended up with a top that I can wear throughout the warmer months. I’m feeling refreshed and ready to tackle more sewing projects. Hurray!