When planning my visit to the NYC Garment District last year, I knew it was important to not only narrow down the number of shops we went into but also to have a list of projects I was shopping for. As someone who is easily overwhelmed by choice on the best of days, I would have been mad to walk into a place like Mood without a plan.
My list looked something like this:
- Spandex blend knit(s) for t-shirts, preferably at least one with navy stripes
- A knit with a print other than a stripe for a top or dress
- A solid rayon or bamboo knit (in a color from my palette) to make a Madalynne x Simplicity bodysuit
- A stretch denim to make a pair of jeans
- Lace and stretch mesh/power net to make a Madalynne x Simplicity bralette
- Notions for the bralette and bodysuit
I struck out on the denim, but was able to bring home a lovely white stretch cotton sateen instead. I also picked up an unplanned-for white mystery fabric with alternating solid and sheer stripes. I was looking forward to making a pleated midi skirt inspired by one I’d seen at Express several seasons ago, but pre-washing the fabric completely changed the way it behaved and it may end up a total loss.
After finishing a couple of striped long- and short-sleeved t-shirts using the fabric from my haul, I decided to dive into the world of lingerie. Well, dip a toe in, anyway.
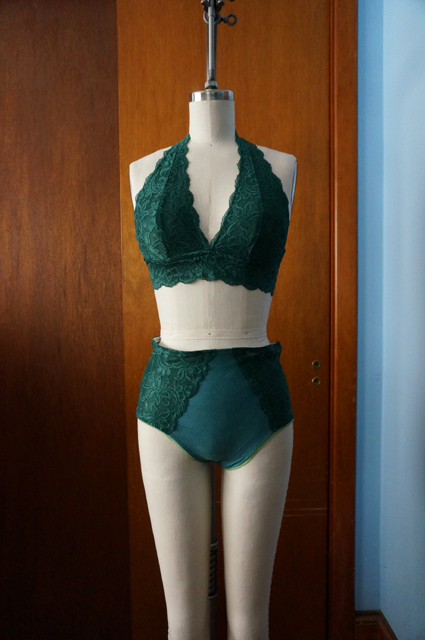
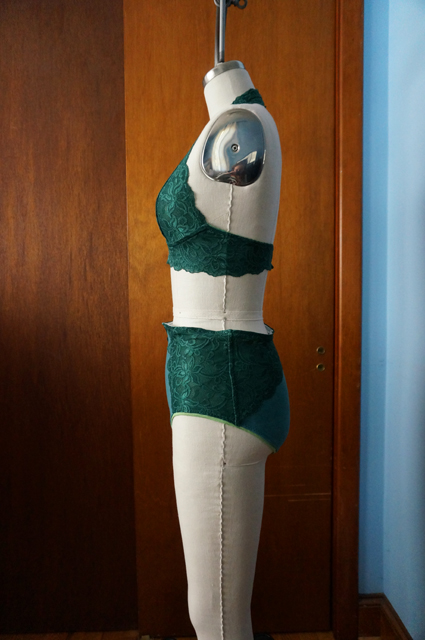
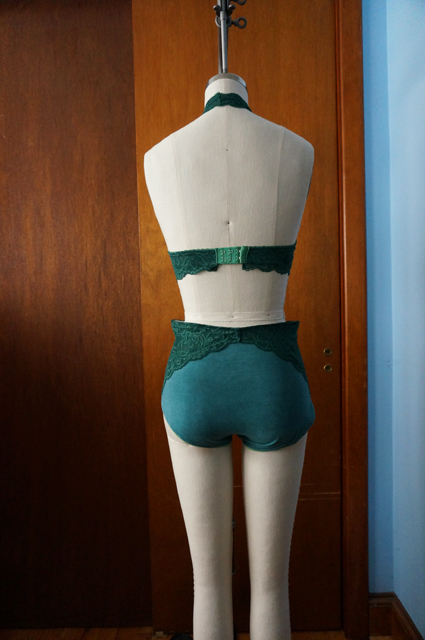
This is Simplicity 8228, a lace halter bralette and embellished high-waisted underwear from the Madalynne x Simplicity collaboration. I wanted to model these myself, because I think the best way to effectively judge a garment is on the body it was intended for. But the lighting inside my house is unpredictable at best, there’s nowhere private for me to take pictures outside even if it were warm enough, and—spoilers—I’m not thrilled with the fit I achieved, and I liked it even less after scrolling through the photos we took. My dress form isn’t necessarily doing the fit any favors either, as I haven’t padded it out to my actual measurements yet. (I have the kit for it, but I’ve been so focused on knitting during the tail end of winter that I haven’t gotten around to doing the work. It will probably take all of 15 minutes when I finally do, and then I’m going to feel like a real chump.)
Style & Size
For the bralette, I chose View A, the halter, which closes in the back with hook and eye tape. While View B, a pull-on racerback style, would have technically been the easier of the two designs to sew, I wanted at least a little bit of challenge, and I was concerned a bralette without closures might be annoying to get on and off (I nearly popped a seam on a similar RTW racerback bralette once). I measured as a 32D according to the instructions. That seemed reasonable, as I measure a 30D in RTW, and anyway 32 was the smallest band size available, so I didn’t have the option to size down (it seemed best not to tinker with the size on a pattern I’d never sewn, especially when I didn’t have any other lingerie experience to compare to either). For the underwear, I cut a size small.
Fabric & Notions
The stretch double galloon lace was a happy find at Spandex World; it was tucked away in the basement along with a small selection of stretch laces in other colors/patterns/widths. I had unthinkingly left my tape measure behind at the hotel and nothing was labeled, so I eyeballed this at 8 inches wide like the pattern called for. It’s actually only 7 inches at the widest point, making me sweat for a hot minute when it came time to lay out the pattern pieces. Everything just fit without needing any piecing, but the message was clear: this pattern isn’t nearly as conservative in its fabric estimates as most Big 4 offerings, so don’t chance it if you’re buying lace specifically for the project.
After being unable to find any green stretch mesh or power net at either Spandex World or Mood Fabrics, I remembered I had a plain white stretch mesh at home already, and I resolved to dye a length of it to match my lace. I thought might use mesh for the main fabric of the underwear as well as the bralette lining, but on sewing day decided to dye a remnant of cotton spandex leftover from some t-shirts instead.
For notions, I turned to Pacific Trimming. After hemming and hawing, I decided to buy white plush picot elastic and white hook and eye tape that I could also dye to match, but black channeling since it would be hidden on the inside anyway.
Dyeing
Because the stretch mesh, elastics, and hook and eye were wholly or primarily synthetic fibers, but the cotton spandex was primarily a natural fiber, I had to cook up two dye baths with Rit DyeMore and Rit All-Purpose, respectively. I was pleased with the color I got on the mesh, so-so with the cotton spandex, and disappointed by the notions. I knew different fabric compositions would take dye differently, but wasn’t expecting the closure to turn out a leafy grass green and the elastics to be neon.
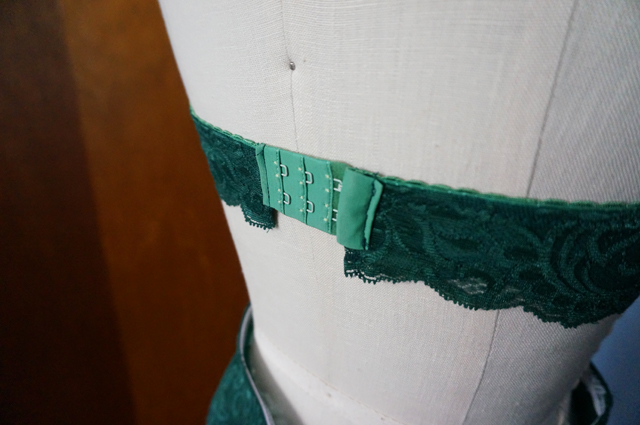
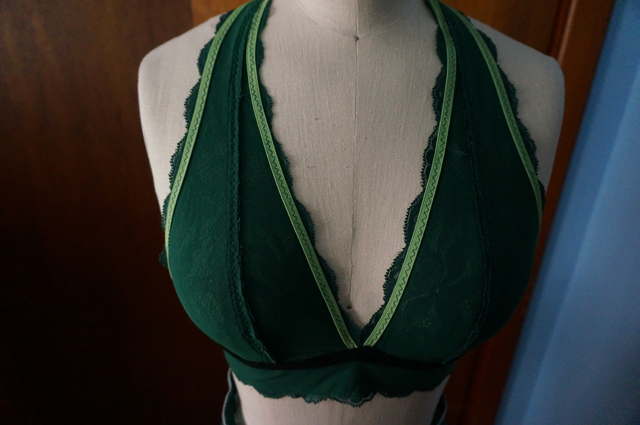
While it’s not the end of the world, it makes the whole thing feel less professional and more DIY, which is a real damper to the enthusiasm for trying something new.
Cutting & Sewing
I took the pattern’s advice to use spray adhesive to baste the lace and mesh together, but I must have missed the instruction about applying the lace to the mesh, because I tried doing it the other way around and ended up painstakingly re-positioning the flimsy, slithery mesh multiple times.
I followed the (rest of the) instructions to the letter, sewing the bralette entirely on my sewing machine and alternating between sewing machine and serger for the underwear. My stitching is a little lumpy and/or wavy in places, but the busy-ness of the lace covers a multitude of sins.
Construction & Fit
For the bralette, I have two minor complaints. The first is there are a lot of raw edges, and the only ones you’re instructed to finish are the cup seams, where you’re told to sew down the seam allowance. There is a note at the beginning about minding the seam allowance size “if you use a serger,” but there aren’t any instructions on when/where to use it. I’ve seen many people talk about constructing and finishing lingerie entirely without one, but perhaps that’s true more for a conventional underwired or padded bra. Using a serger on the halter seam, for instance, would have helped to make the whole thing feel a little more finished, a little more polished:
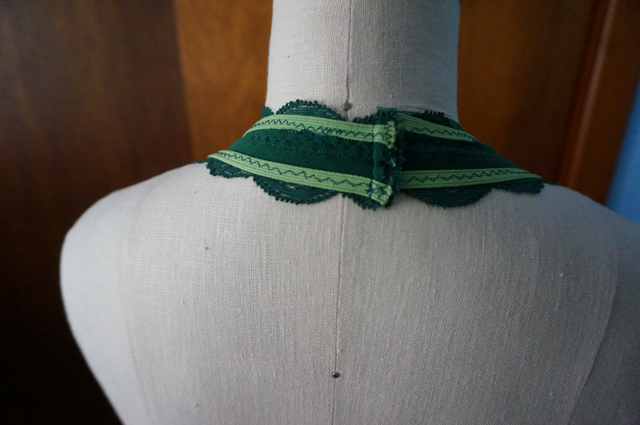
Then again, maybe this is typical of RTW bralettes. I don’t own one, so I don’t know. Maybe it’s time to pop into a store and examine some seams?
The second minor gripe I have is the lace and mesh making up the frame aren’t sewn along the bottom. Elsewhere the lace and mesh are secured by stitching on two or more edges, but the bottom of the frame is open. For me, this means the mesh tends to wrinkle and roll at every opportunity, especially when I sit down. This might be solved by sewing a zigzag across the bottom of the frame above the scallops, although I’m concerned the stitching wouldn’t hold up to stretching.
Apart from these complaints, it does fit well enough, although ideally I’d prefer to go down a band size and up a cup size to gain a little more cup projection and prevent the band from sliding up or down.
For the underwear, I knew I was taking a gamble since I don’t normally wear a high-waisted style, but I thought it might be worth revisiting my preference, and there was always the option to wear it under dresses since it wouldn’t work with my pants.
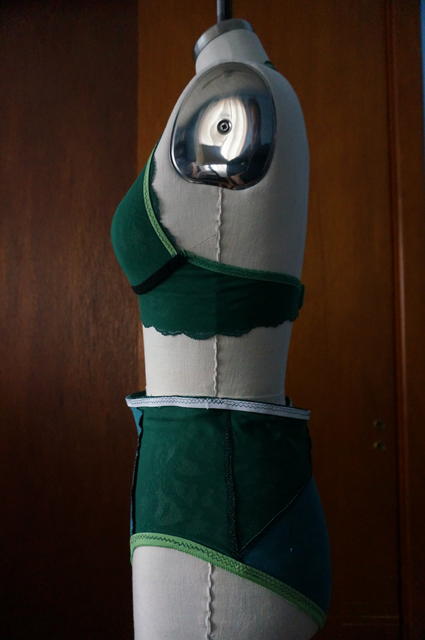
I could not get the elastic to lie flat around the waist, even after removing and re-sewing it. I assume I stretched the fabric, the elastic, or both while sewing, even though I was trying not to. It’s definitely more pronounced on my form than my body, but the effect is the same: rippling and buckling.
Final Thoughts
After wearing the bralette a couple of times I realized I’m pretty attached to underwire. Sure, I don’t necessarily need it, but I like it and feel more comfortable with it than without it. Given that the pattern is designed to use channeling to shape and support the cups, it might be worth it to try making another version in a (hacked) 30D and adding underwires.
I thought about cutting the panties down to a mid-rise style, but the truth is that the cotton spandex I used is just too thick for comfort. They ended up feeling sort of like shapewear without any of the benefits. It was not a good call for underwear; I’d used the fabric for for fitted t-shirts and leggings—what was I thinking here? So even if I managed to nail the fit, I know I wouldn’t wear them.
On the whole, I’m more than a little bummed about the experience. I’ve mostly let go of the feeling I’ve wasted precious fabric—it’s not exactly one of a kind, and there’s always more fabric—but I’d hoped to get bitten by the lingerie bug and embark on a spree of replacing all of my tired old things with fresh, perfectly fitting handmade undergarments.
I’d sort of scoffed at the idea of kits, because in the trade-off between money and time I can afford to source materials myself, and as someone who prefers self-directed learning and doing things on my own, paying someone to figure things out for me doesn’t come naturally. But I’ve started to see how a kit is a good way to break into new territory of a hobby. And it’s hard to argue with how pretty they are!
