Tribute Month Sewing Notes

Have you been following Tribute Month over on the Sewcialists blog? My own tribute went up earlier this week—check it out here to read how Erica Bunker inspired this outfit, and don’t forget to follow the blogs of all the creative and inspiring contributors who made Tribute Month possible! I can hardly wait for the next theme—having direction and a concrete deadline really helped to focus my sewing, especially when I came close to stalling out right before the finish.

Before these garments are too far behind me, it seems like a good idea to record some of the more technical details of what I did. I deviated significantly on both patterns, but I do hope to make them again, and I’d like the next versions to be even better.

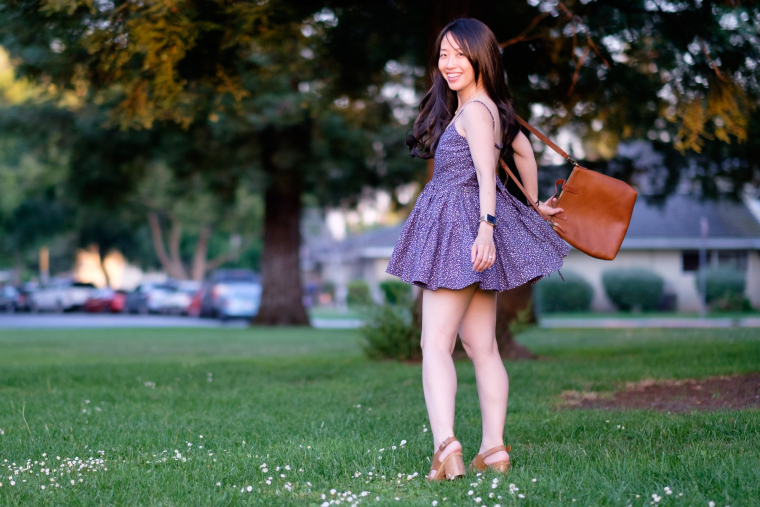
First, the skirt. It’s Simplicity 1465 View C, a straight skirt with a waist facing, front and back darts, and a center back invisible zipper. I’ve said many times before that I’m not fond of skirts that sit the natural waist because they feel constricting to me, and because they tend to emphasize that my waist is not much smaller than my bust and hips, making it look thicker than it is and making my whole torso look rather straight-up-and-down. But I’ve also had minimal success at finding or altering patterns to be low-rise, and after ruining a lovely lightweight yardage of navy corduroy trying to make that modification, I decided to bite the bullet and give a natural-waisted skirt a try. I wagered that, since I was planning to make it in a dressier print, I’d probably only wear it for nicer occasions anyway, and if I didn’t love it, I’d only be wearing it for a few hours at a time a few times a year anyway.

I cut a straight size 12 based on my waist measurement, but pegged the bottom of the skirt by subtracting 1 inch at each side seam (4 inches total). My waist is a fraction larger than a 12, but after reviewing the pattern pieces I was confident that there was enough ease to cover that extra quarter-inch. In fact, after wearing the skirt out to take photos, I think that I could take the waist in a little on a future iterations. I don’t know if I could go down a full size, but I could probably shave a little off each side seam—and possibly a little more if I chose not to line it or chose a slightly stretchier fabric than the mid-weight stretch cotton sateen I used here.

The pattern is designed to be unlined, but I wanted the option to wear it with tights in cooler weather, so turned to Sunni’s BurdaStyle tutorials for how to create a ventdraft a vented lining, and sew a vented lining, but modifying my pieces slightly to keep the original waist facing. These instructions used to be on Sunni’s blog A Fashionable Stitch, and I vaguely recall them being easier to follow when I used them the first time. I managed to muddle through them with much reading, re-reading, and test-folding my fabric, but it does bug me (more than it should, to be honest) that they create a vent that is lapped in the opposite direction than usually you see in ready-to-wear: normally the satin stitches that tack the top of the vent in place create the appearance of the number 1. In future iterations, I’ll reverse my left and right back pattern pieces and back lining pattern pieces. I’ll also make the vent longer (taller?), because I find it shortens my walking stride a little more than I like.

One critical thing that’s not covered by the tutorial is attaching the lining to the skirt at the waist. The tutorial is written for the BurdaStyle Jenny skirt, which has a waistband, so you can follow all of the steps for attaching the lining to the skirt at the vent and then worry about attaching the lining to the skirt at the waist afterward. Because I was using a pattern with a facing instead of waistband, I figured out that I needed to attach the shell and lining at the waist first if I wanted to be able to get a clean finish, including understitching the waist facing to keep it lying flat. Once the waist was taken care of, then I could follow the instructions for attaching the lining to the vent, and then finally handle attaching the lining to the zipper tape so that it doesn’t get caught in the zipper.

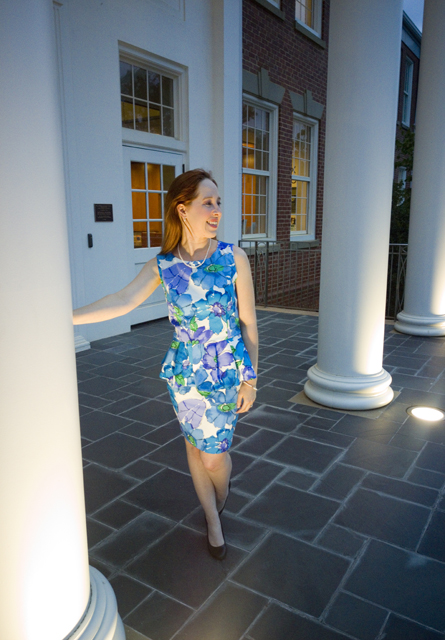
And now, the top. It’s Simplicity 1425 View E, a sleeveless, princess-seamed top with a pleated peplum. Although my measurements put me in a size 12, I cut a size 10 after seeing that the pattern has 3.5″ of ease at the bust and 4.5″ of ease at the waist. If/when I make it again, I’ll go down a size; with such a contoured style, and especially in a fabric with stretch, I’d like it to fit more closely to my body than it does.

When I pulled this pattern from my stash to sew, I actually thought it was designed with a back zipper, and it wasn’t until I had cut out all the pieces and was skimming the instructions before starting to sew that I realized it has buttons. I can’t imagine making it that way; it’s not loose enough to render the buttons purely decorative, and having to do them up behind my own back—with fabric loops instead of buttonholes, no less!—is not my idea of fun.

Despite some initial trepidation about using a separating metal zipper, the entire process was painless, easier than installing an invisible zipper. I used an 18″ zipper, which ended up about 3.5″ shorter than the length of the top. I knew that the top of the skirt would come up higher than the bottom of the zipper, and if I’m wearing it casually with low-rise jeans I don’t mind the possibility of flashing a tiny sliver of skin, but if that’s a concern then definitely consider getting a longer zipper and shortening it.

For both pieces, I finished things cleanly and invisibly everywhere I could. The skirt lining has French seam; the skirt shell has serged seams (I thought Hong Kong seams, while lovely, would be too bulky and hidden anyway); the cut edge of the skirt hem is covered with a fun purple grosgrain ribbon and blindstitched in place. The top has bias facings at neck, arm, and peplum hem, all blinstitched as well. I enjoy hand-sewing, but next time I’ll draft an all-in-one facing for the bodice.

On the whole, I’m very pleased with how the entire outfit came out, and I’m very much looking forward to wearing it to a professional event in October. It’s also restored some of my desire to sew with wovens (or stretch wovens, at least), because it proved that I could find middle ground between a comfortable fit and a flattering silhouette. I doubt they’ll overtake knits in my wardrobe, but at least I can regard them with a little less prejudice.

Inspired by Sewcialists

I spend as much (or more) time dreaming and scheming about my wardrobe as I do sewing it. There are so many clever, creative people sharing their sewing adventures online, and so many drool-worthy projects beamed directly to my appreciative eyeballs each day, that sometimes it’s tempting never to sit down at my own sewing machine!

Tribute Month is about fanning that glow of admiration into a fire for completing a garment. Below are five brilliant ladies who have style and passion in spades, and who make me want to sew up a beautiful handmade wardrobe. Each one is an inspiring answer to the question: “What should I make next?”

Inspiration #1

Allie

Sewcialist: Allie of Allie M. Jackson

Sewcializes at: Blog, Facebook, Instagram, Pinterest

Style notes: Demure & coordinated

How she inspires me: Variously described as “modern mid-century” and “fresh, feminine, and vintage-inspired,” Allie’s style strikes a perfect balance between retro glamour and modern sensibilities. She tempers silhouettes from the past with today’s fabrics, of-the-moment accessories, and practical makeup and hairstyles. When she dresses down, she never looks sloppy, even if she’s just taking her dog for a walk or lounging in her pajamas.

In short, Allie has the kind of always-put-together look that I dream of creating in my own wardrobe. Her success is due in no small part to the fact that she knows what colors work for her and sticks to them for most of her projects, and she has no problem sewing a winning pattern multiple times to up the mixing and matching potential. At the same time, she often uses interesting fabrics or thoughtful details like lace overlays, ruffled accents, or a touch of embroidery to elevate her garments from ordinary to everyday luxuries.

What I’d sew: What better place to start than a two-piece set? Coordinated separates in a solid color (especially if it’s from my personal color palette) or a large-scale print would be great wardrobe-builders on their own and would make a bold statement when worn together. If I wanted to go a step further and borrow more specifically from Allie’s closet, I’d choose a faux crop top and full skirt.

Inspiration #2

Erica.jpg

Sewcialist: Erica of Erica Bunker DIY Style

Sewcializes at: Blog, Facebook, Twitter, Instagram, Pinterest, YouTube

Style Notes: Fashion-forward

How she inspires me: Erica is a powerhouse when it comes to sewing. She regularly sews the more complex patterns available from the Big 4—often turning out multiple garments a month—and she’s completely undaunted by fiddly construction techniques, shifty fabrics, or harder-to-fit garments like jackets and pants. In fact, she’s got such a firm grasp of fitting and all the little tricks that make garments a success (never skip the interfacing!) that I can’t remember a time she’s mentioned a project turning out poorly.

But what really attracts me to Erica’s work is her focus on fashion. Sewing enables her to explore and revel in sartorial trends, and her excitement about the creative possibilities this offers runs like an electric current through every one of her sewing stories. She genuinely enjoys the process of sewing clothes in order to dress her best, and the way she challenges herself to re-create or take inspiration from expensive luxury brands makes me want to push my own sewing (and dressing) to the next level.

What I’d sew: Because Erica sews just about everything she wears, no garment would be off limits here, so long as it has a dramatic detail like plunging neckline, exaggerated sleeves, or cut-outs.

Inspiration #3

Juebejue.jpg

Sewcialist: Juebejue of Petite Republic

Sewcializes at: Blog

Style notes: Flirty & feminine

How she inspires me: Shout-out to all my fellow shorties! While pattern adjustments for a petite figure are by no means the most difficult or time-consuming modifications, I’m always on the lookout for style ideas from other ladies 5’4” and under.

But beyond a shared need to shorten everything, what I admire most about Juebejue is her unabashed love for clothes that are fun and a just a bit sexy. She rocks floaty dresses and sky-high heels, and she’s not afraid to show a little skin. She’s also devoted mom to two girls—check out the sweet costumes she’s made for Little A and Little K—and throughout the changes that’s brought she’s maintained a strong sense of personal style and a devotion to wearing what she enjoys.

Juebejue is fearless, and a great reminder to wear the clothes that make you feel good about your body, whatever that may look like.

What I’d sew: Time to set my own silly insecurities aside and treat myself to a short-short dress that shows off my legs. For some instant-gratification girliness, I’d whip up a ruffly off-the-shoulder top in a summery color. For a more time-intensive project, I’d love to sew a perfectly fitted fashion corset that I could wear out to date night.

Inspiration #4

Carolyn.jpg

Sewcialist: Carolyn of Handmade by Carolyn

Sewcializes at: Blog, Facebook, Instagram, Pinterest, YouTube

Style notes: Practical layers with a twist

How she inspires me: If you know anything at all about Carolyn, then a better question is “how DOESN’T she inspire me?” This amazing lady committed to a year of wearing only handmade items, including shoes, and continues to wear exclusively handmade garments even after her self-set challenge has ended. She’s created not one but two wholly local outfits. She’s an unselfish sewist and an occasional costume-maker. She also knits.

Carolyn sews a mix of dresses and separates, and she’s a pro at mixing, matching, and layering the items in her closet. Many of her garments would superficially qualify as basics, but they’re far from boring. She often turns to Vogue or Japanese pattern designers to inject her projects with visual interest through unusual style lines or clever construction. Her approach to wardrobe building means that she not only looks fab day to day, but putting together a coordinated travel wardrobe for any climate is a breeze.

What I’d sew: A miniskirt with statement pockets or a knit top with a draped neckline would be a great way to add both versatility and punch to my wardrobe. A woven dress with hi-lo split hem (and perfectly mitered corners) would easily take me from work to weekend in style.

Inspiration #5

Klara.JPG

Sewcialist: Klara of A Robot Heart

Sewcializes at: Blog, Facebook, Tumblr, Instagram, Pinterest

Style notes: Vintage prep & whimsy

How she inspires me: A Robot Heart dwells at the intersection of dreamy fairy tale landscapes and serious reflections on identity, beauty, and sustainability. Striving for balance is a recurring theme in Klara’s personal style journey, and her outfits are a delightful contrast of tough and sweet, practical and playful, classic and quirky. Likewise, her wardrobe is a varied collection of garments she’s sewn herself (many self-drafted!), accessories made by independent designers, thrift shop finds, and vintage hand-me-downs.

Klara’s a veteran re-mixer, but the common thread throughout her looks is a touch of the romantic, the whimsical, the just-a-little-silly. As her style has evolved, various influences have waxed and waned, but her outfits remain undeniably her, which in my mind is the definition of style.

Each of Klara’s outfits has a larger story beyond the sewing, one she tells in a voice that is lyrical yet raw with honesty—no mean feat considering English isn’t her first language. She doesn’t shy away from sharing her own struggles with responsible consumption, self-acceptance, and mental health, and she’s a model for using sewing and fashion as an avenue to look thoughtfully at all areas of life.

What I’d sew: Balance and contrast are touchstones for Klara, so a fitted denim jacket with metal hardware or an oversized knit cardigan with leather elbow patches would bring a good mix of yin and yang to my closet. To inject a dose of fun into my otherwise sedate work wardrobe, Klara would no doubt approve a button-up shirt in a cheeky print.

I’m Sewcial!

In the wake of Me-Made-May, I had a wealth of ideas but no real direction for my next project. Enter the lovely Gillian of Crafting a Rainbow, who invited me to be a part of the return of the Sewcialists!

A sewcialist is anyone who talks about sewing on social media, and the Sewcialists blog is a collaborative space to challenge, inspire, and share each others’ sewing adventures through monthly themed sewing.

Somehow—and I’m really, truly not sure how—I missed the Sewcialists during their original run. Surely I must have seen projects and posts prompted by the monthly themes, but I was never a regular visitor to the site.

Luckily for me, the Sewcialists archives are still around any time I’d like to take a dive into Scraptember, Sew Disney, or Lingerie Month. And I’m beyond fortunate to get to be a contributor to the relaunch of this great group.

To kick off, August 2017 has been named Tribute Month, where we’ll be looking to our fellow sewcialists for sartorial inspiration. Whether taking cues from their favorite silhouette, fabric, or pattern—or even copying one of their garments we love—we’ll be sewing up a storm in their honor.

Tomorrow I’ll share 5 sewing bloggers who inspire my sewing choices and, even more importantly, make me want to dedicate whole days to my machine. Later in August I’ll share sneak peeks of the outfit I’m working on, and at the end of the month my finished garment(s) (I’m hoping to make two) will appear on the Sewcialists blog.

What are you most looking forward to sewing in August?

Me-Made-May ’17: Wrap-Up

Now that I’ve logged my two sewing projects from May and cleared some space mentally, I’m ready to review my Me-Made-May experience. I know we’re more than halfway through June and the sewing blogosphere has moved on already, but you’ll humor me, right? You’re the best. 🙂

Except for one missed day during Week 3, I kept to my goal of wearing at least four me-made garments each week. (Then again, the last week of May didn’t have four days in it, but I managed two me-mades anyway, so I’m calling it a wash.) There were definitely repeated garments, but no completely repeated outfits, which is a feat I didn’t think I’d be able to pull off, especially since I tend to go through phases of wanting to reach for whatever feels easiest or most comfortable at the time, over and over again.

Though I didn’t end up posting weekly here as I’d thought I would, and though I still can’t get on board with Instagram—I’m a words person through and through—I did take photos every day that I wore a me-made garment so that I’d be able to spot trends, reflect on silhouettes, and identify wardrobe gaps.

Week 1: Active in Aqua Workout Top & Pants // Mashion Cardigan & Black Leggings (unblogged) // Black Leggings (unblogged) // Easy Tartan Scarf

Week 2: So In Love Cardigan (on Ravelry) // Sage Pleated Skirt & Holden Shawlette (on Ravelry) // Sunbird Shawl (on Ravelry) // Floral Sorbetto

Week 3: Haruni and the Tree of Stories Shawl (on Ravelry) // Vanilla Skirt // Pumped Up in Pink Workout Top & Pants

Week 4: Rings of Ouranos (on Ravelry) // Easy Tartan Scarf // White T-Shirt // Black Leggings (unblogged)

Week 5: Floral Sorbetto // White T-Shirt

Seeing everything laid out like this, I’ve realized several things:

  • I wear a lot of black. (I wore even more than you see here, on days when I didn’t wear any me-mades.) I don’t actually want to wear as much black as I do, because I find it looks quite harsh against my skin, especially near my face. But since I bought most of my office attire during a few major shopping trips during and immediately after college, and I’ve neither grown out of nor worn through most of it, those initial purchases continue to linger in my closet. I’d really like to phase them out in favor of more navy blue, warm browns, and even some grey, but options in those colors tend to be more miss than hit most seasons at the few stores I shop. I need to either a) expand my shopping horizons and try other petite -friendly retailers besides Express, b) find a tailor I can trust to alter pants from regular misses sizes , or c) learn to sew my own perfectly fitting pants. At this point, I’m not actually sure which of these is the path of least resistance.
  • I’m grateful that the May weather was so variable, because a sizable chunk of my handmade wardrobe comes in the form of handknit accessories. I’m complete okay with this, but could stand to add a few more sweaters, particularly cardigans of various weights, to the mix. There’s absolutely zero chance you’ll find me in handknits in the summer, though—it’s unbearably hot and humid here, and wool, no matter how magical its properties, will never feel good on a 100-degree, 100-percent-humidity-but-somehow-no-rain day.
  • I’ve been gravitating toward skinny bottoms balanced with looser tops. I need to make more of both.
  • I only wore one dress (with leggings) and one skirt (with tights). I’d say dresses and skirts were underrepresented this month, but only barely. I can probably chalk this up to the fact that most of my dresses, me-made and ready-to-wear, are too casual even for my laid back office. My office is also freezing, so I’d just end up covered in a fleece blanket at my desk anyway. But I love the idea of pulling on secret pajamas a comfortable dress and rolling out in the morning, so maybe I need to suck it up and make a dress or two.
  • My outfits are dying for more texture. My wardrobe is overwhelmingly simple, solid-colored separates, which means that outfits tend to fall flat visually. They’re crying out for a statement necklace or shoes, a cute handbag, a textured fabric like bouclé or suede, or a textural design element like pleats, pintucks, ruffles, or visible ribbing. Anything to break up all the solid blocks of color and smooth fabric surfaces.

These observations open up a lot of different creative directions, and it’s so tempting to try to run down every path at once. But I’m going to try to rein myself in and remember that neither a handmade wardrobe nor a strong sense of personal style happens over night (especially since recent household budgetary constraints have me limited to my existing stash, which may not jive with my current seasonal/situational needs).

Despite feeling like my current wardrobe is a long way off from my ideal, participating in Me-Made-May has convinced me that it’s not impossible for me, personally, to one day have a wardrobe where I could wear at least one thing I made every day, if I wanted to. I don’t know that I’ll ever achieve—or even aim for—an entirely handmade wardrobe, but it’s gratifying to see that what I’ve made with my own two hands takes more than two hands to count!

Just for fun, because I’ve secretly wanted to do this every year that I’ve followed along with Me-Made-May, here’s a gif of my outfits each day:

Concept and Iteration

How did I arrive at a point in my life where I didn’t own a solid white or a solid black t-shirt? It’s certainly not because my wardrobe is dominated by prints—easily 90% of my clothes are solids. It’s also not because I eschew basics—I tend to buy staples like v-neck sweaters and button-up shirts in multiples, and I own few, if any, pieces I would consider “statements.” And yet here I was, lacking in the most basic of everyday garments (after underwear, of course).

The last few times I’ve tried to buy plain white and black tees, either short- or long-sleeved, I was deeply disappointed by the options available. I’m sure you’re all-too-familiar with the scene: racks of tissue-thin shirts that cling unflatteringly, bind up around the arms, and fall apart in three washes or fewer. No thanks.

I had plenty of white and black cotton/spandex blend in my stash, as well as a PDF copy of the free Tonic T-Shirt pattern from SBCC Patterns. I’d attempted the pattern before and wasn’t happy with the results, but I was determined to get it to work so that I’d have a well-fitting pattern at my disposal whenever I wanted/needed to whip up a new tee. (I also really want SBCC Patterns to work for me, because they’re specifically drafted for petites and I’d love to be able to support someone pitching my niche.)

As it turns out, my issue with the fit of the first attempt came down almost entirely to size selection. I’d sewn a small because I didn’t want the shirt to be too snug in the waist or hips, but that meant the finished bust was 1″ larger than my actual bust. Also, I must have taken my waist measurement on a day when I was bloated or something, because I’ve since re-measured at a slightly smaller size. These measurement issues, combined with a fabric that wants to mold rather than drape, made for an ill-fitting shirt that went straight into the recycling heap.

This time around, I cut out an extra-small (in white) in order to get negative ease at the bust and was much happier. To concentrate on neat, even sewing with no puckers or wavy seams, I basted everything with a zig-zag stitch on my sewing machine and then went back over everything with my serger. It takes twice as long, but it’s the only way for me to get a good finish. Maybe one day I’ll be able to zip everything through the serger without putting holes through the middle of the fabric, but today’s not that day, and tomorrow’s not looking good either.

I prefer to install my knit bands in the round rather than in the flat because I feel like I get a cleaner finish that way, and I had to cut off 1″ of the band in order to have a loop that was smaller than the neck opening. (I also prefer to sew my seams and then turn up and topstitch my hems for the same reason. So, I basically ignored the instructions and used the alternative method for every step. It worked out fine.)

With the proportions sorted out, I noticed two things: the hem has a tendency to ride up, most likely due to the amount of negative ease through the body, and the neckband was difficult to serge and topstitch down evenly due to its narrowness.

I immediately cut out another shirt (also in white), but lengthened the bottom hem straight down by 1.5″ and doubled the height of the neckband. I chose to add length at the bottom rather than at the lengthen/shorten line because the narrowest part of the shirt does seem to be hitting the narrowest part of my waist. This worked exactly as I planned, but for someone long-waisted, the lengthen/shorten line is the way to go.

I like the double-height neckband—it somehow has a more casual feel—but even with the previous alteration of shortening it by 1″ it was a little too long, and even after pressing it’s noticeably wavy. It’s no worse than you’d find in some ready-to-wear, but it’s something I wanted to fix on future versions.

With that in mind, I cut out a third and fourth shirt, both in black. For this iteration, I cut an XXS neckband instead of an XS and reduced the height of the neckband to 2 1/8″. This new neckband is now taller than the original but shorter than the doubled version, and it just might be perfect. I could probably shave a tiny bit more of the length off to get the band to lay completely flat, but I’m not sweating it.

At this point, I also lengthened my topstitch from 2.5 mm to 3.5 mm, which made the stitches a little more visible without being sloppy.

Below are the three version to give you an idea of what the differences look like in context. Black and white do not like to be photographed together like this, so the exposure/contrast is absolutely awful, but I hope it gets the point across.

Here’s a look at the necklines up close, so you can see the differences in neckband height:

One last thing I’d like to mention is that Steam-a-Seam 2 is the not the same as Dritz Wash Away™ Wonder Tape. At some point I had rolls of both in my notions collection, but I must have used up the latter on a previous project. I grabbed the Steam-a-Seam 2 thinking that it was designed for the same purpose and painstakingly applied it to the sleeve hems and bottom hem of my first t-shirt, only to realize after heat-setting it that it’s much stiffer than Wonder Tape. It seems to have softened a bit after a couple of washes, but I definitely wouldn’t use it again for stabilizing a knit hem while sewing. Steam-a-Seam 2 Lite might work for that purpose (I haven’t tried it myself), but I think I’ll stick with Wonder Tape.

I’m so glad to have these shirts in my closet. They aren’t glamorous, but they’re comfortable, and it’s nice to feel like even on an ordinary day I have something handmade to wear.